SEO is at the heart of running a successful website for your brand or business. There is probably no better way to ensure a steady flow of highly targeted web traffic to your site. And Yoast SEO is the best plugin to bring the most out of your WordPress website.
You’ll be surprised to know, there are 5,897,408 websites that are using the Yoast SEO plugin. Covering a market share of 71.94% in the SEO industry, Yoast SEO is one of the most powerful SEO tools in WordPress.
It’s easy to use and how does Yoast SEO work seamlessly? But installing and configuring the Yoast SEO plugin can be daunting, especially for beginners. But don’t worry!
As WordPress experts, we know how Yoast SEO works and the difficulties involved in installing it.
Let’s dive right into step-by-step instructions on how to install and setup the WordPress SEO plugin by Yoast.
Here’s what you will learn in this guide.
But before you start, please make sure you are using wordpress.org (business plan), as there are some limitations while using wordpress.com.
Let’s start with how to install Yoast SEO Plugin.
A. How to Install Yoast SEO Plugin in WordPress
Follow step-by-step instructions to Install Yoast SEO Plugin in WordPress.
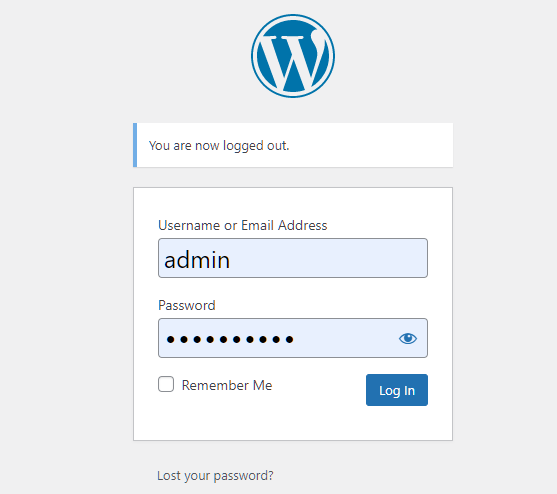
Step-1: Log in to Your WordPress Admin Account
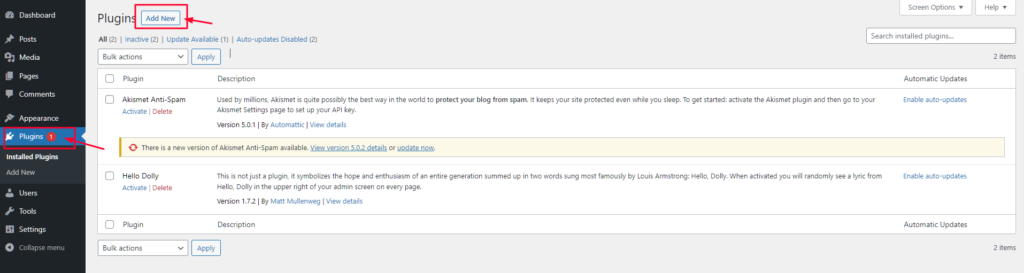
Step-2: Click on “Plugins” from Left Menu Bar
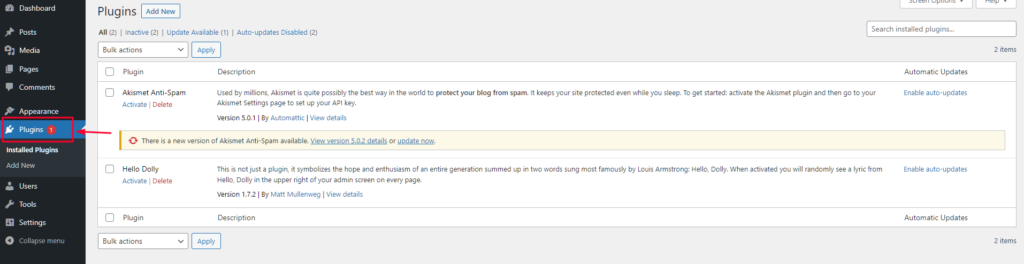
Step-3: Select “Add New” from the Dropdown List or above the List of Plugins
This will add an SEO plugin to WordPress.
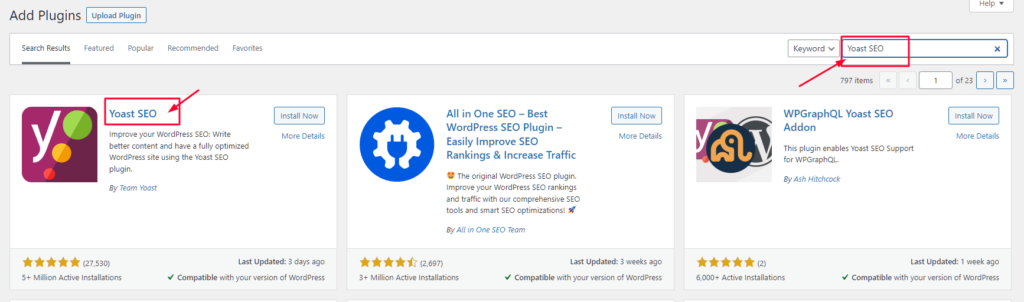
Step-4: In the “Search Bar”, Search for the Yoast SEO Plugin
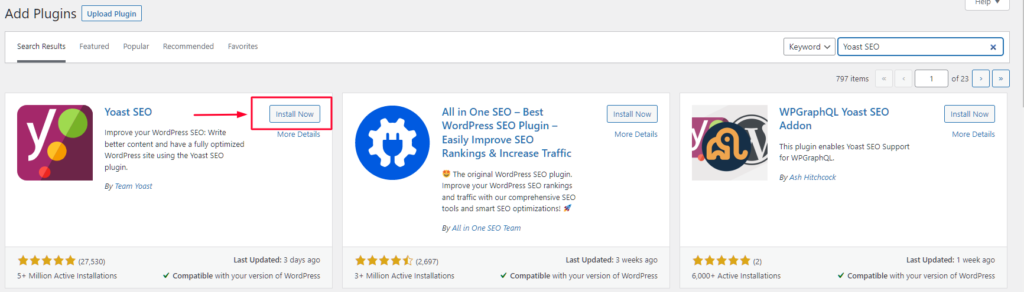
Step-5: Click the “Install Now” button
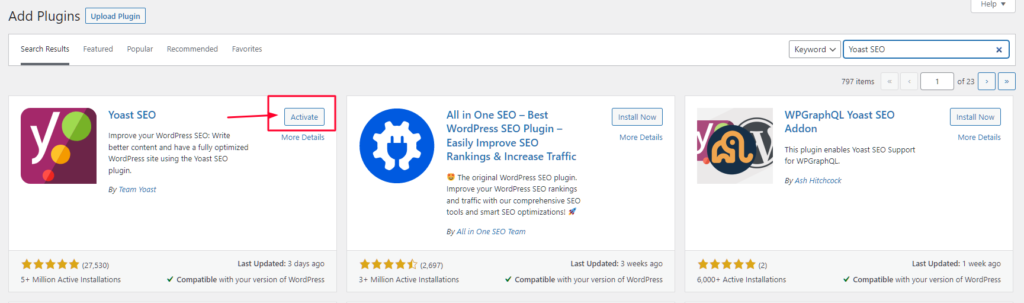
Step-6: Click the Activate button once the Yoast SEO plugin gets installed
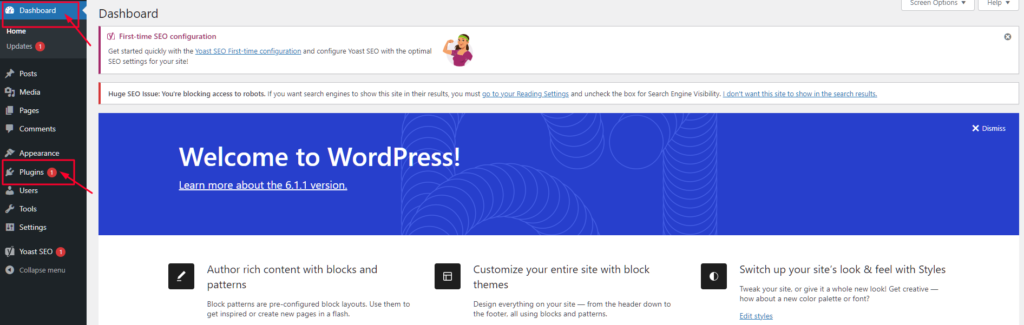
Once you have followed all these steps, you are good to go.
Congrats, Yoast SEO is now installed on your WordPress site.
To cross-check that the Yoast SEO Plugin is installed successfully:
- Go to the WordPress dashboard
- Check Yoast SEO in the left sidebar under “SEO”
Now, let’s learn to set up Yoast SEO with two different methods explained in detail.
B. How to Set Up Yoast SEO Plugin in WordPress
The selected settings are the ones we follow while implementing SEO for our clients. It’s alright if your process may vary from other experts.
But being a beginner, we advise you to follow each step carefully.
In WordPress, there are two ways how to setup Yoast SEO for WordPress.
Phase 1: If you are already using another SEO Plugin before installing Yoast then:
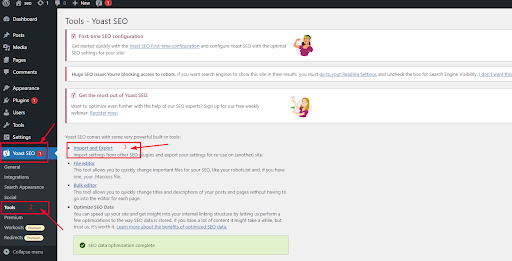
1. Click on SEO.
2. Click on Tools from Right Menu Bar.
3. Click on Import and Export.
4. You Will See a List of “Import From” Checkboxes. (All-In-One SEO, Wpseo, and Woo SEO Frameworks).
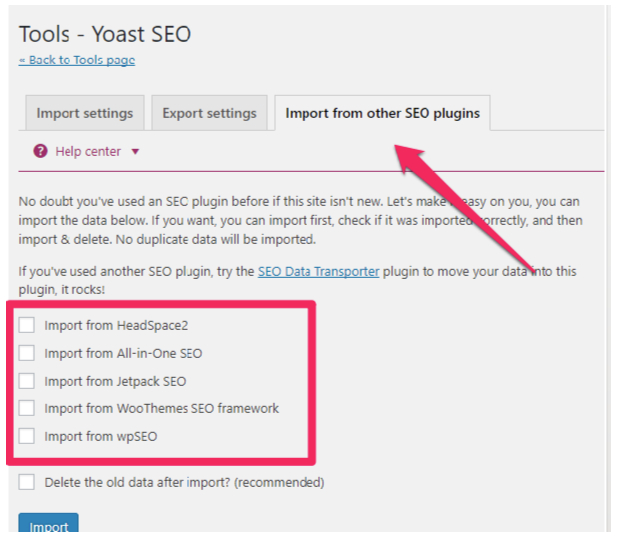
5. Choose the Plugin to Import in the Current Settings for the SEO Plugin.
6. Check the Box of the SEO Tool You Were Using.
7. Click on Import.
Yoast will automatically import all your Yoast SEO settings, that includes your default XML sitemap settings or a default title template.
NOTE: This import function is only available for paid Yoast users. So if you don’t see the option, it might be time to upgrade.
Even if you have imported all your settings from another plugin. We recommend going through all the settings below to get the most out of Yoast.
If not, skip this step and start the setup freshly.
Phase 2: Now, let’s set up all-new settings. To set up the General Settings:
1. Click on the Yoast SEO Icon to Take You to the Dashboard of the Settings Page.
Here, you will see some SEO Problems with notifications. At the beginning of the page, you will notice a wizard of First-time SEO configuration. But ignore this wizard for now. We will walk you step by step through each point.
2. Click on the “General” Tab from the Navigation.
3. Click on the “Features” Tab.
Yoast SEO has lots of features you can readily turn on/off. But, some of the features are available in the Premium version only.
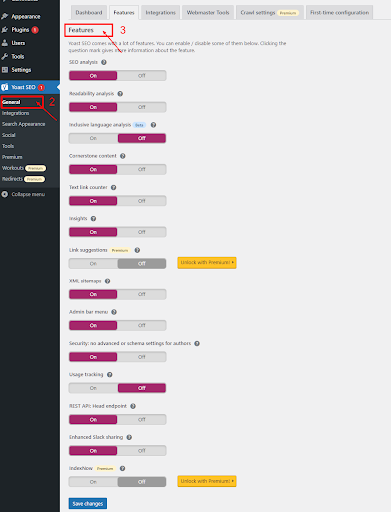
- SEO Analysis – Indicates the SEO score and analysis for your content.
- Readability Analysis – Indicates the readability analysis and score for your content.
- Cornerstone Content – One of the most important pillars for articles, it allows you to filter and mark cornerstone content.
- Text Link Counter – Indicates an interlinked number of internal text links in an article.
- Insights – Indicates the words you most often use that match the keywords used in your content.
- XML Sitemaps – Helps create XML sitemaps for your website.
- Admin Bar Menu – Contains links to third-party tools for analyzing pages and helps to see new notifications.
- Security – Helps to hide advanced settings from authors to change schema metadata for a post.
- Usage Tracking – Allows a plugin to track some usage data and keep it up to date.
- REST API: Head endpoint – Allows you to fetch SEO data for specific WordPress posts or pages. You can turn it off if you are not building a headless WordPress site.
- Enhanced Slack Sharing – Adds an author byline and reading time estimate to the article’s snippet when shared on Slack.
Make sure you click on the “Save Changes” button to store your settings.
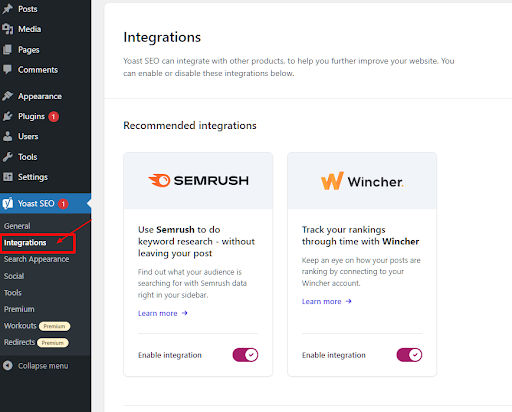
4. Click on the “Integrations” Tab.
If you wish to integrate with recommended SEMRush or Wincher or any other Integrations.
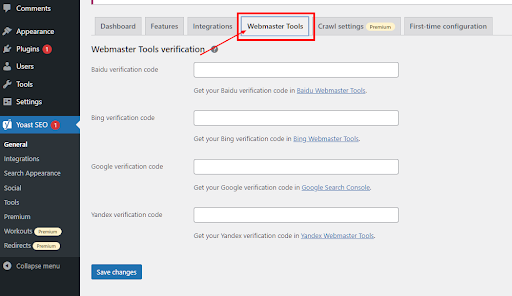
5. Click on “Webmaster Tools” to Verify with the Different Webmaster Tools.
To get a Google verification code for Yoast SEO. Add a verification meta tag in the box from webmaster tools (Bing, Google, Yandex, and Baidu). Insert the same meta tag code on the homepage (instructions mentioned in the specific tools) to complete the verification method. If your site is already verified, skip this.
6. Click on “Search Appearance” from the Navigation.
Search Appearance helps you to control how your website appears in search results. Adding this information will benefit you in Google’s Knowledge Graph Card.
There are several options. Let’s get through them one by one.
1. General
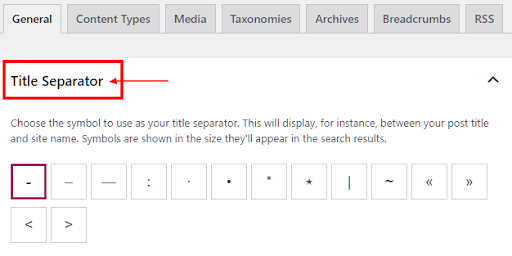
- Title Separator – Choose a symbol to use as a separator between the post title and site name. These symbols will appear in the google search results.
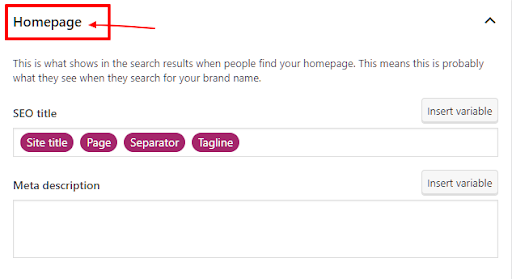
- Homepage – The main page of the entire website is the homepage that shows in the search results when people search for your brand name.
- Social Settings – Adding a social image, title, and description benefits us while sharing of homepage link on the social platform.

- Knowledge Graph And Schema
Add the website name and alternate website name, which will show up in the search results.
Choose whether you are an organization or an individual. This information will show up as metadata in Google’s Knowledge Graph.
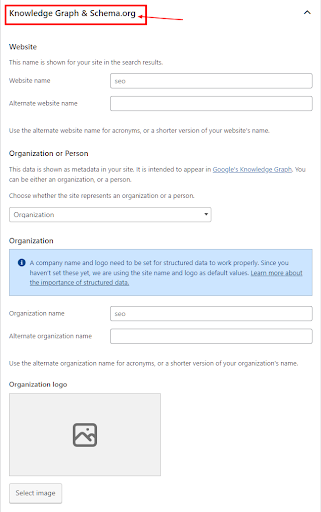
Add a company name and logo to enhance the structured data of your website.
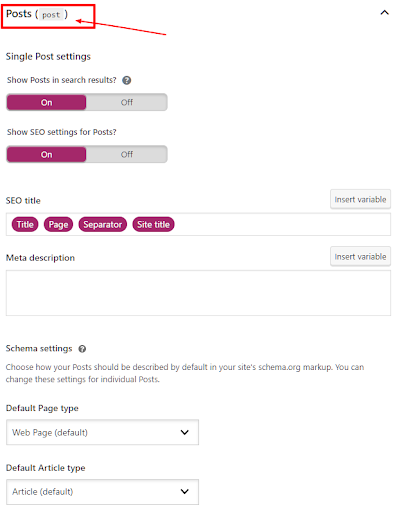
2. Content Types
- You can set the SEO title and meta description for each post or page that you create in the future.
- You can set up a default template that you can use to dynamically generate a description from the first few lines of your article/page if you forget to add them manually.
- There’s an option to set the search appearance whether or not to show for each content type that appears in search results.
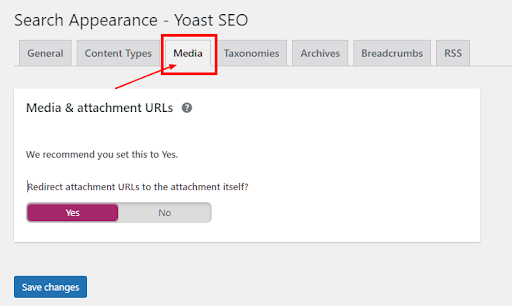
3. Media
Media is an attachment URL (attachment page or media page) is a page WordPress automatically creates when you upload an attachment (image) to your site. If you set it to yes, Yoast will redirect attachment URLs to the attachments themselves. We recommend setting it to No to avoid unnecessary image URLs.
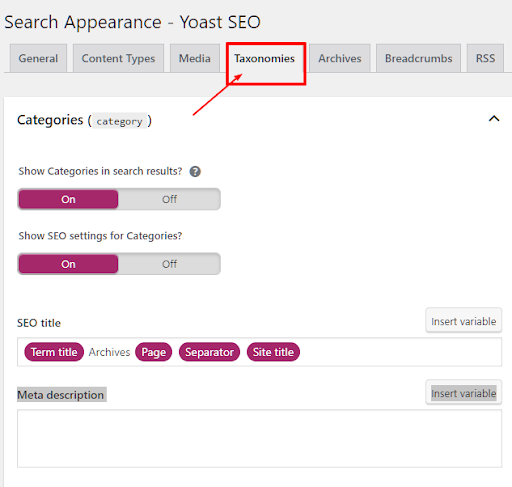
4. Taxonomies
You can set up default template variables for SEO requirements like titles and meta descriptions for pages, categories, tags, custom taxonomies, and post format archives.
Choose an option to keep or remove category URLs in WordPress to contain a prefix, usually /category/ for category pages in your website.
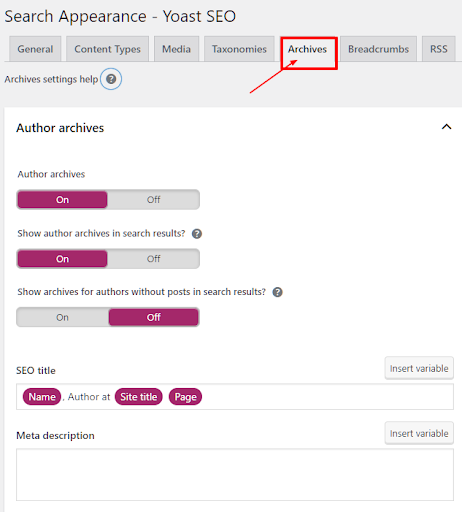
5. Archives
The default option will work but disable author archive pages from search engines if there’s a single author blog. The author archive pages are similar to date archive or blog pages that create duplicate content and affect your SEO rankings.
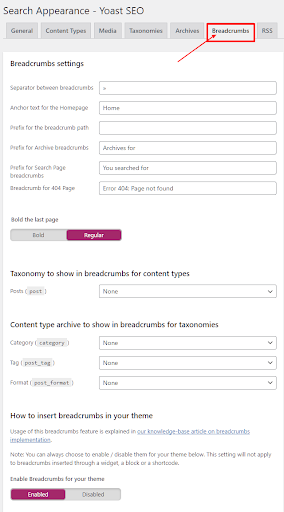
6. Breadcrumbs
Breadcrumbs are navigational links appearing at the top of a post or page and indicate the relation between their location on a page (product page) and higher-level categories (category page).
It provides a sense of structure and navigation for site visitors to view the page or a post that shows in Google Search Results.
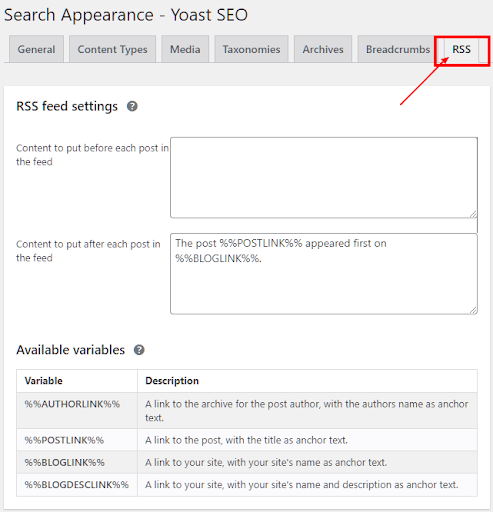
7. RSS
RSS feature automatically adds content to your website updated from a website or blog of their choice. By default, the feed takes published content or frequent updates of site content, such as news, author, and blog posts.
Yes! Yoast SEO has a feature to connect your social profiles that help increase your brand awareness and users can reach you easily.
7. Click on “Social” in the navigation.
- The Accounts feature allows Yoast SEO to inform Google regarding your social profiles. Just add the URLs of Facebook, Twitter, Pinterest, and other platforms.
- Next, the Facebook tab allows Yoast SEO to add Facebook open graph metadata and default thumbnail images to your website. While sharing on Facebook, it catches the right thumbnail of the image, meta title, and description from the webpage.
- In Twitter Tab, you can Add Twitter card metadata to display a preview with images and text while shared on Twitter.
- In Pinterest Tab, you only need to enter the site verification code provided by Pinterest. By visiting your Pinterest account settings, the provided code with a meta tag needs to enter in the box.
C. How to Configure Yoast SEO Plugin in WordPress
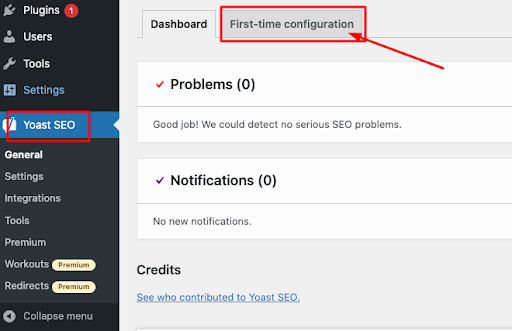
Go to the First-time configuration tab. Begin with the Configuration Wizard for all the new settings step-by-step.
1. Click on SEO data optimization.
Let’s Run the SEO data optimization For the Indexables. Yoast SEO starts processing all the content on your website and stores the data in the database. If you come across a big website, it might take some time. But you don’t need to run through the process every time you update or add content. Yoast SEO will automatically catch the data whenever you save that content.
Environment – What type of site do you want to configure YOAST SEO?
a. Production (live)
b. Stagging (similar to live but for testing purposes only)
c. Development (developer use)
If you select a staging or development site, the website will not get visible in search engines because Yoast will prevent the site from being indexed by search engines.
So, make sure you select the accurate one.

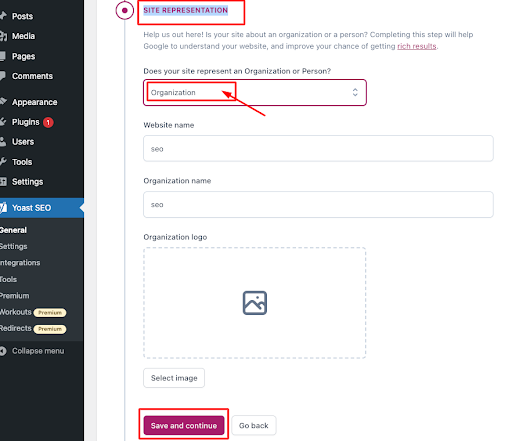
2. Click on Site Representation.
In the Site representation settings, the Yoast SEO plugin allows you to choose whether your website is an organization (for instance, a local business) or a person (say, a personal blog).
As shown in the snapshot, you can upload the company logo from a computer or WordPress media library.
Note: The image you upload should be a minimum of 112x112px and also square-shaped.
Then, click on Save and continue to proceed.
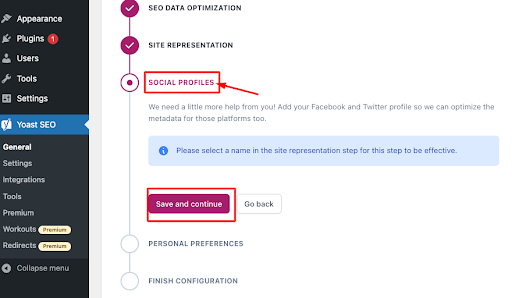
3. Click on Social Profiles.
Social media is booming and can help you to reach your targets and increase brand visibility.
Here, you can add all the social media profiles for your website (organization), consolidating them into your organization’s one unique social profile.
Adding these profiles will help us to optimize the metadata for those platforms.
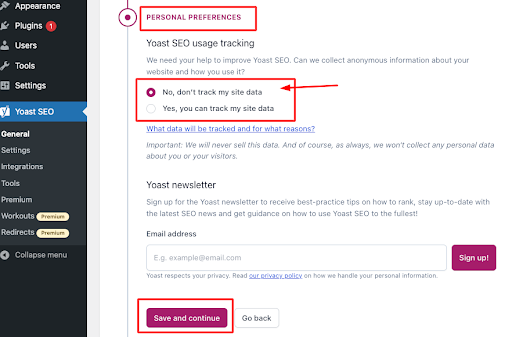
4. Click on Personal Preferences.
In the Personal Preferences section, under Yoast SEO usage tracking, decide whether you want Yoast SEO to track your website data.
And subscribe to the Yoast newsletter to receive best-practice tips on the latest SEO news and get guidance.
5. Click on Finish Configuration.
Make sure to click on Finish Configuration to complete your Yoast Website optimization setup. And if you want, you can enroll for Yoast’s free week-by-week online course.
Hurray!! That concludes your Yoast SEO configuration.
Welcome Dashboard appears to choose the Yoast SEO Configuration.

In Conclusion
Yoast SEO is one of the best SEO plugins for WordPress websites. It can help you streamline your SEO efforts quickly and efficiently. It can boost your search engine ranking. But beginners like you might find it a bit daunting to get started with this plugin. Hopefully, this guide will help you install and configure the Yoast SEO plugin setup without hiccups.
Do you still have doubts about the SEO of your WordPress website? Feel free to reach out to us. E2M is a white-label digital marketing agency. Our experts can help you streamline your SEO and content marketing.