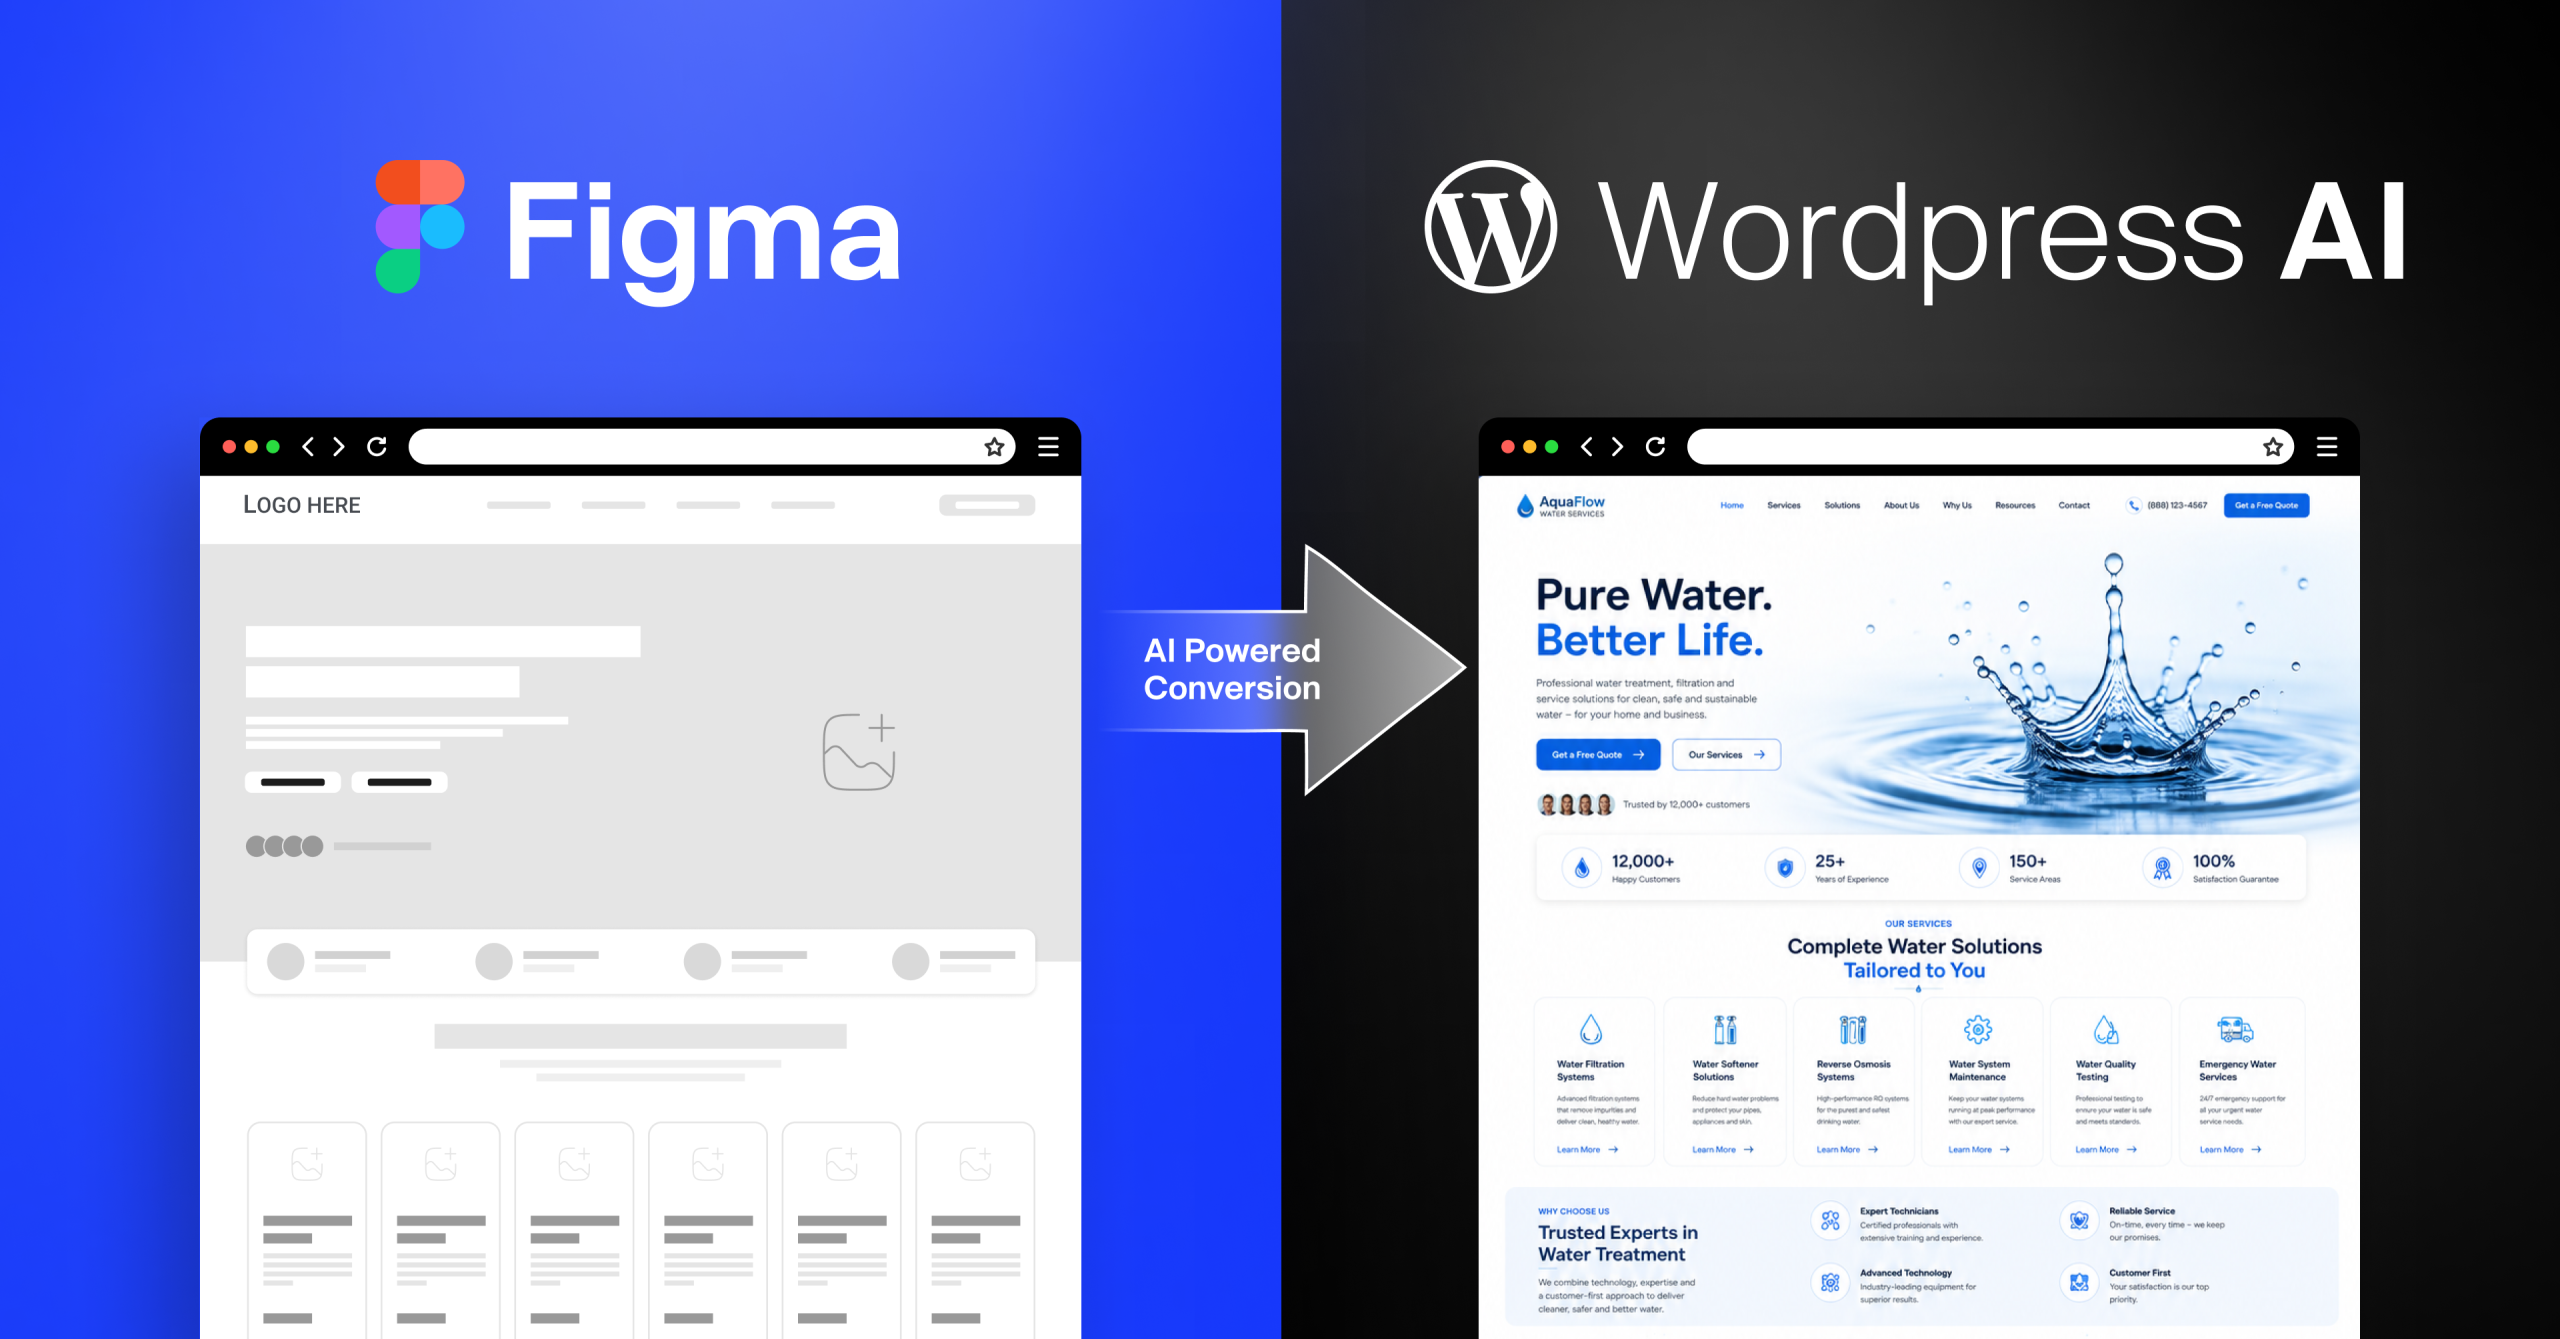
Your team just got a signed-off Figma file from a client. In the old workflow, two developers spend four to six days translating every section into code by hand, a project manager chases down which fields the client actually needs to edit later, and QA compares screenshots manually before launch.
This Figma to WordPress AI guide walks through the new workflow. How E2M’s AI-assisted agents turn that same Figma file into a production-ready, fully editable WordPress site, usually inside a day, with a person approving every decision along the way.
Turning an approved Figma design into a production-ready WordPress website has traditionally required a lot of repetitive work: interpreting layouts, writing front-end code, creating editable fields, checking responsive behavior, and comparing the finished site against the design.
At E2M, we are changing that development process with an AI-assisted workflow. The goal is not simply to generate code faster. The goal is to use AI for repeatable production work while keeping human approvals, WordPress standards, editability, and QA at the center of delivery.
This isn’t a plug-in your file, hope for the best AI Figma to WordPress converter. It’s a supervised pipeline with named agents and human checkpoints, and the difference shows up in the audit scores later in this guide.
This guide shows the real process for Figma to WordPress using AI: from reading the design to delivering a measured, editable WordPress website.
Everything below comes from one real project run through the pipeline, including the QA verdict that came back as an honest FAIL before it came back green.
Who this is for: Agency owners and WordPress operations leads who want to convert Figma to WordPress with AI themselves, or who’d rather hand the build to a proven partner.
Everything below is the exact process, step by step, behind it, screenshot by screenshot.
What Is Figma to WordPress AI Conversion?
Figma to WordPress AI conversion is the process of turning an approved Figma design into a live WordPress website using AI agents for the repetitive production work, while a person still approves every major decision, checks the output, and signs off before anything goes live.
At E2M, that process runs as a two-phase pipeline:
Figma to a validated front end, then front end to editable WordPress.
Process 1: Figma to HTML. The approved design becomes a real, working web version, an accurate replica of what was designed.
Process 2: HTML to WordPress. That web version becomes a WordPress theme where every section is an editable field in the dashboard, powered by Advanced Custom Fields.
Underneath, it is a coordinated set of specialized AI agents. One reads the design. One plans the editable structure. Others build, deploy, and verify. Each has a narrow job, and none of them is allowed to improvise past the next checkpoint.
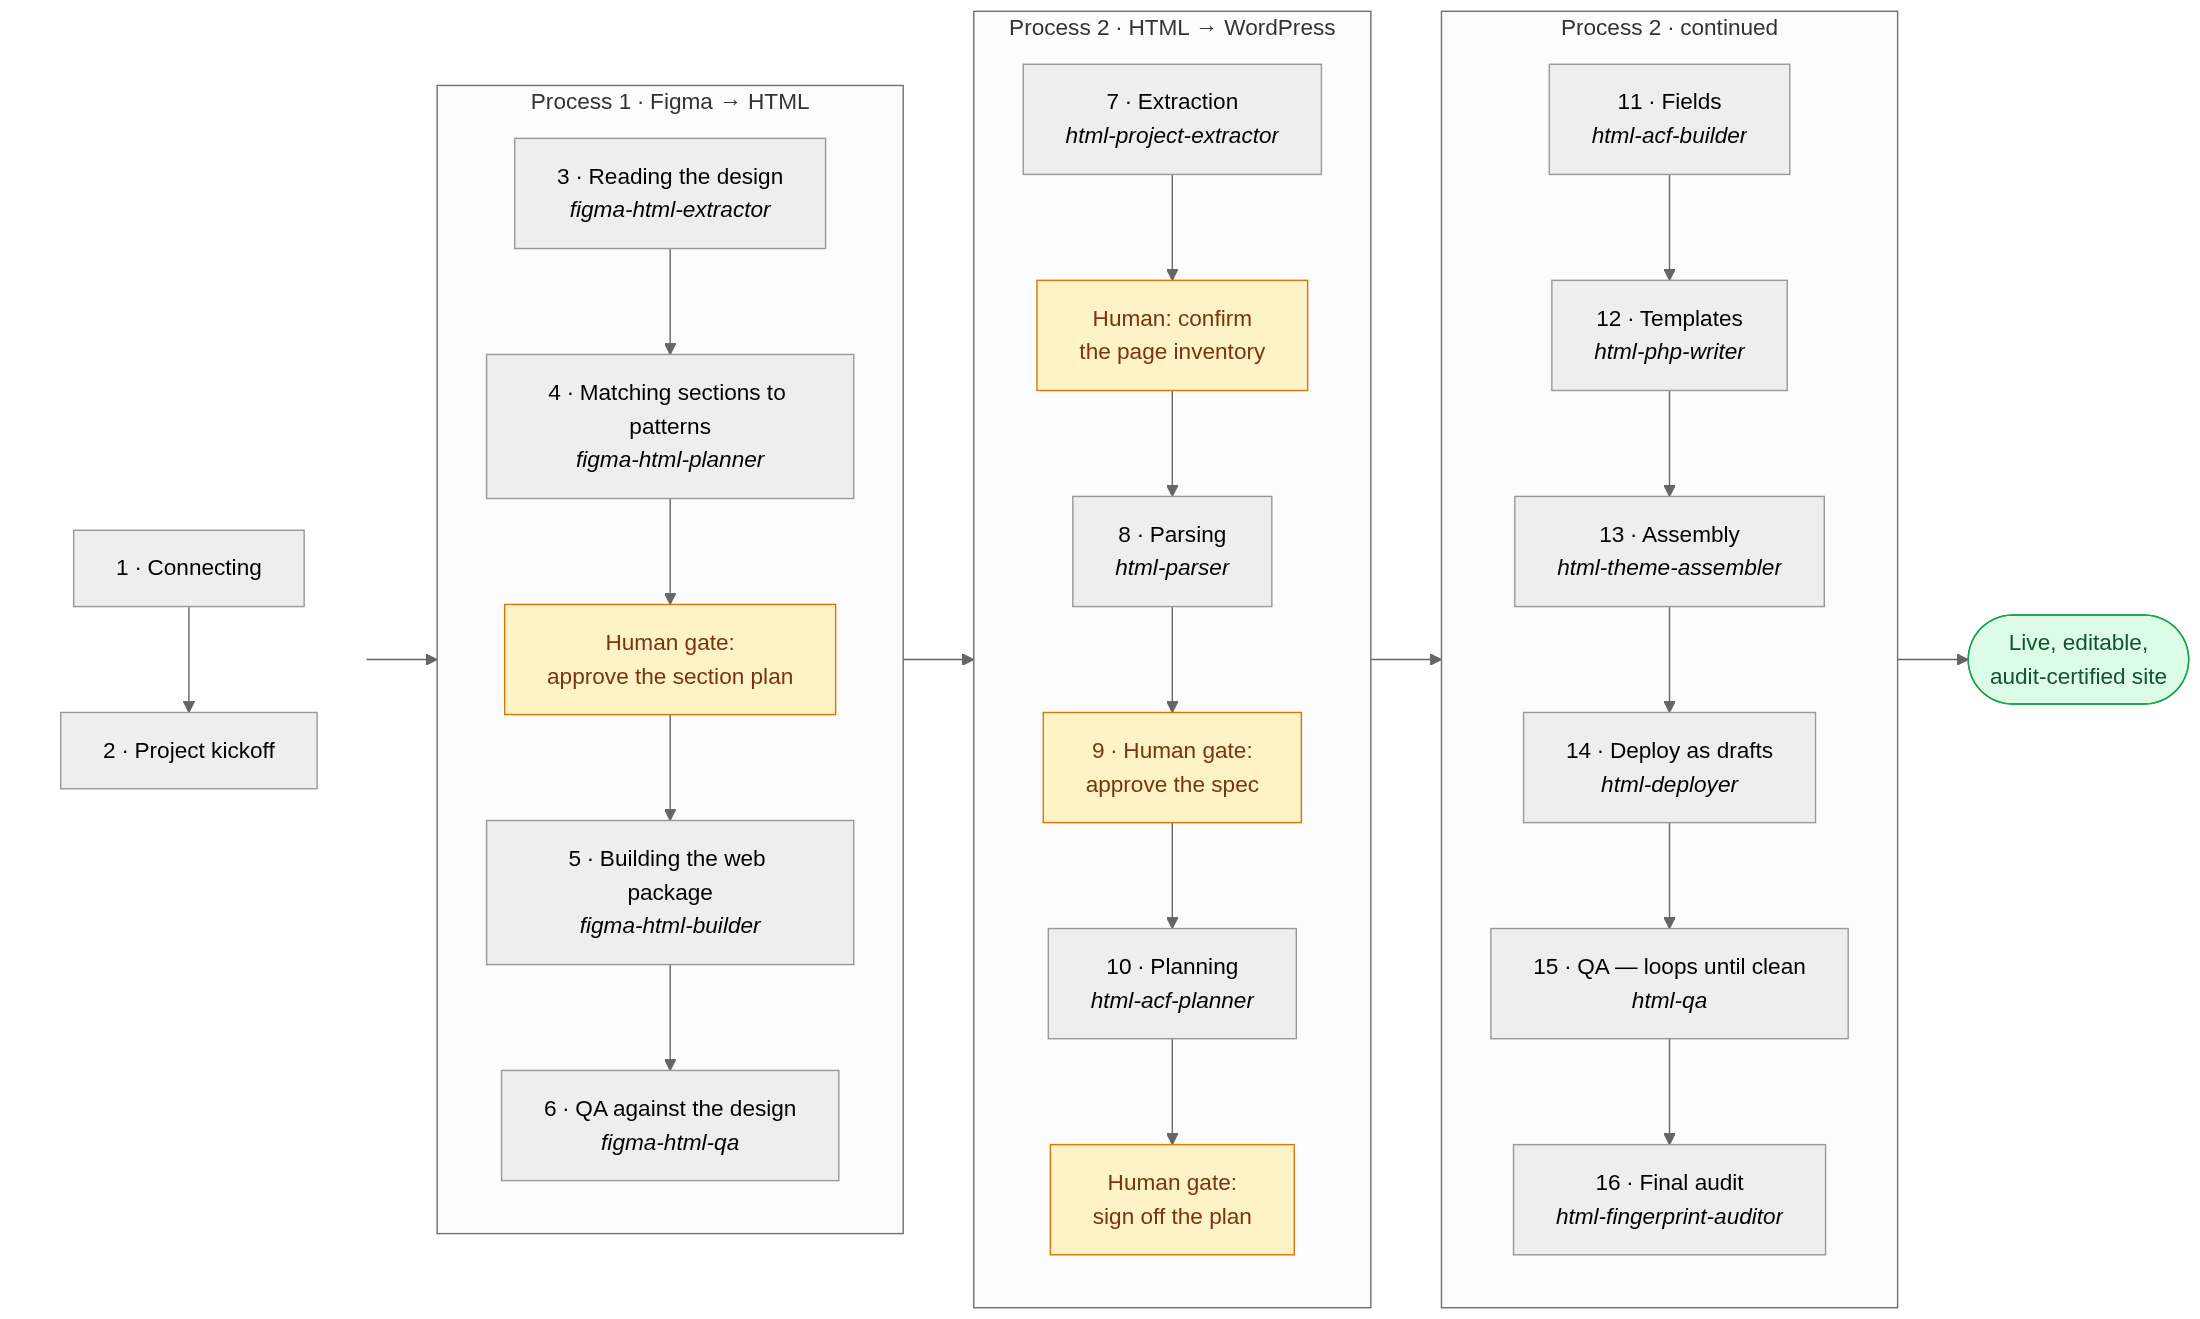
The full pipeline. Process 1 turns the Figma design into a working website, Process 2 turns it into an editable WordPress site, with human approval gates at every decisive moment.
Three rules make this different from a typical AI Figma to WordPress converter, and they are worth stating before the step-by-step:
- Nothing is retyped. At every handoff, the previous stage’s output is preserved and transplanted, never rewritten from memory. This single rule is responsible for most of the visual fidelity you will see in the audit scores later.
- A human stays in the loop. The pipeline stops at review gates. A person approves before anything gets built, and every approval is recorded in the project files where downstream agents read it.
- Accuracy is measured, not promised. The run ends on a numerical audit that scores the live site against the original and names every single difference, including the ones we approved on purpose.
Related: AI Design Tools for Agencies: How E2M Uses Interactive Prototypes to Speed Up Web Delivery, covering what happens before the Figma file is final, and how approved prototypes become implementation assets instead of loose references.
How Does E2M’s Figma to WordPress AI Workflow Work, Step by Step?
The workflow runs as 16 checkpointed steps across two processes. Steps 1 through 6 turn a Figma file into a validated HTML website (Process 1). Steps 7 through 16 turn that website into an editable WordPress theme (Process 2). Here is what happens at each step.
Step 1: How Do You Connect an AI Tool to Your WordPress Site?
You connect the AI to WordPress with a plugin and a short list of copy-paste commands, nothing more technical than that. We link our AI client (Claude Code) to the target WordPress site using the DEV Connect plugin. That numbered list of commands is the entire installation:
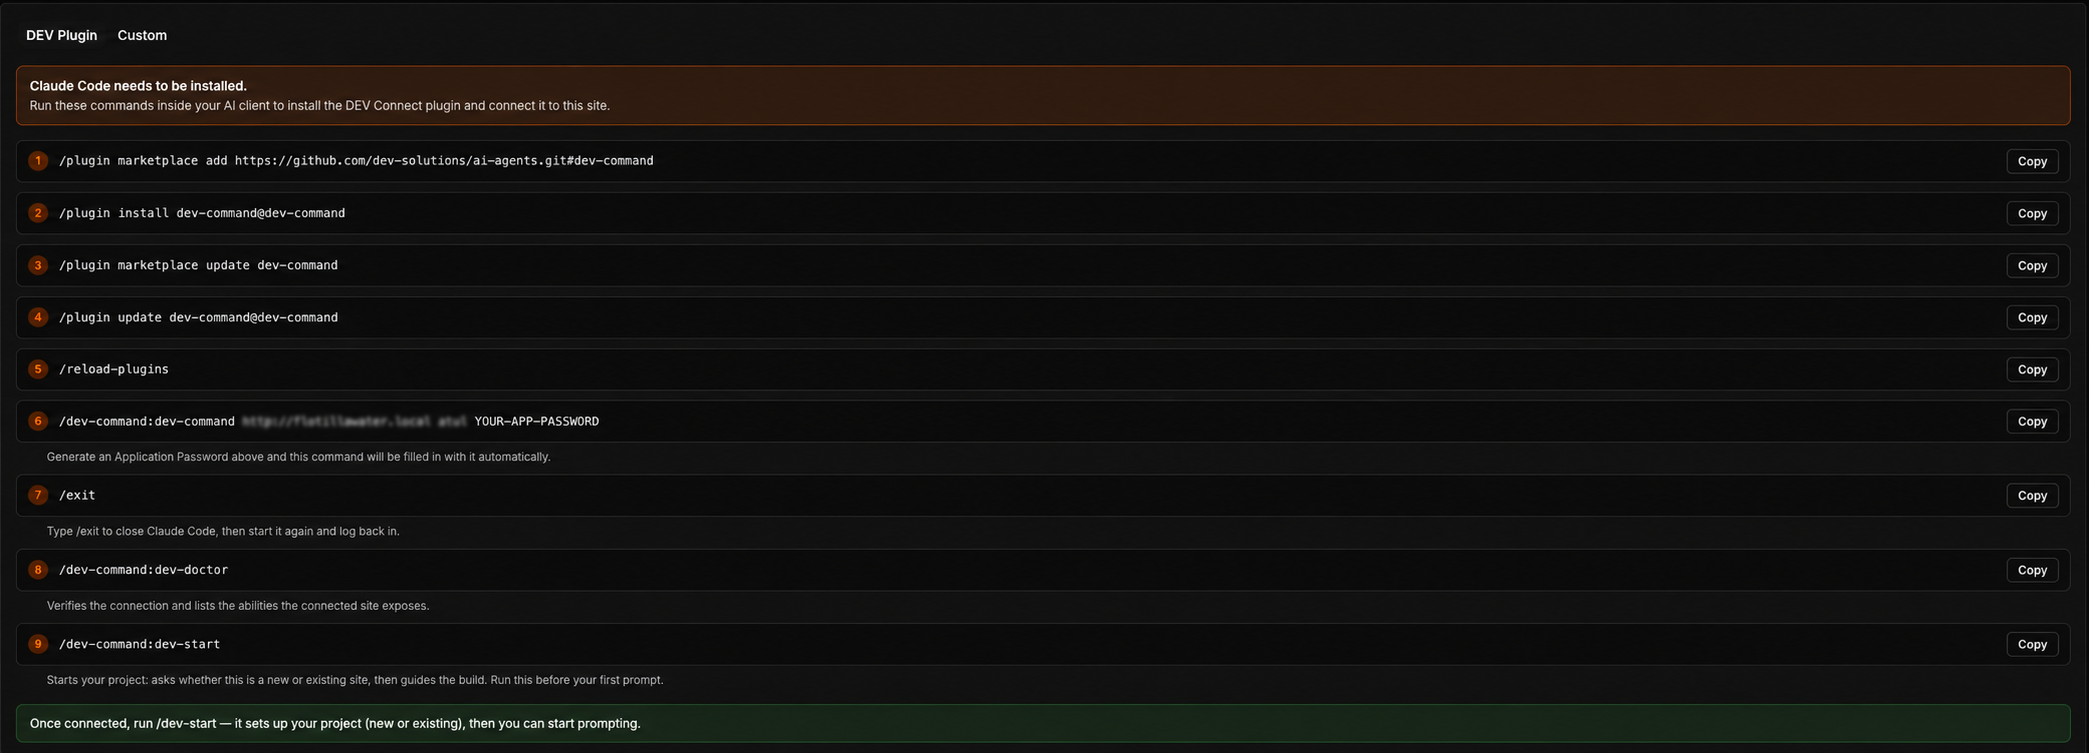
The DEV Connect setup panel: a numbered list of copy paste commands that installs the toolkit and links the AI client to the WordPress site.
The commands install the toolkit, authorize the connection with a secure Application Password (no admin passwords are ever shared, and the site owner can revoke access at any time), and verify everything with a health check (dev-doctor). This is the only “technical” step in the whole flow. From here, one command (dev-start) drives the rest.
Step 2: What Happens During the AI Project Kickoff?
Process: guided project setup. Command: dev-start.
Before anything is built, the pipeline interviews you: a short series of plain English questions whose answers are stored in the project’s configuration, so no agent ever has to ask again later. It asks whether this is a new or existing site, which builder to use (this run: ACF), and where the design is coming from:

The design source question: a Figma URL, a Figma ZIP export, or an HTML package.
This question is the hinge of the whole system. The pipeline accepts the design at whichever stage it exists: a Figma file, in which case Process 1 turns it into a working web version first, or a ready HTML package, which jumps straight to Process 2. This project’s design went through both, and that’s the journey the rest of this guide follows.
The last questions cover publishing policy. Note the recommended default:

The publish policy question: new pages stay as drafts until a human publishes them.
Nothing goes live by itself. Every page the pipeline creates stays a draft: built, verified, QA passed, and waiting until a person decides to publish.
Process 1: Figma to HTML. First, the approved design becomes a real, working website.
Step 3: How Does AI Read and Extract a Figma Design?
Process: design extraction. Agent: figma-html-extractor.
The first specialist agent opens the Figma file and reads the design the way a builder needs it read: every section identified, the full color palette and typography system captured, every text string collected, and all 21 image assets verified, plus full page snapshots of the design that become the quality benchmark later:
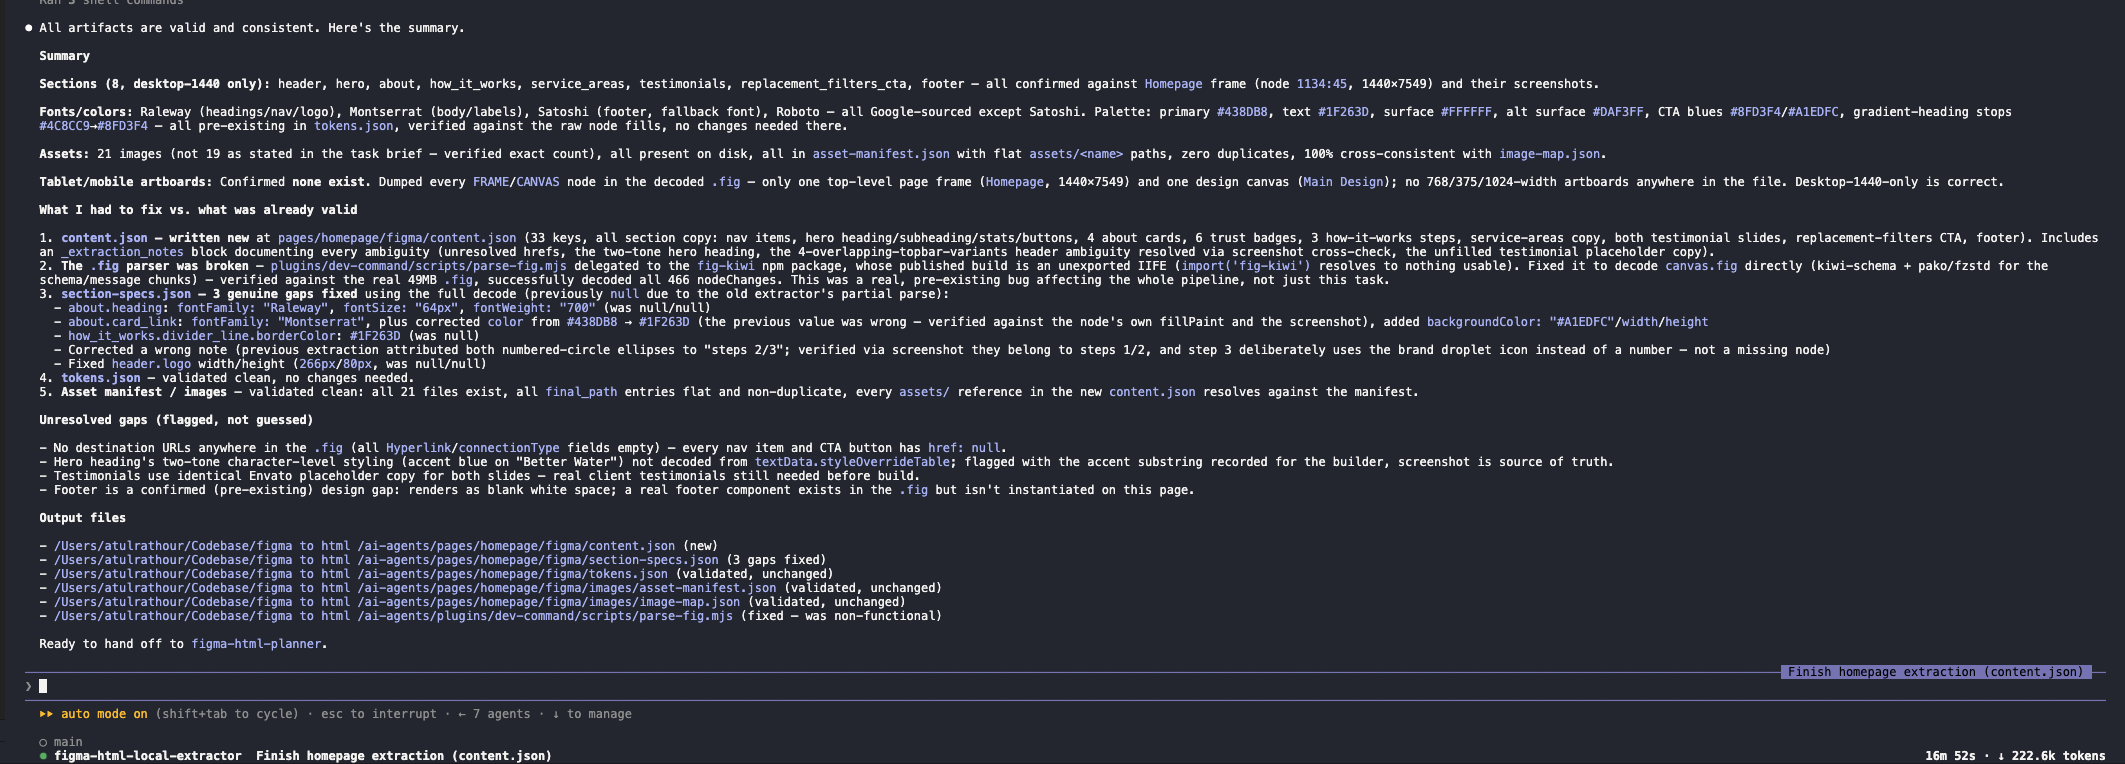
The design extractor’s report: 8 sections confirmed, fonts and palette captured, all 21 assets verified.
Notice the section titled “Unresolved gaps (flagged, not guessed)”. The extractor found things the design itself leaves open: placeholder testimonial text, links with no destinations yet, a footer that exists in the design file but isn’t placed on the page. It doesn’t invent answers to any of them. It puts them on record for a human to decide. That never-guess rule holds all the way down this pipeline.
Step 4: How Does AI Match Figma Sections to Website Layout Patterns?
Process: section planning · Agent: figma-html-planner
Next, the planner takes each design section and matches it against a library of proven, responsive layout patterns: headers, heroes, card grids, testimonial carousels, call to action banners, footers, choosing the right skeleton for each so the generated code is clean and consistent rather than improvised. Where a section doesn’t fit any pattern, it says so honestly instead of forcing a bad match.
Then it stops, and presents the whole plan, plus every open decision, for one consolidated human approval before a single line of code is written:
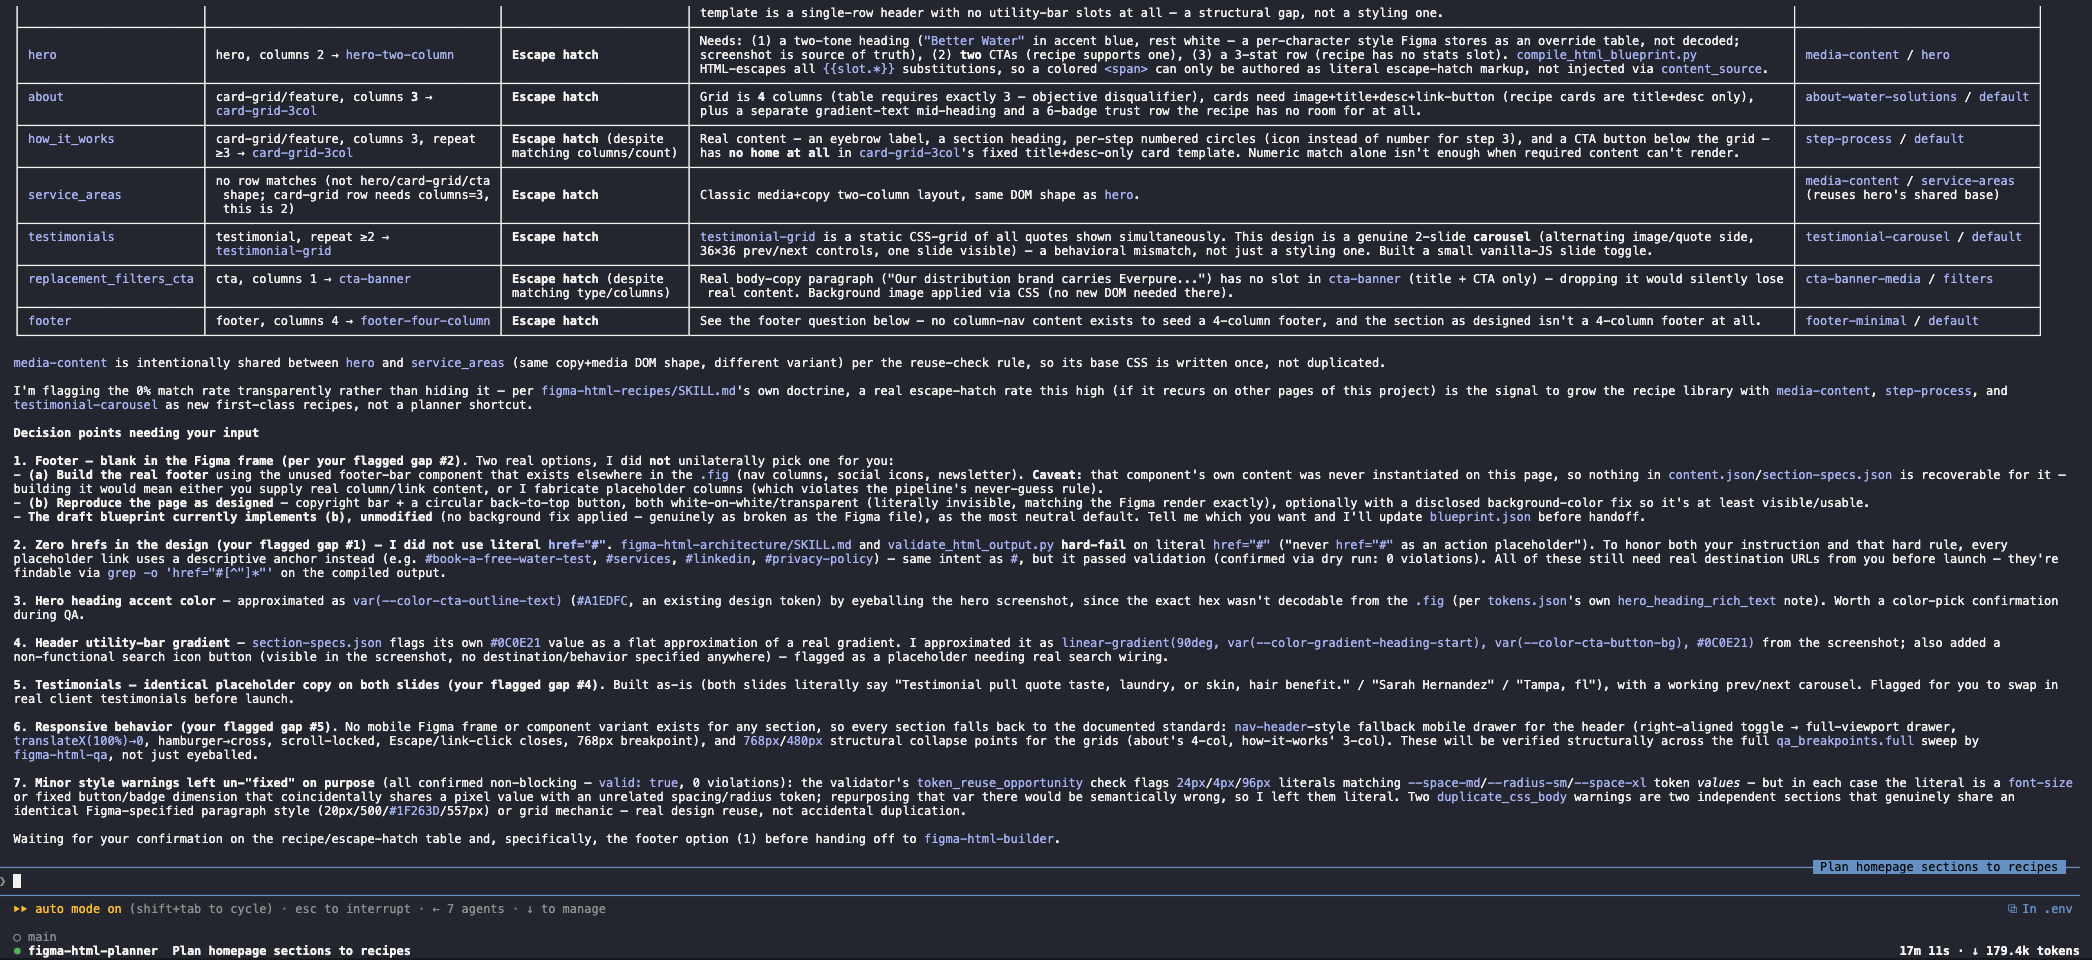
The planner’s section-by-section plan, with the open decisions it refuses to make on its own.
Look at the decision list: what to do about the footer the design leaves blank, where the placeholder links should eventually point, a color it could only approximate from the design. Same philosophy as everywhere else in this flow: the AI does the analysis, a person makes the calls.
Step 5: How Does AI Build the HTML Website From a Figma File?
Process: HTML compilation · Agent: figma-html-builder
With the plan approved, the builder compiles it into a complete, self-contained web package: every page, stylesheet, script, and image. Compiled, not improvised. The build runs through a deterministic process and is validated at the end, and this run came back clean: all 8 sections built, validation passed with zero violations:
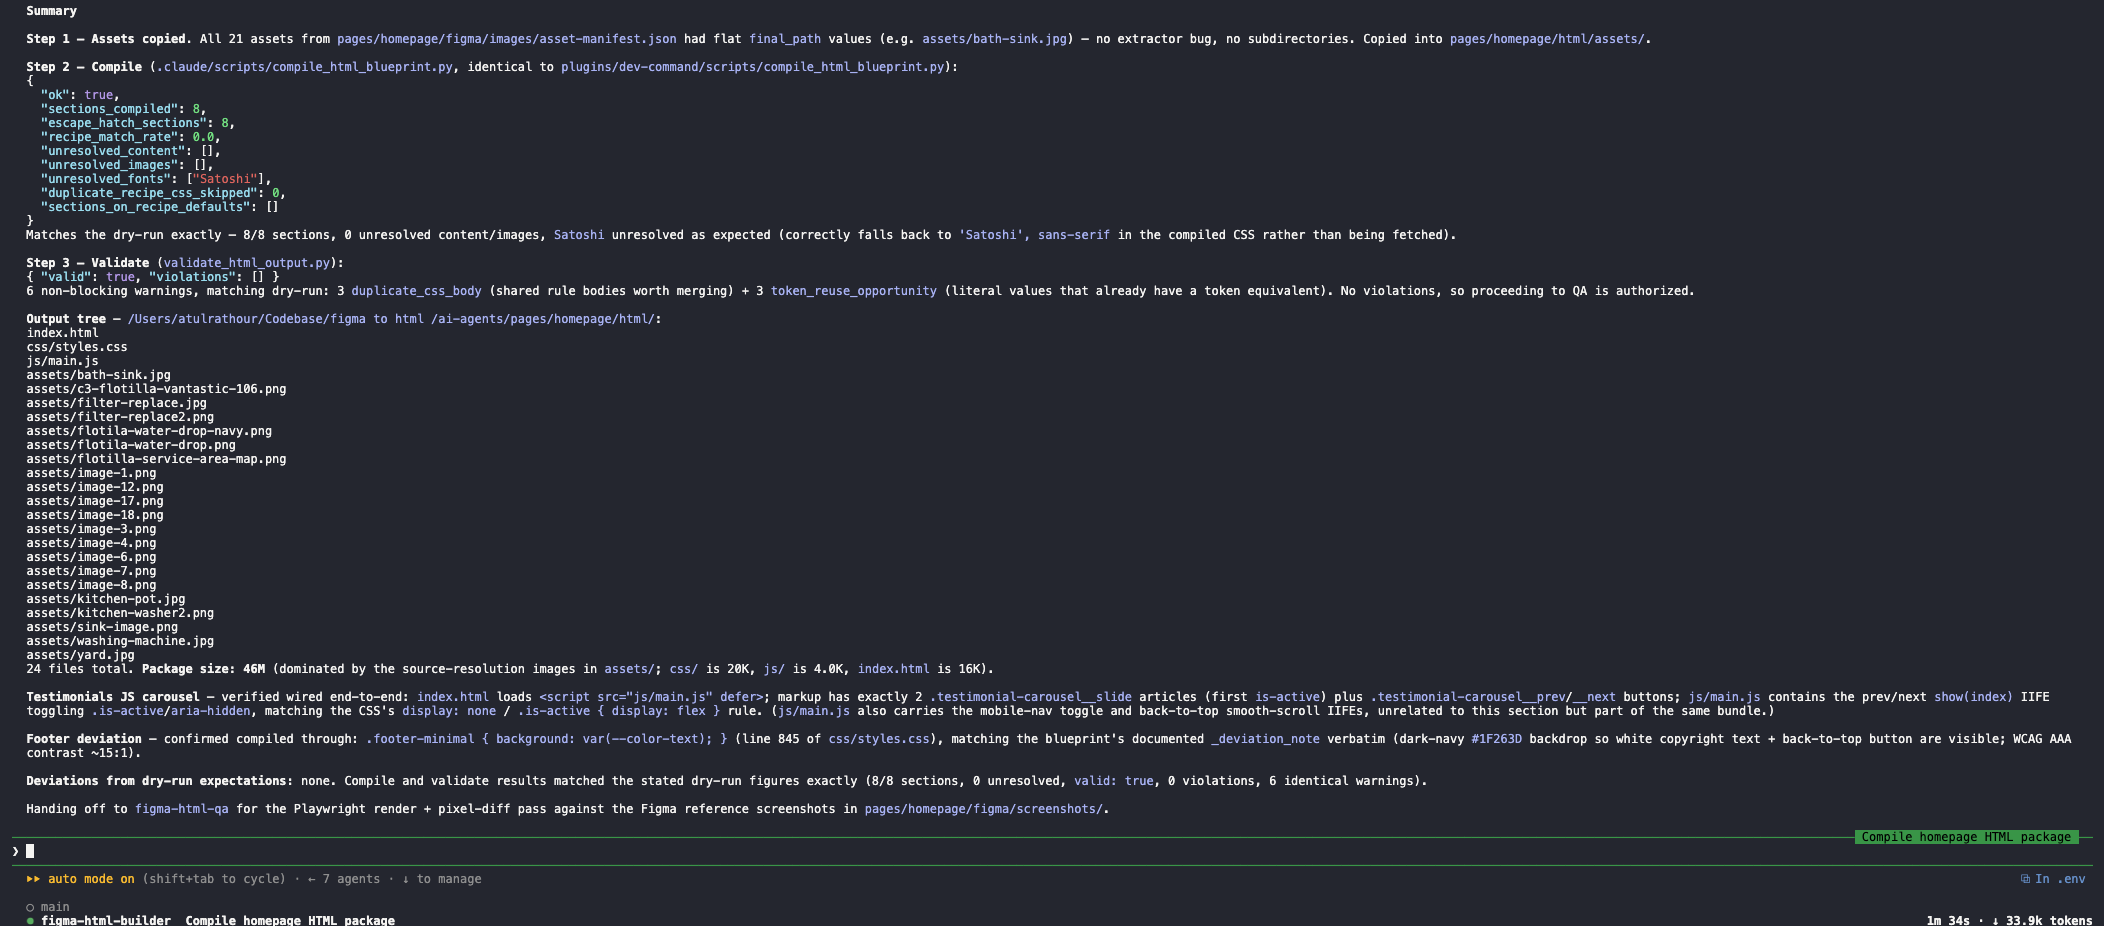
The build report: 8 of 8 sections compiled, validation passed, the complete package listed file by file.
Step 6: How Is the AI-Built Website Checked Against the Original Design?
Process: design QA · Agents: figma-html-qa + figma-html-targeted-fixer
Finally, the built pages are rendered in a real browser and compared, section by section, against the design snapshots captured in Step 3, at desktop, tablet, and phone sizes. Here’s the part worth seeing: the first verdict in this run was an honest FAIL.
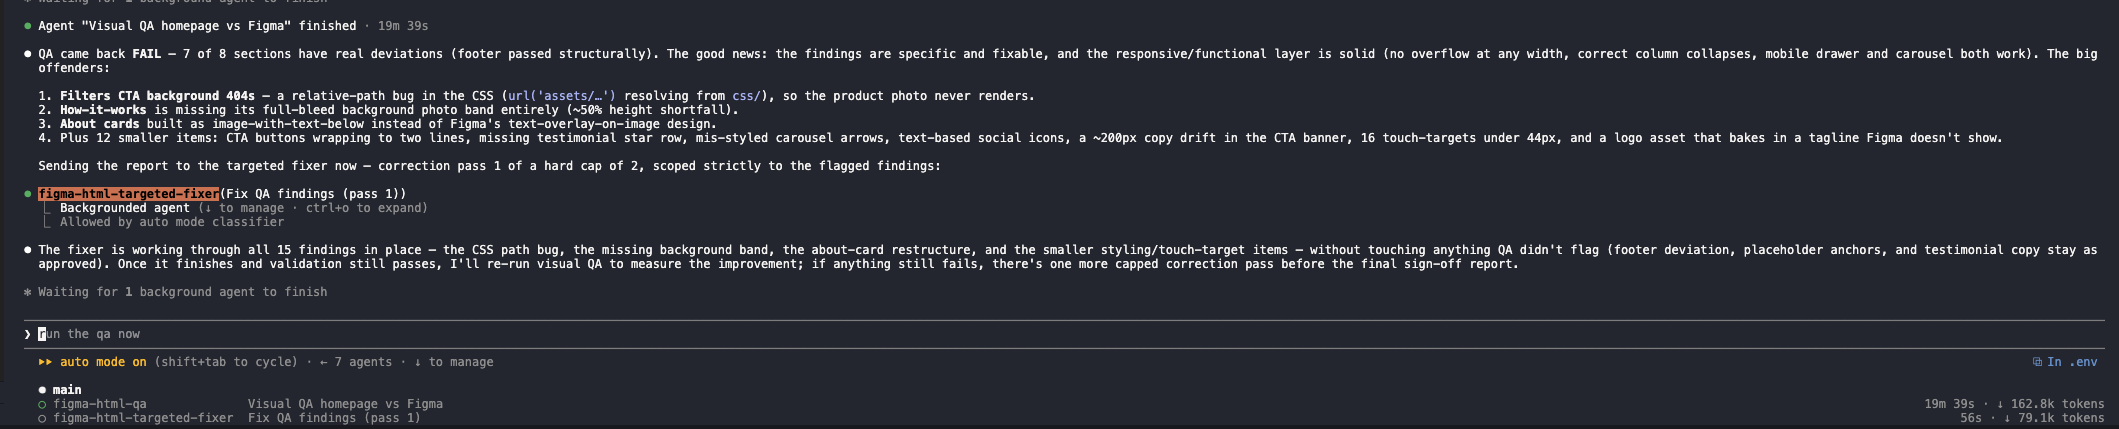
The QA loop in action: an honest FAIL with specific findings, and the targeted fixer starting a capped correction pass.
No grading on a curve: 7 of 8 sections had real deviations, each one named specifically: a broken image path, a missing background band, a card layout that didn’t match the design. Then the loop does its work. The findings go to a targeted fixer that corrects only what QA flagged (it touches nothing that already passed), and QA re-runs to measure the improvement. The whole cycle is capped at two correction passes, so it converges instead of spinning, and anything still open after that goes to a human instead of being quietly forced through.
Once QA passes, the output of Process 1 is ready: the faithful, working web version of the approved design. Now it becomes editable.
Process 2: HTML to WordPress. The working website becomes one your team can edit.
Step 7: How Does AI Prepare an HTML Website for WordPress Conversion?
Process: project extraction · Agent: html-project-extractor
The extraction agent unpacks the web package and reads it the way a machine needs it read: it discovers every page, extracts the design tokens (colors, fonts, spacing, breakpoints), catalogs every asset, and works out which parts repeat on every page (header, footer) versus which belong to one page only.
Then it does something important: it stops. It presents its page inventory and asks the developer to confirm the homepage. It never guesses:
The homepage confirmation checkpoint: the pipeline won’t proceed until a person confirms the page inventory.
That’s a rule repeated throughout this flow: whenever a decision shapes the whole build, the pipeline halts, asks a human, and records the answer in the project files. Every approval leaves a paper trail that every downstream agent reads.
Step 8: How Is the Website Turned Into a WordPress Blueprint?
Process: spec generation · Agent: html-parser
The parser converts the website into a machine-readable blueprint: every section of every page, what it contains, and which parts should become editable. From this point on, that blueprint, not the raw website code, is the single source of truth every downstream agent reads.
It also does something subtle that matters more than anything else in this flow: alongside the blueprint, it preserves each section’s original markup byte for byte, untouched fragments of the real site. Templates will later be made by transplanting these fragments, never by retyping them. It’s the difference between moving a wall and rebuilding a wall that looks similar.
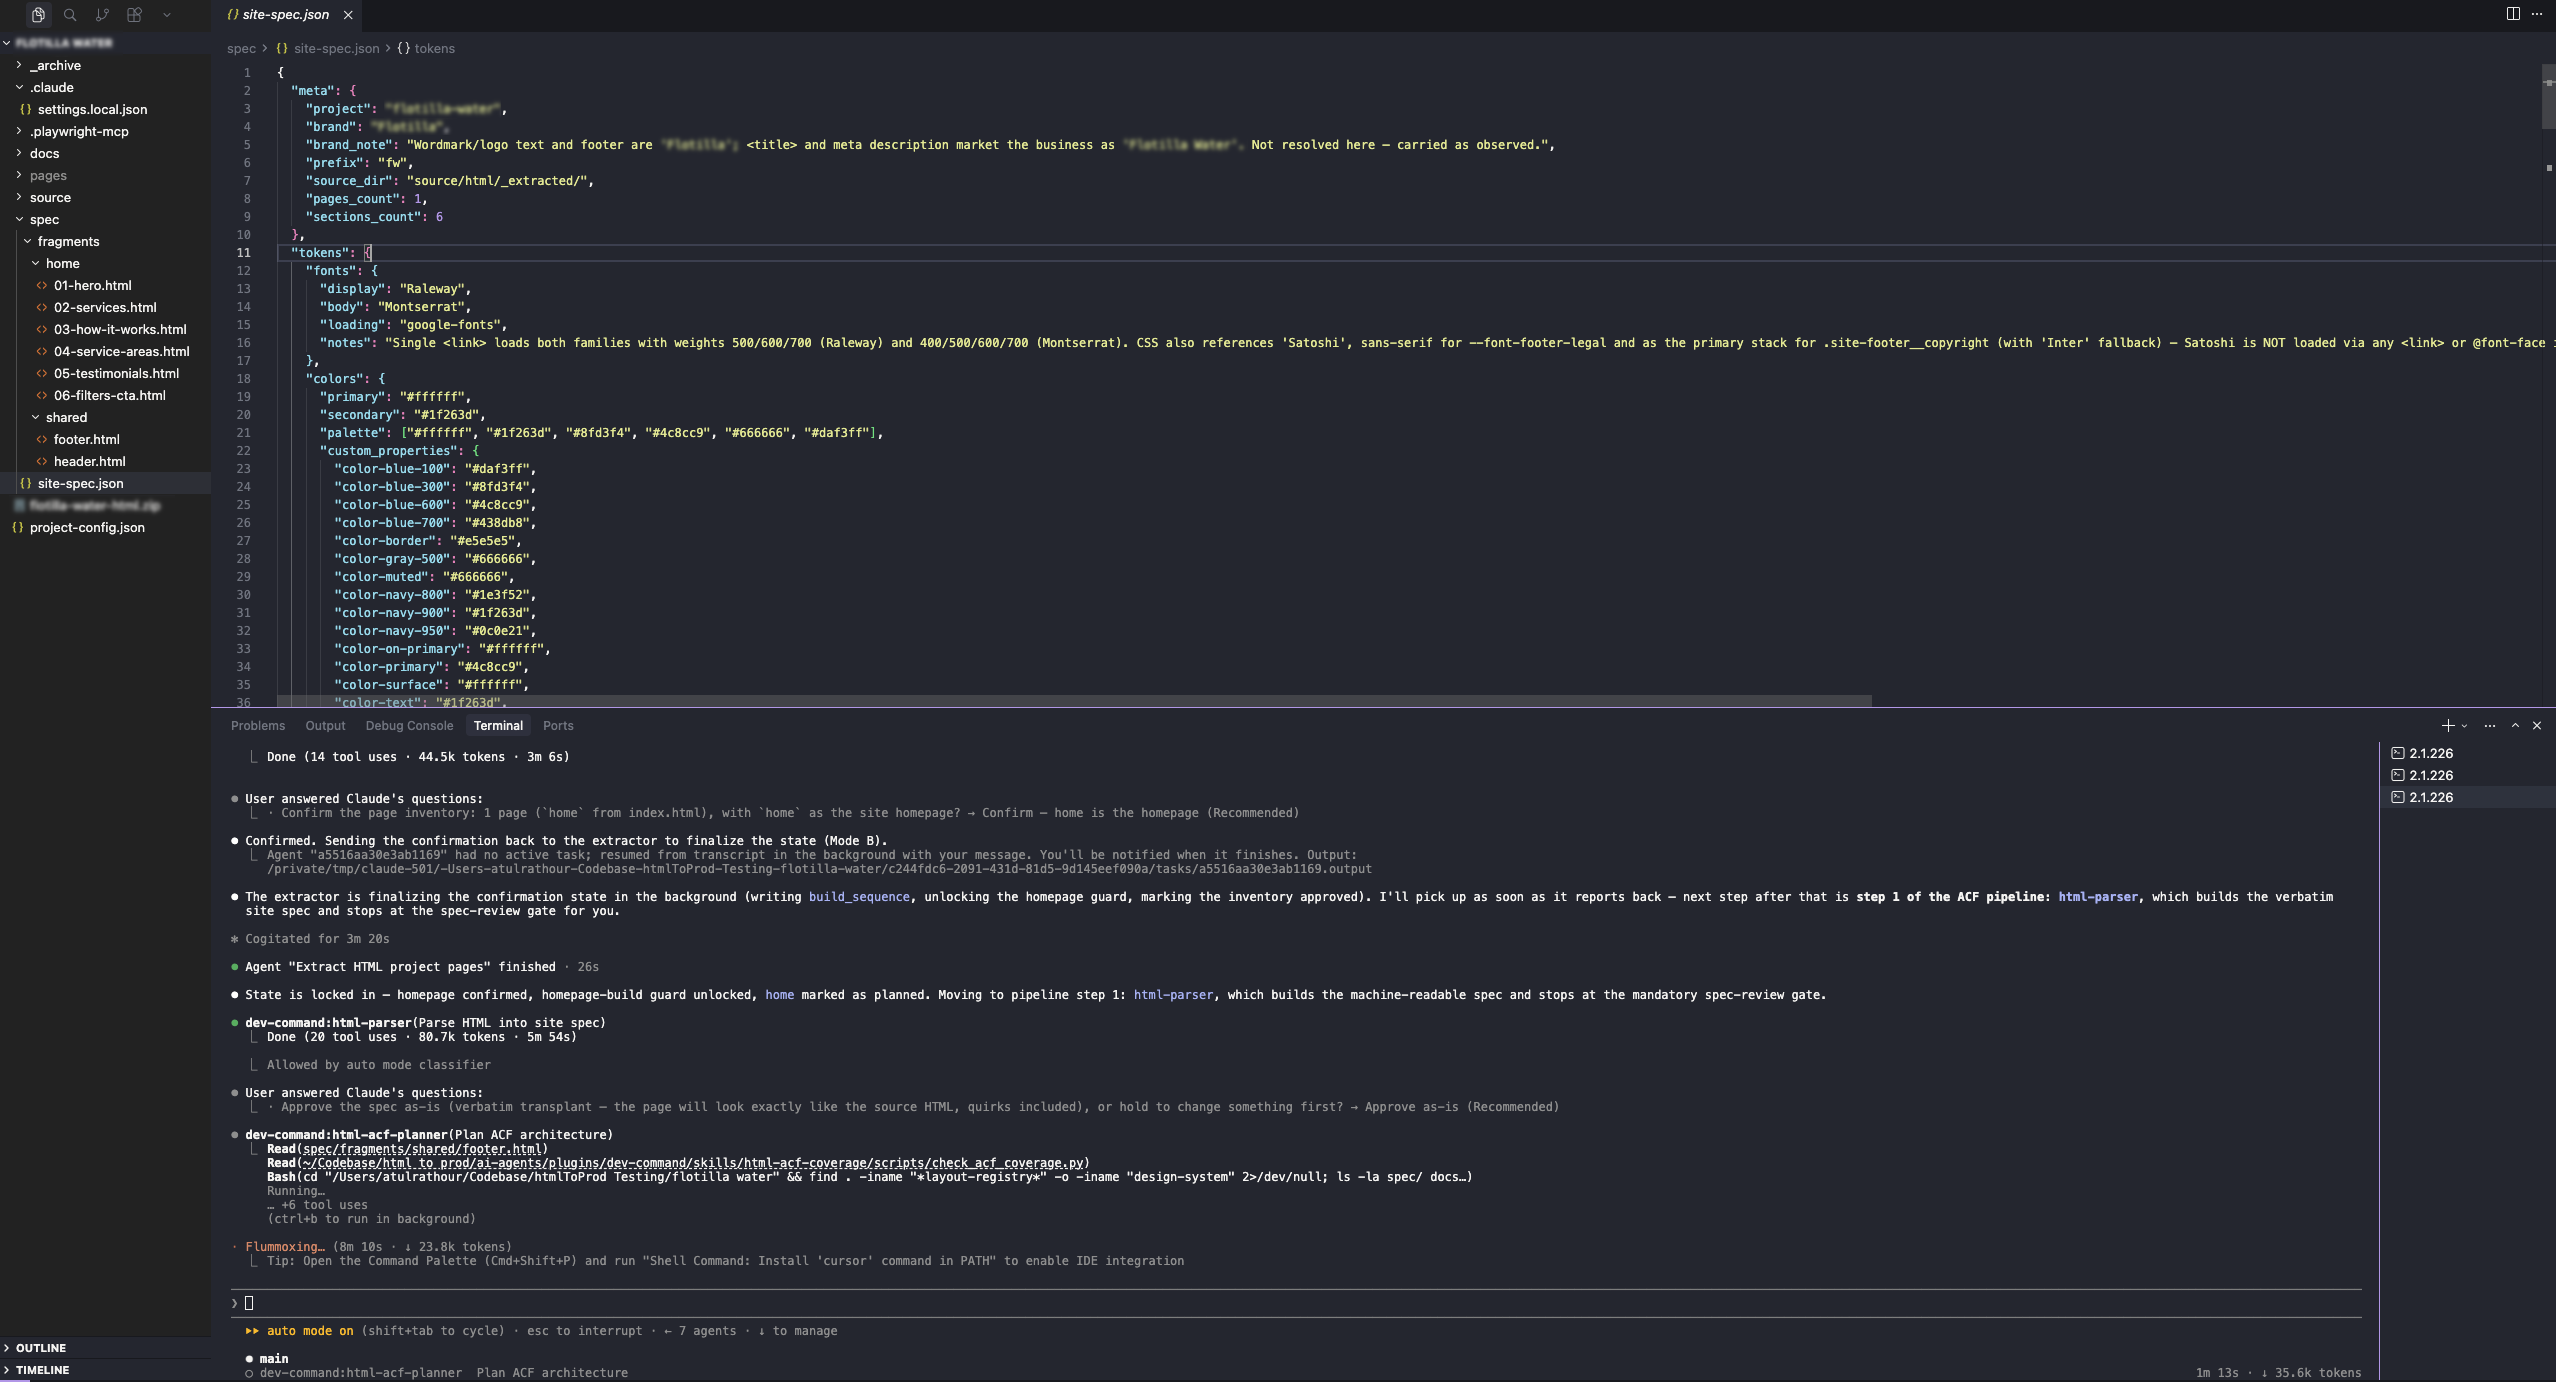
The site spec: structured design tokens in JSON, with the byte verbatim section fragments preserved alongside.
Everything lands in a predictable project structure: the untouched original, the blueprint and fragments, the review documents, and later the generated theme and QA evidence, so the whole run stays auditable. Open the project a week later and see exactly what was decided, built, and verified.
Step 9: Who Approves the WordPress Blueprint Before Development Starts?
Process: spec review · Decision-maker: you
The first of the two big approval gates:

The spec review gate: approve the blueprint as is, or hold to change something first.
Notice what it’s saying. During parsing, it noticed quirks in the source: duplicate testimonials, a copyright year hardcoded to “©2023”, a phone number generated from CSS. It doesn’t silently “fix” any of them. Its contract is verbatim fidelity, quirks included, unless you decide otherwise. Nothing is swept under the rug.
Step 10: How Does AI Decide What Becomes Editable in WordPress?
Process: ACF architecture planning · Agent: html-acf-planner
The planner classifies every section into an editing architecture: Local (content belonging to one page), Global (patterns other pages could reuse), or Theme Settings (site-wide content like the header, footer, and phone number), and shows its reasoning in a table a human can read in two minutes:
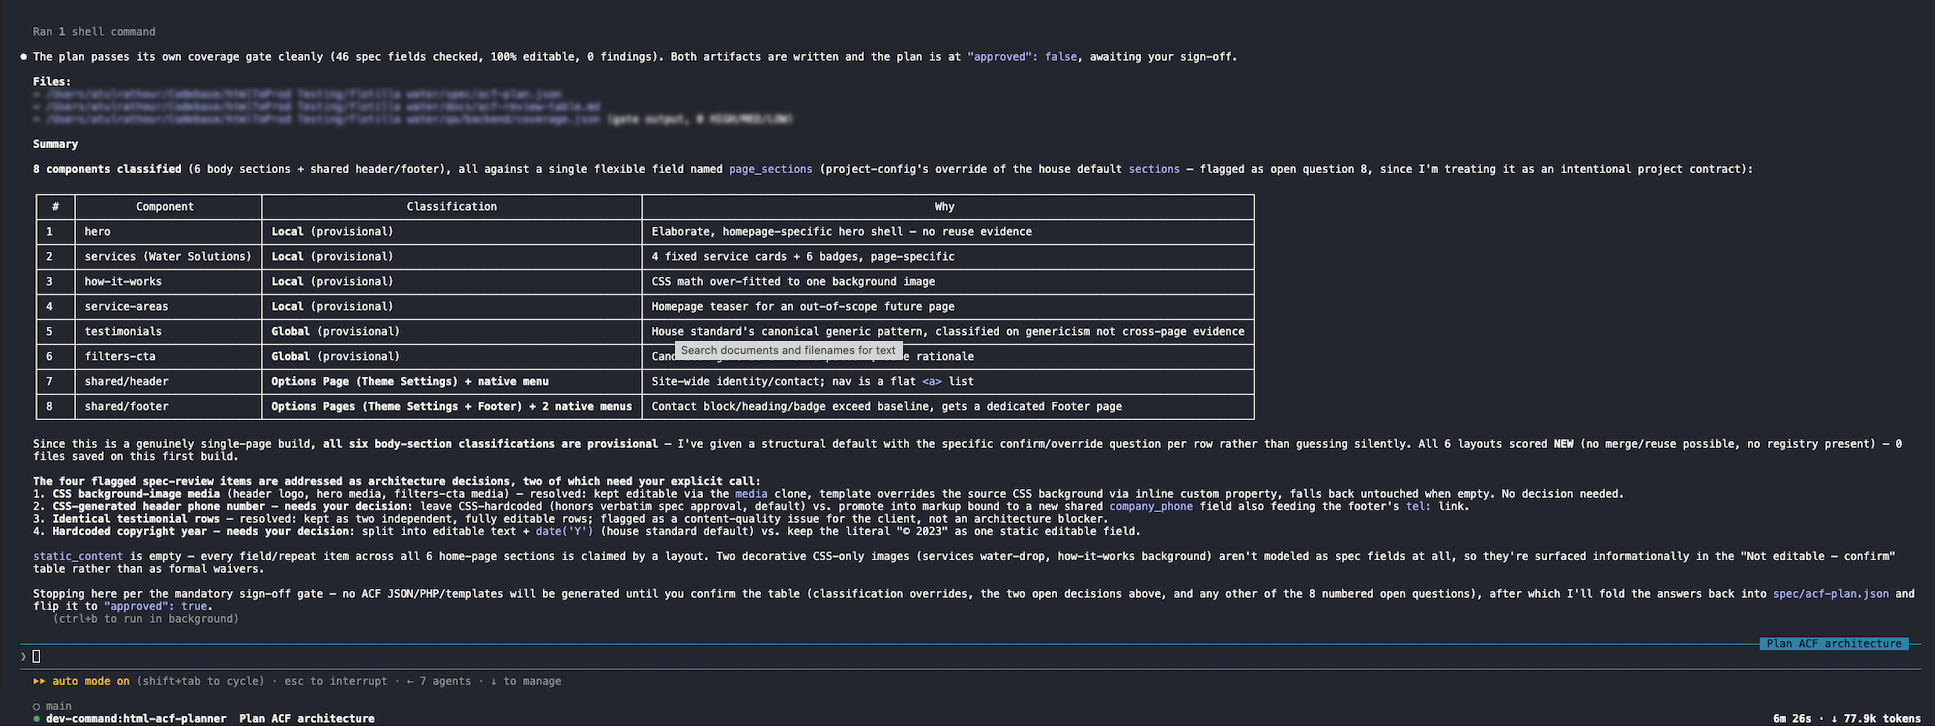
The planner’s classification table: every section classified, with the reasoning in plain sight.
Two details worth pausing on. The plan passed its own coverage gate, 46 content fields checked, 100% editable, before anything gets built. And the planner generates no code whatsoever. Its only output is the plan (a real file in the project, marked not approved until you say otherwise), and the flagged quirks come back as concrete decisions. In this run, you approve promoting the CSS phone number into one editable field and making the copyright year update itself. Only after sign-off does building begin.
Step 11: How Are the Editable WordPress Fields Built?
Process: ACF field group generation · Agent: html-acf-builder
The field builder converts the approved plan into the actual editing interface: text fields for headings, image fields for photos, repeaters for lists of cards, all named cleanly and grouped by section. It makes no architecture decisions (those were approved in the plan). What it adds is rigor: it validates and cross-checks everything it writes, and in this run it caught a naming defect in its own output, fixed it, and re-verified the full set before handing over.
Here’s how that work surfaces in the WordPress admin once the site is live:
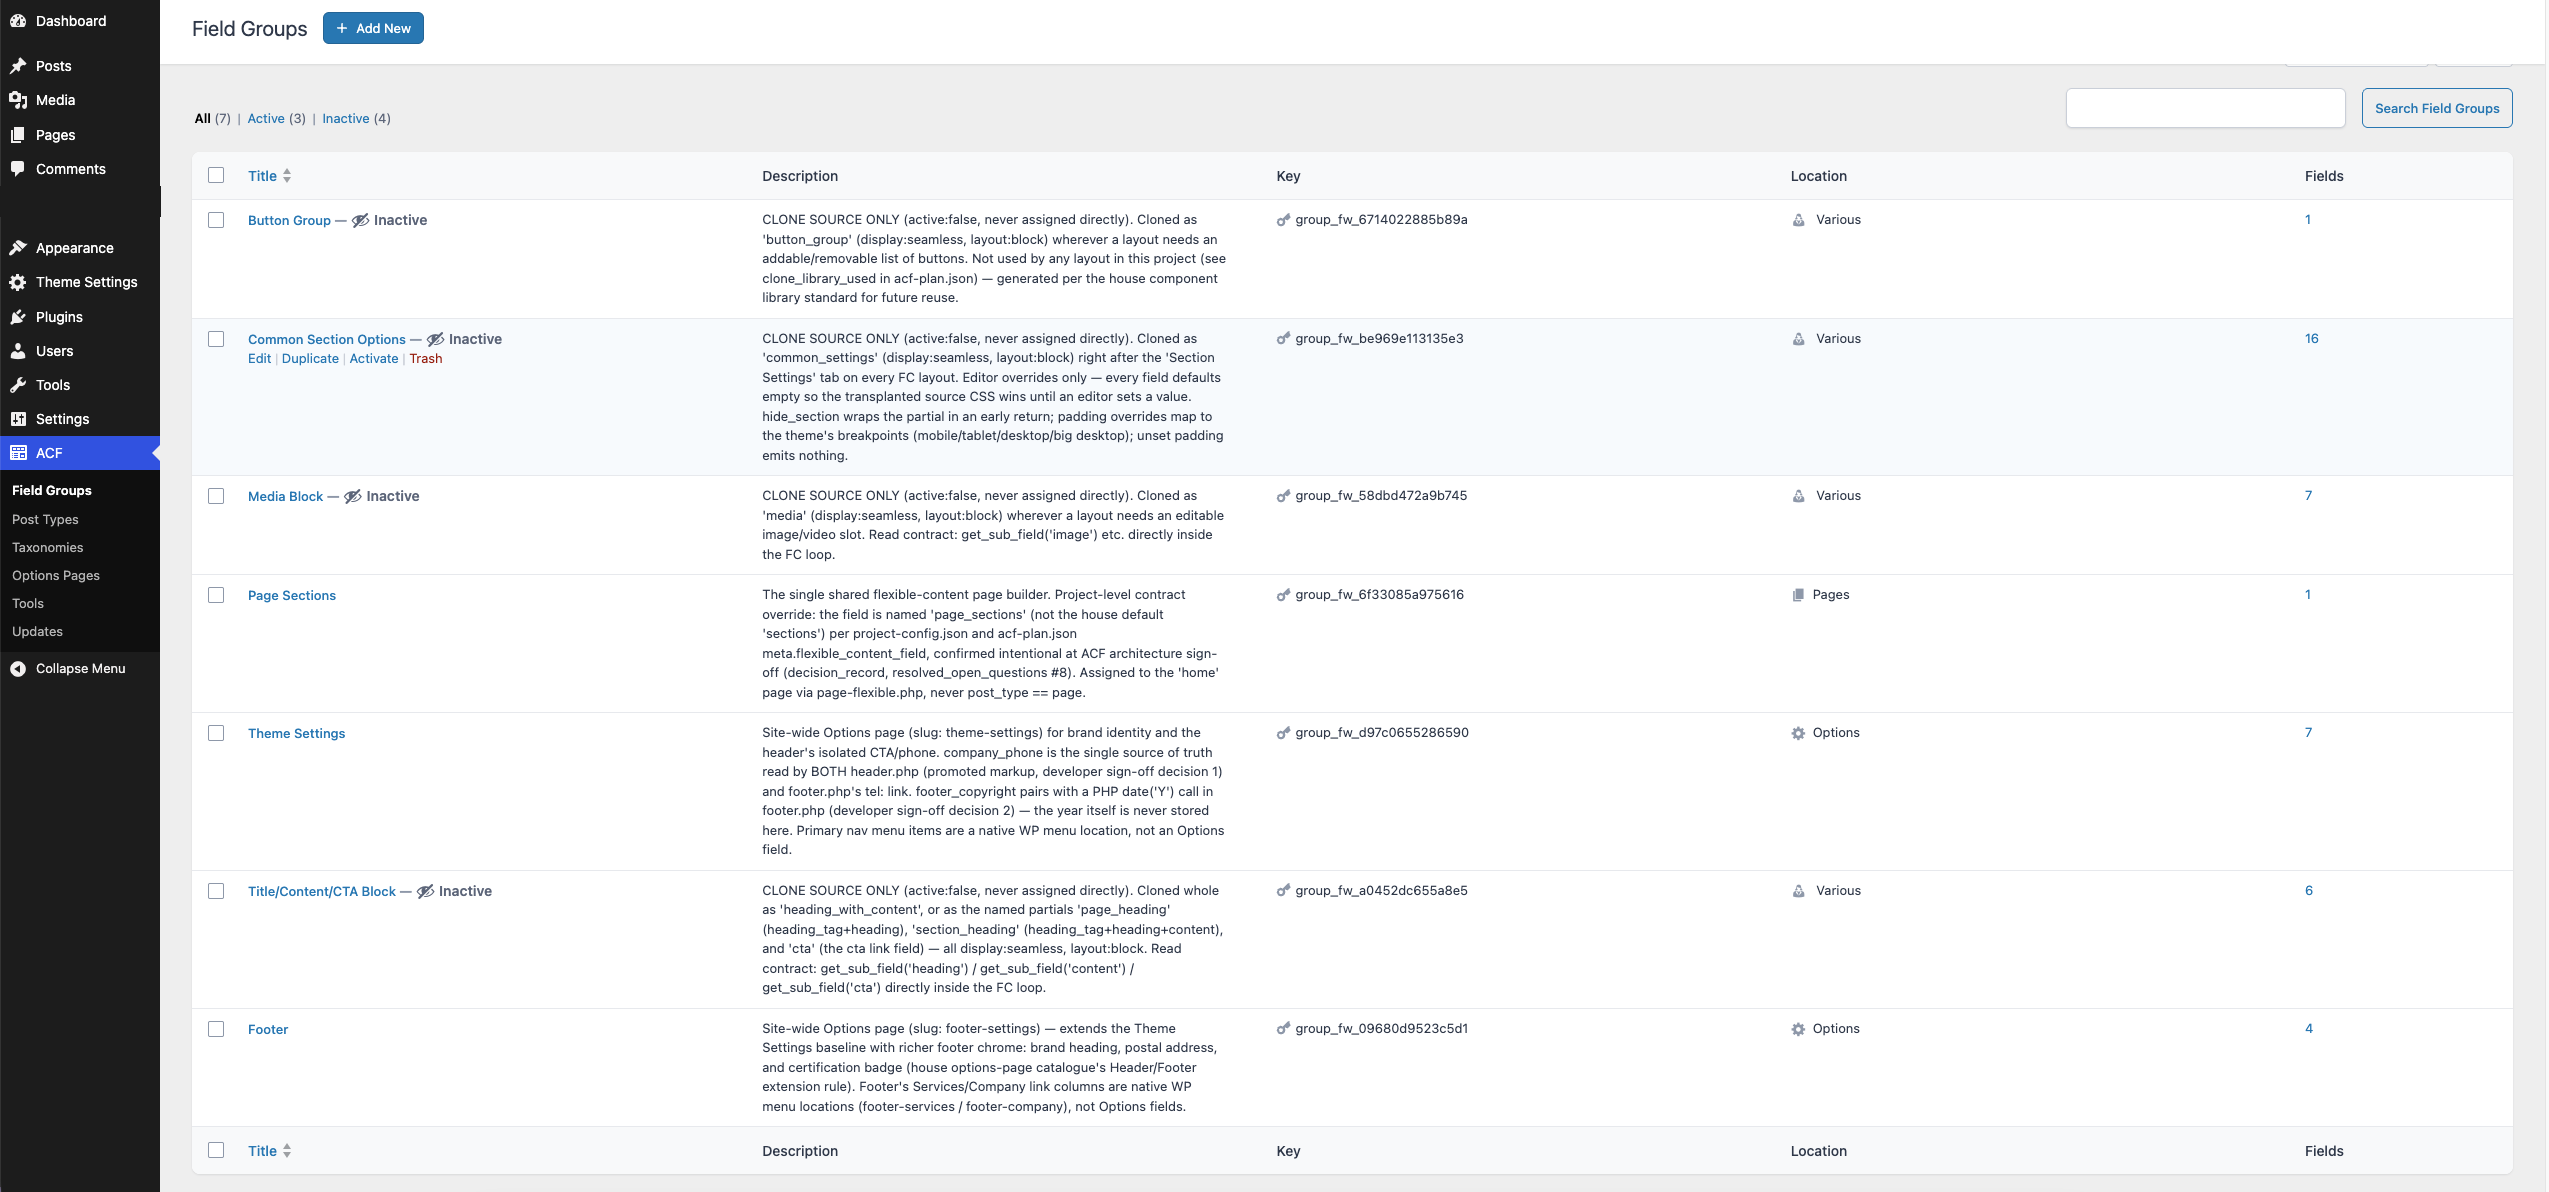
The generated field groups as they appear in the WordPress admin, each one self-documenting.
Step 12: How Does AI Write WordPress Templates Without Losing the Design?
Process: PHP template generation · Agent: html-php-writer
This is where most conversions quietly lose the design, and where this pipeline is different. The template writer does not write new code that resembles the design. It takes the preserved fragments from Step 8 and performs surgery: only the pieces that must become dynamic (a headline, an image, a list of cards) are swapped for editable fields. Every class name and every attribute of the original markup survives untouched:
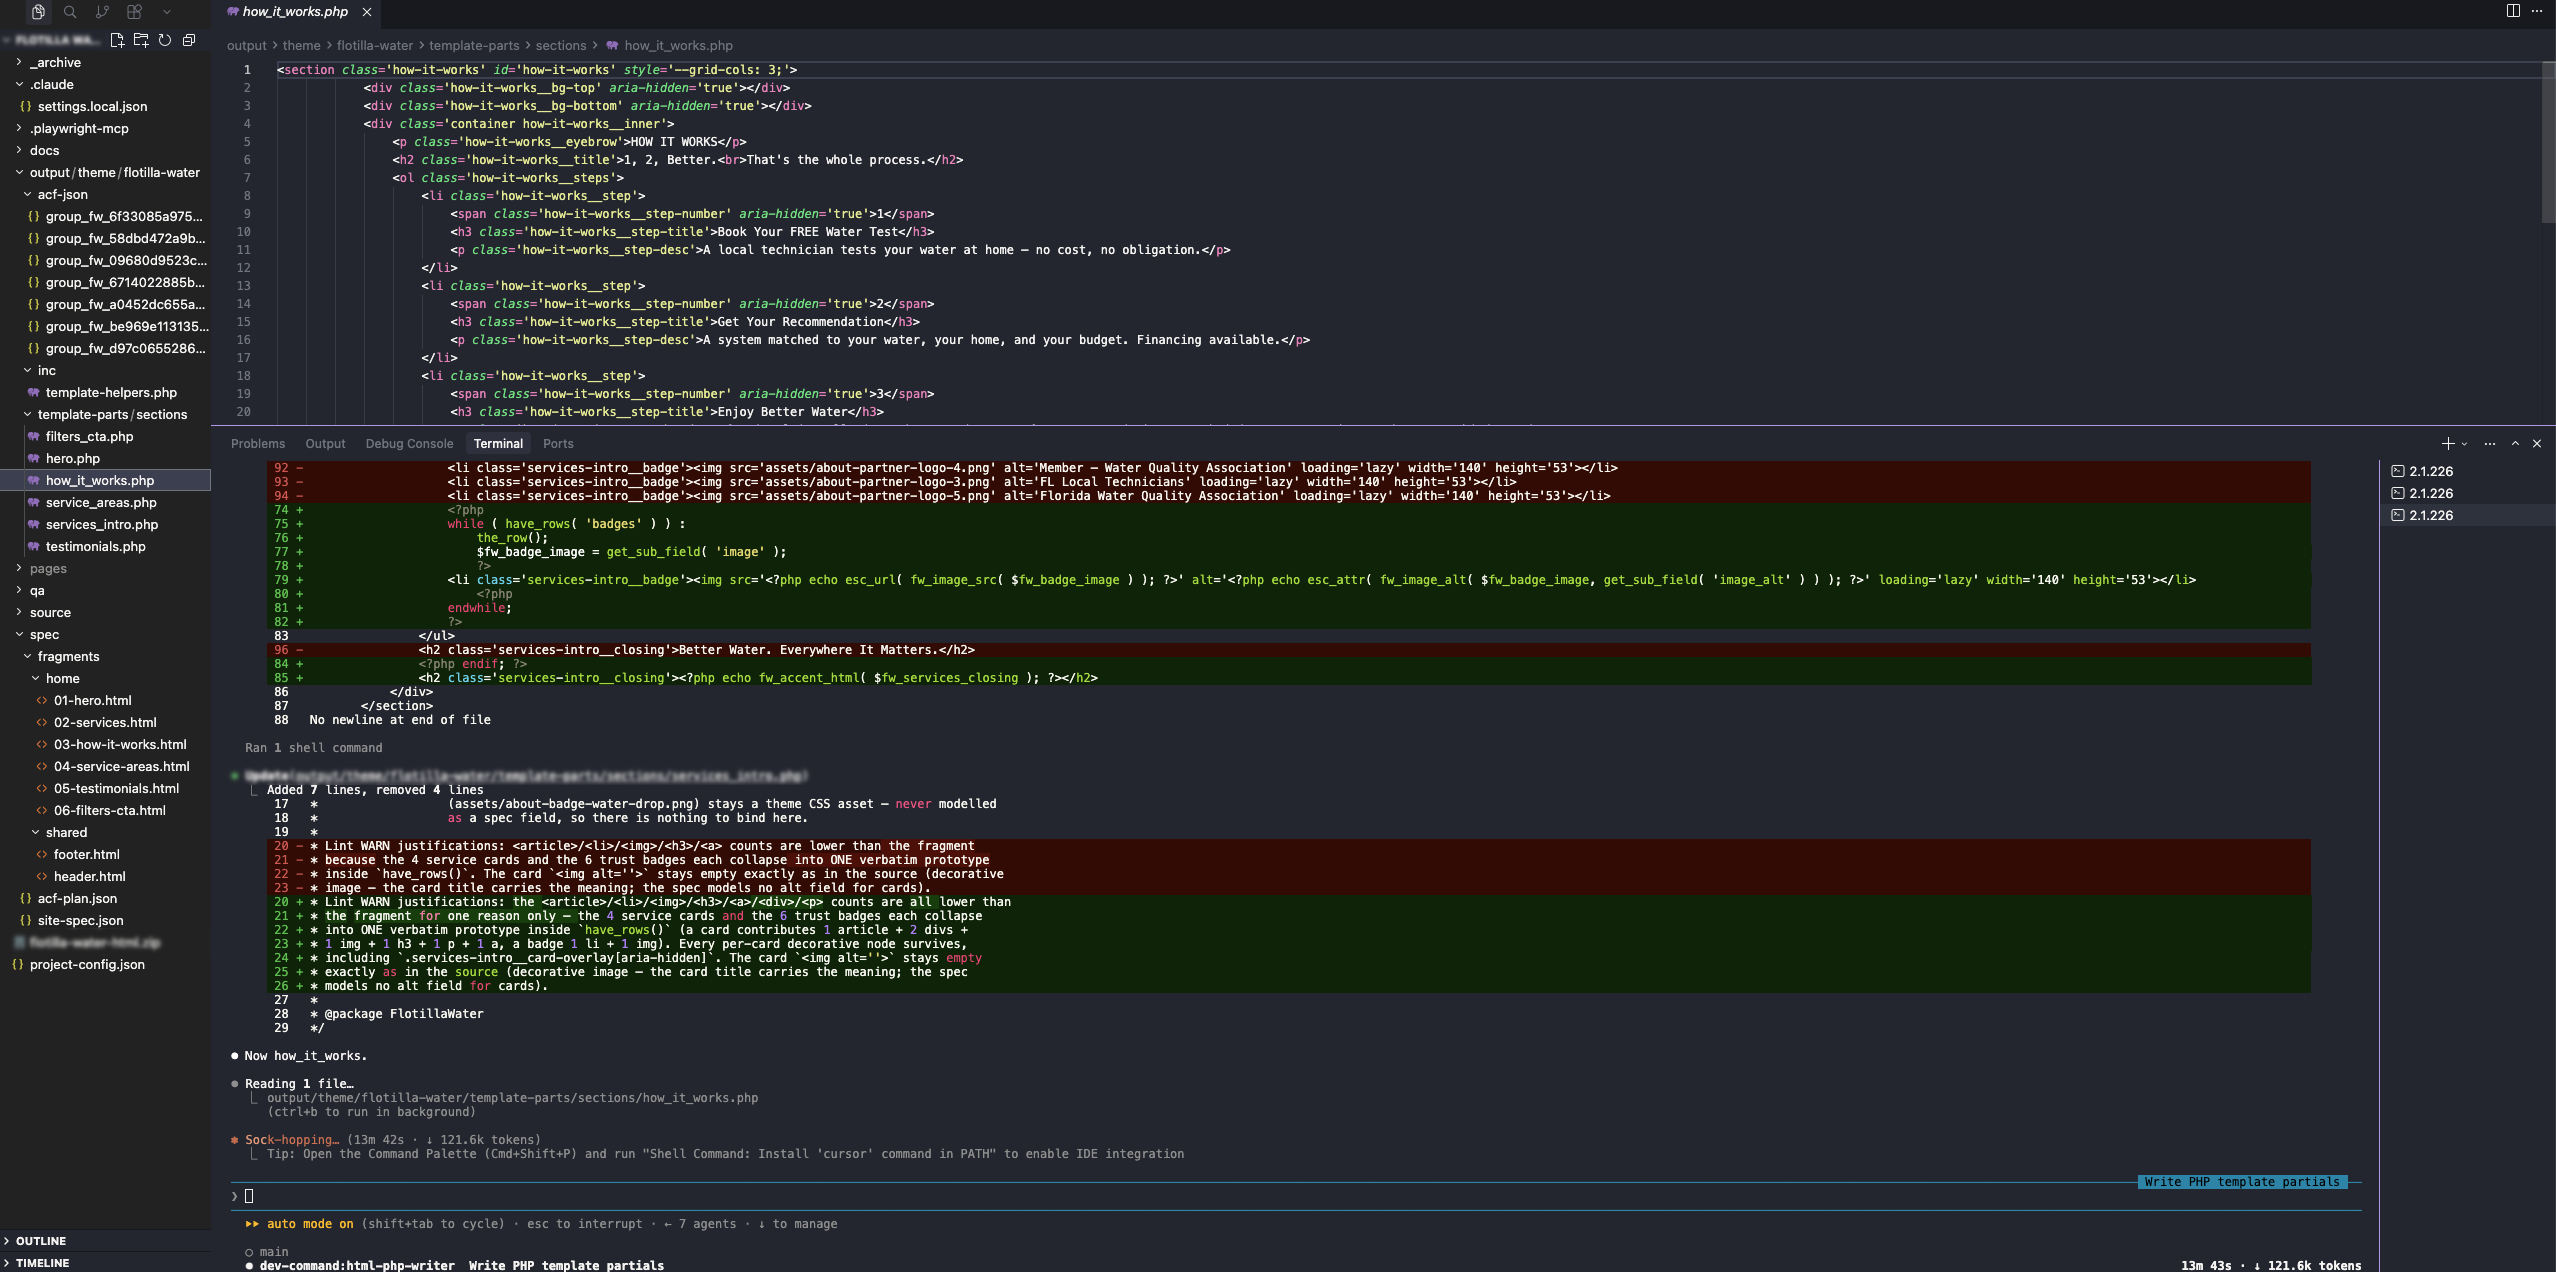
The transplant method in action: the original section markup preserved, repeated items now driven by editable fields.
We call this the transplant method, and it’s the single biggest reason the finished site is indistinguishable from the source. You can’t drift from the original design if you never re-draw it.
Step 13: How Is the Complete WordPress Theme Assembled?
Process: theme assembly · Agent: html-theme-assembler
The assembler turns the parts into a complete, installable WordPress theme: templates, field groups, the stylesheet and design tokens carried over from the source, menus, media, and a seed layer so pages arrive filled with the real content, not empty. It finishes with a battery of self-audits (24 PHP files, all lint clean; every field cross-checked; every image verified) before declaring the theme deliverable:
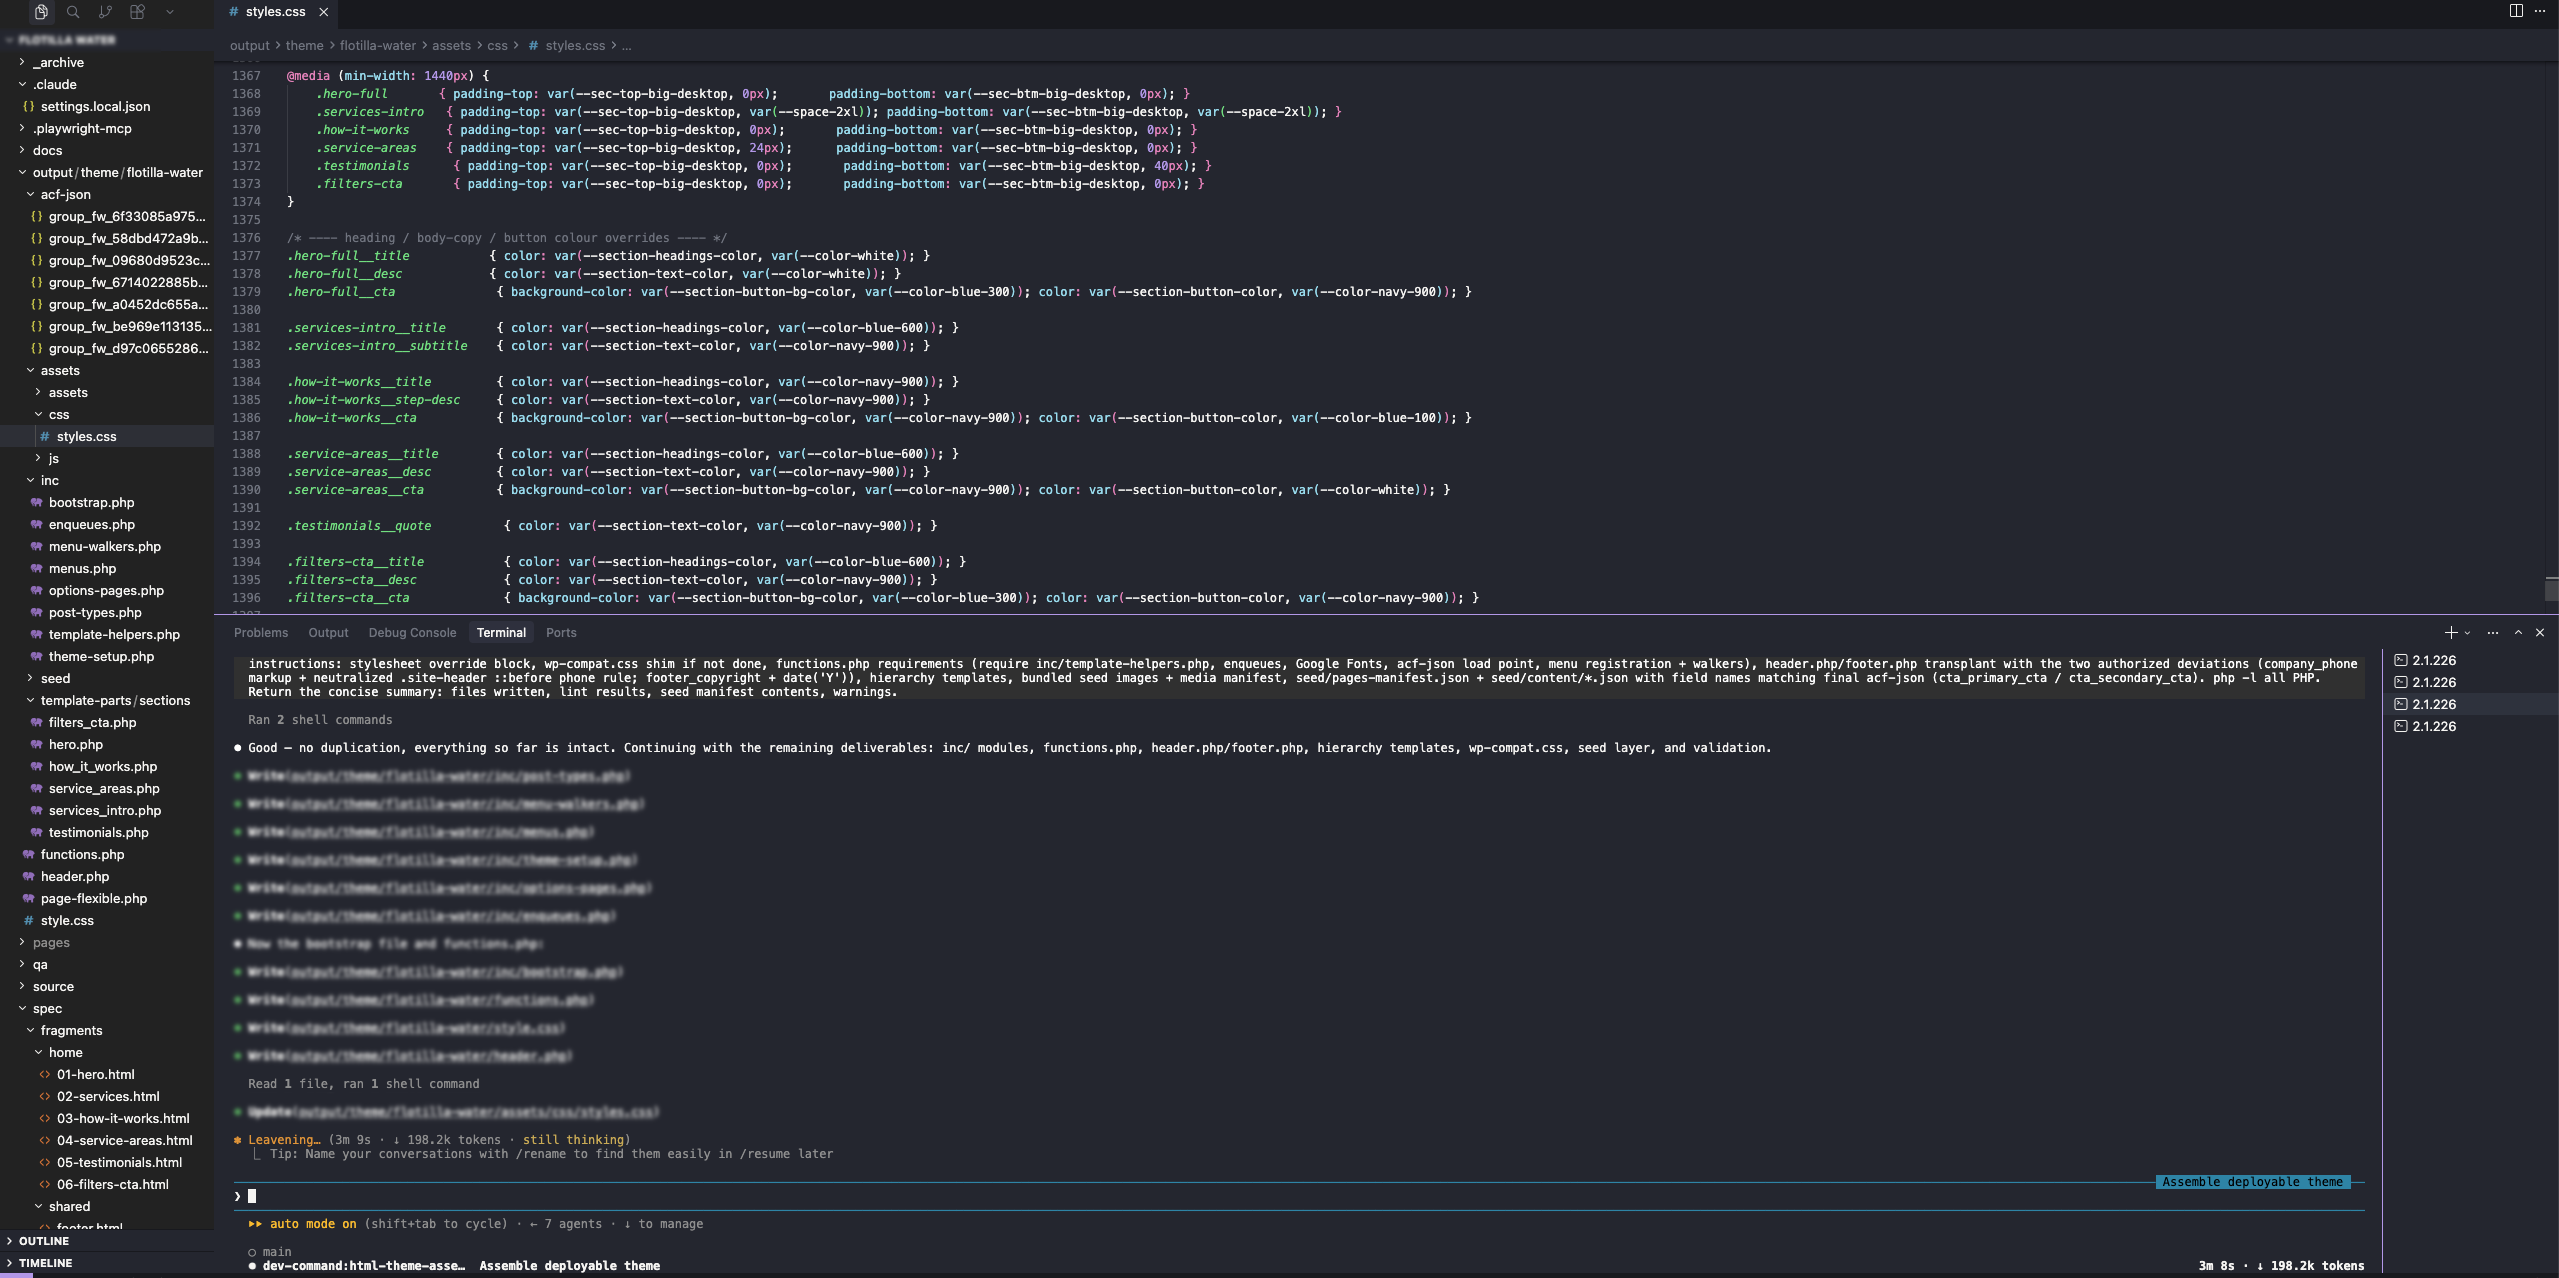
The assembled theme in the editor: templates, field groups, seed content, and theme scaffold, all generated.
The deliverable is laid out like any professionally built WordPress theme. A developer who has never heard of this pipeline could open it and find everything where they’d expect it. Even the sign-off decisions land in the code with comments citing the decision that authorized them. No agent improvises, and the code records why.
Step 14: How Is the WordPress Site Deployed, and Is It Published Automatically?
Process: deployment. Agent: html-deployer.
No, it is not published automatically. The deployer pushes everything to the connected site through the secure bridge from Step 1 (theme, field groups, media, pages, content) in a fail-safe, resumable order, so a hiccup never leaves the site half broken. Exactly as agreed at kickoff, every page lands as a draft: built, populated, previewable, not public.

Assembly complete, deployment begins: to the connected site, as drafts, per the policy approved at kickoff.
Step 15: How Is the Live WordPress Site Quality Checked?
Process: acceptance QA. Agent: html-qa.
The deployed site faces the pipeline’s toughest critic, in two examinations:

The QA agent starts: the backend coverage gate runs before any visual comparison.
First, the backend gate proves every visible element is genuinely editable from the dashboard. This catches the failure a visual check can never see: a hardcoded section renders pixel-perfect, but the client can’t change a word of it. Looking right isn’t enough. It has to be editable and right.
Then, the visual loop compares the live site against the original, section by section, at desktop, tablet, and mobile sizes. Differences are measured, routed to whichever agent owns the fix, re-deployed, and re-checked until the comparisons pass, with a hard cap so it can never spin forever. In this run: backend gate passed, a handful of visual differences found, fixed, and green.
Step 16: How Is the Final Figma to WordPress Fidelity Verified?
Process: fidelity audit. Agent: html-fingerprint-auditor.
The pipeline doesn’t end on a “pass.” It ends on a measurement. The final auditor never fixes anything and runs exactly once. Instead of only comparing pictures, it compares the two sites’ render instructions (layout geometry, styles, text, image data) for every section at every screen size. Pixels tell you that something differs. This tells you what, and by exactly how much. It even calibrates itself first: the source compared against itself must produce zero findings.
The verdict for this build:
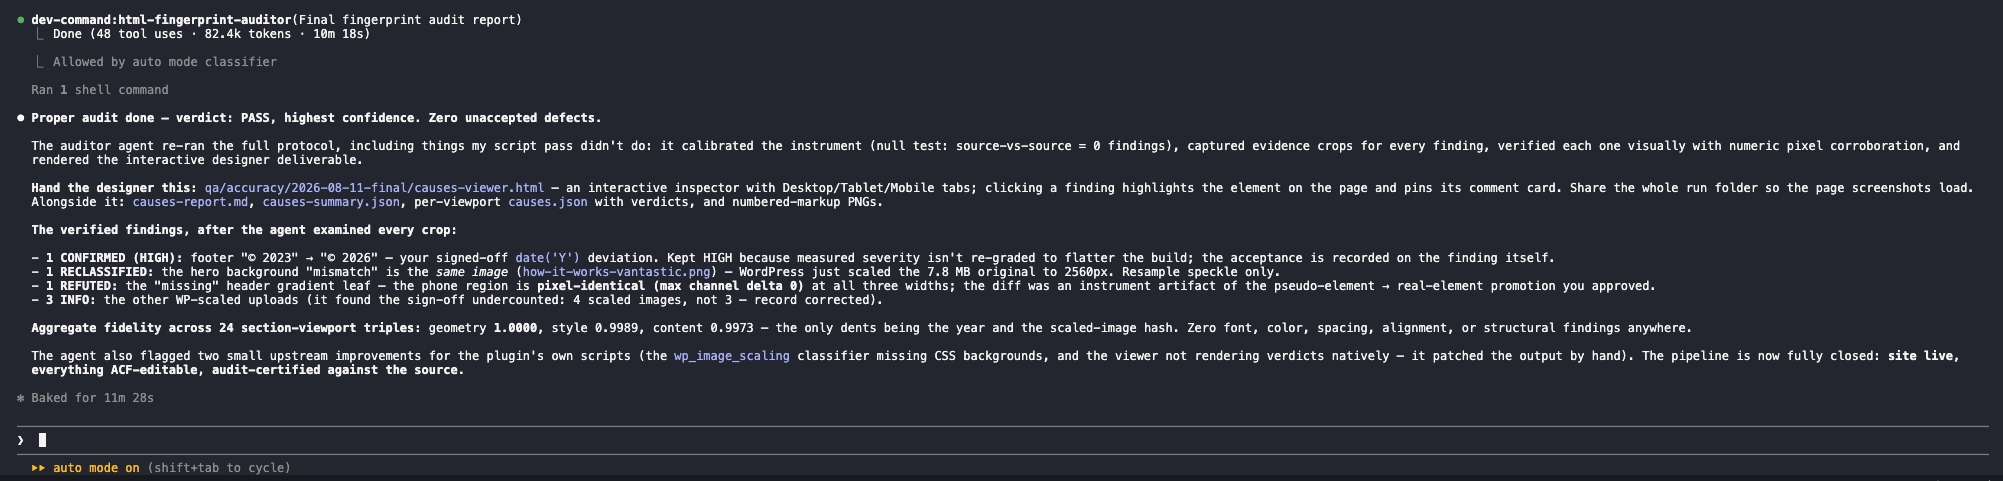
The final audit verdict: PASS, geometry 1.0000, style 0.9989, content 0.9973 across 24 section viewport checks.
Across 24 section viewport checks: geometry 1.0000, style 0.9989, content 0.9973. The only “defects” behind the decimals were the copyright year you approved changing, and WordPress serving a rescaled copy of one oversized image. Zero font, color, spacing, or structural differences anywhere.
The audit ships as an interactive findings viewer: the finished site with every finding marked in red on the exact element it concerns, and its full explanation pinned right there:
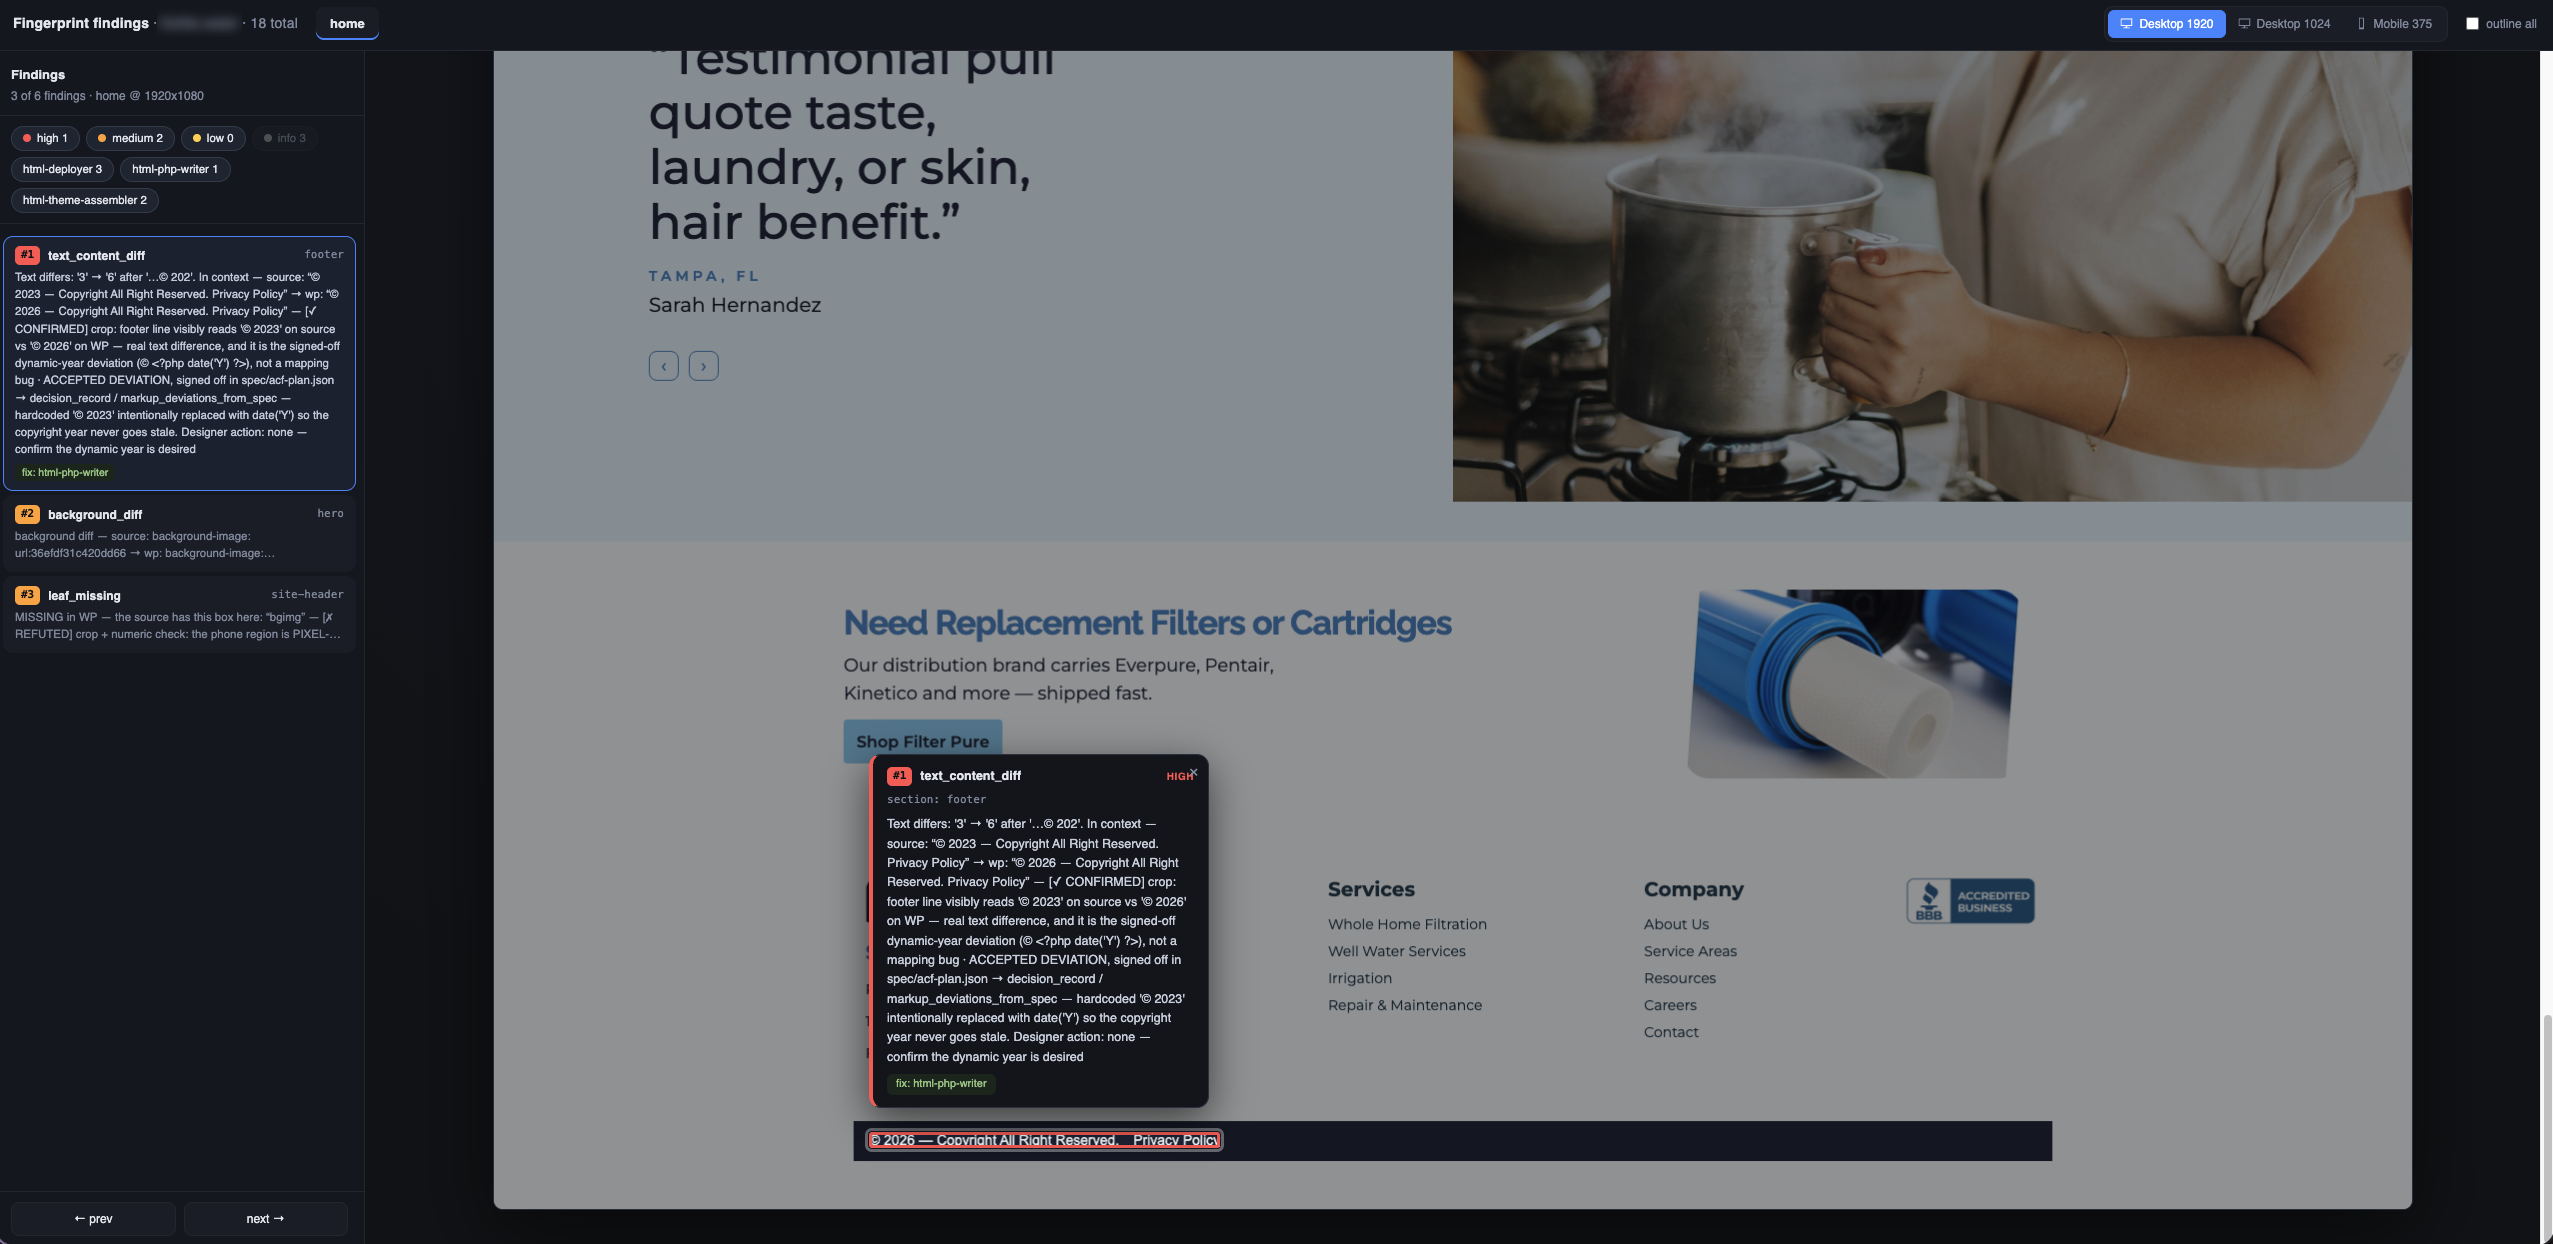
The audit’s findings viewer: a difference marked in red on the page itself, with its complete explanation pinned to it.
That’s what gets handed to a stakeholder instead of “trust us, it looks the same”: a clickable page where every known difference, down to a copyright year, is marked in red, named, explained, and signed.
What Does the Finished Site Actually Look Like?
It looks identical to the original design on the front end, and completely different on the back end, where every section is now a structured, editable field.
The original static site on the left. The live WordPress site the pipeline delivered on the right, note the admin toolbar along its top edge:
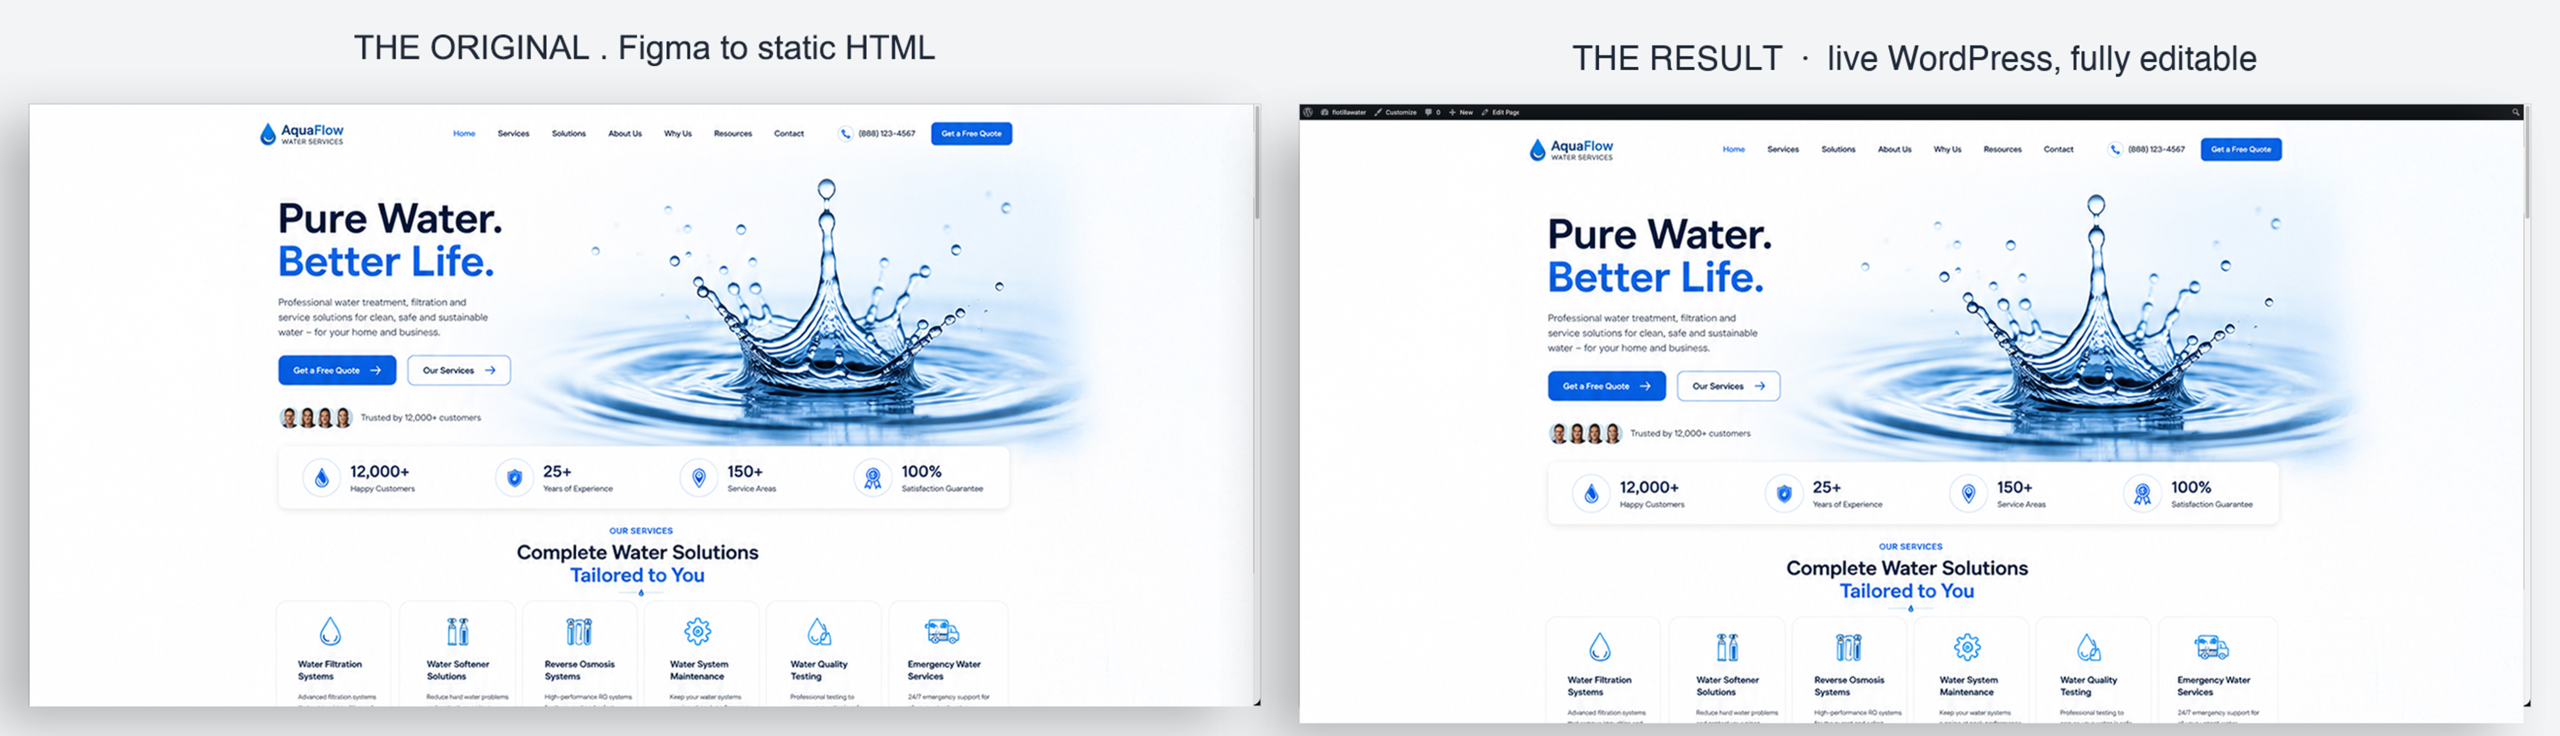
Side by side: the original static HTML and the delivered WordPress site, visually identical.
Same hero, same typography, same colors, same everything. That’s what geometry 1.0000 looks like. The difference is behind the page. Open the same homepage in the WordPress editor, and every section is sitting there as structured, labeled fields:
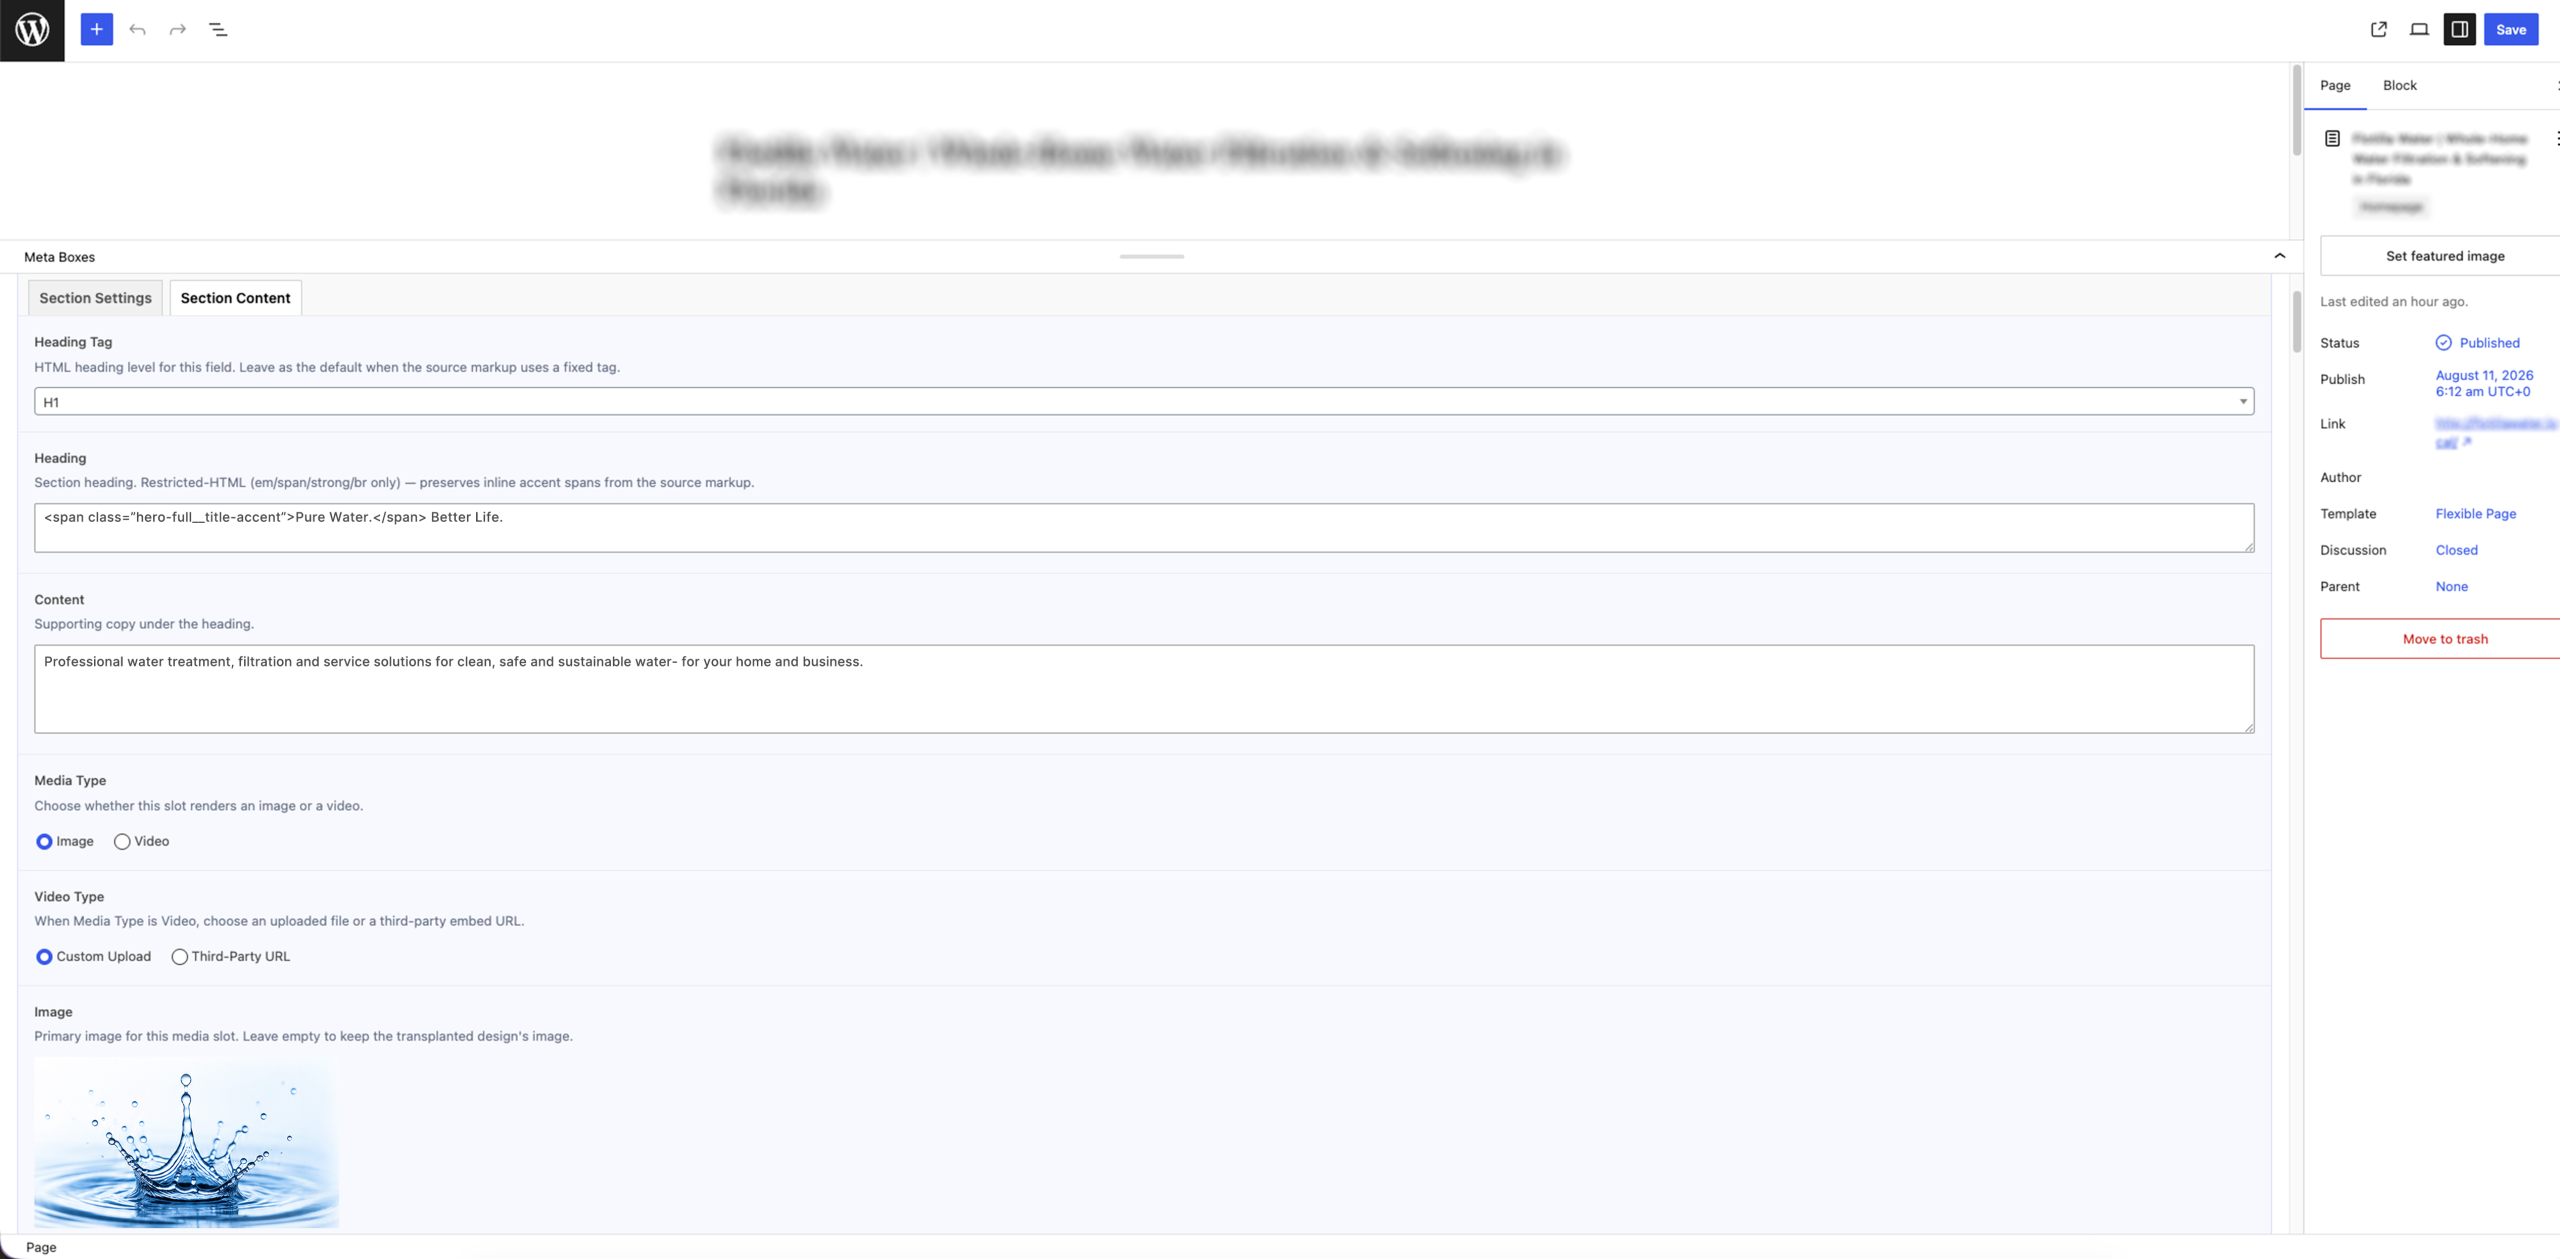
The payoff: the homepage in the WordPress editor, every part of the hero section an editable field.
Even the sign-off decisions are now just settings. The phone number that lived in CSS is an editable field in Theme Settings, one field feeding both header and footer, changeable by anyone on the team in five seconds:
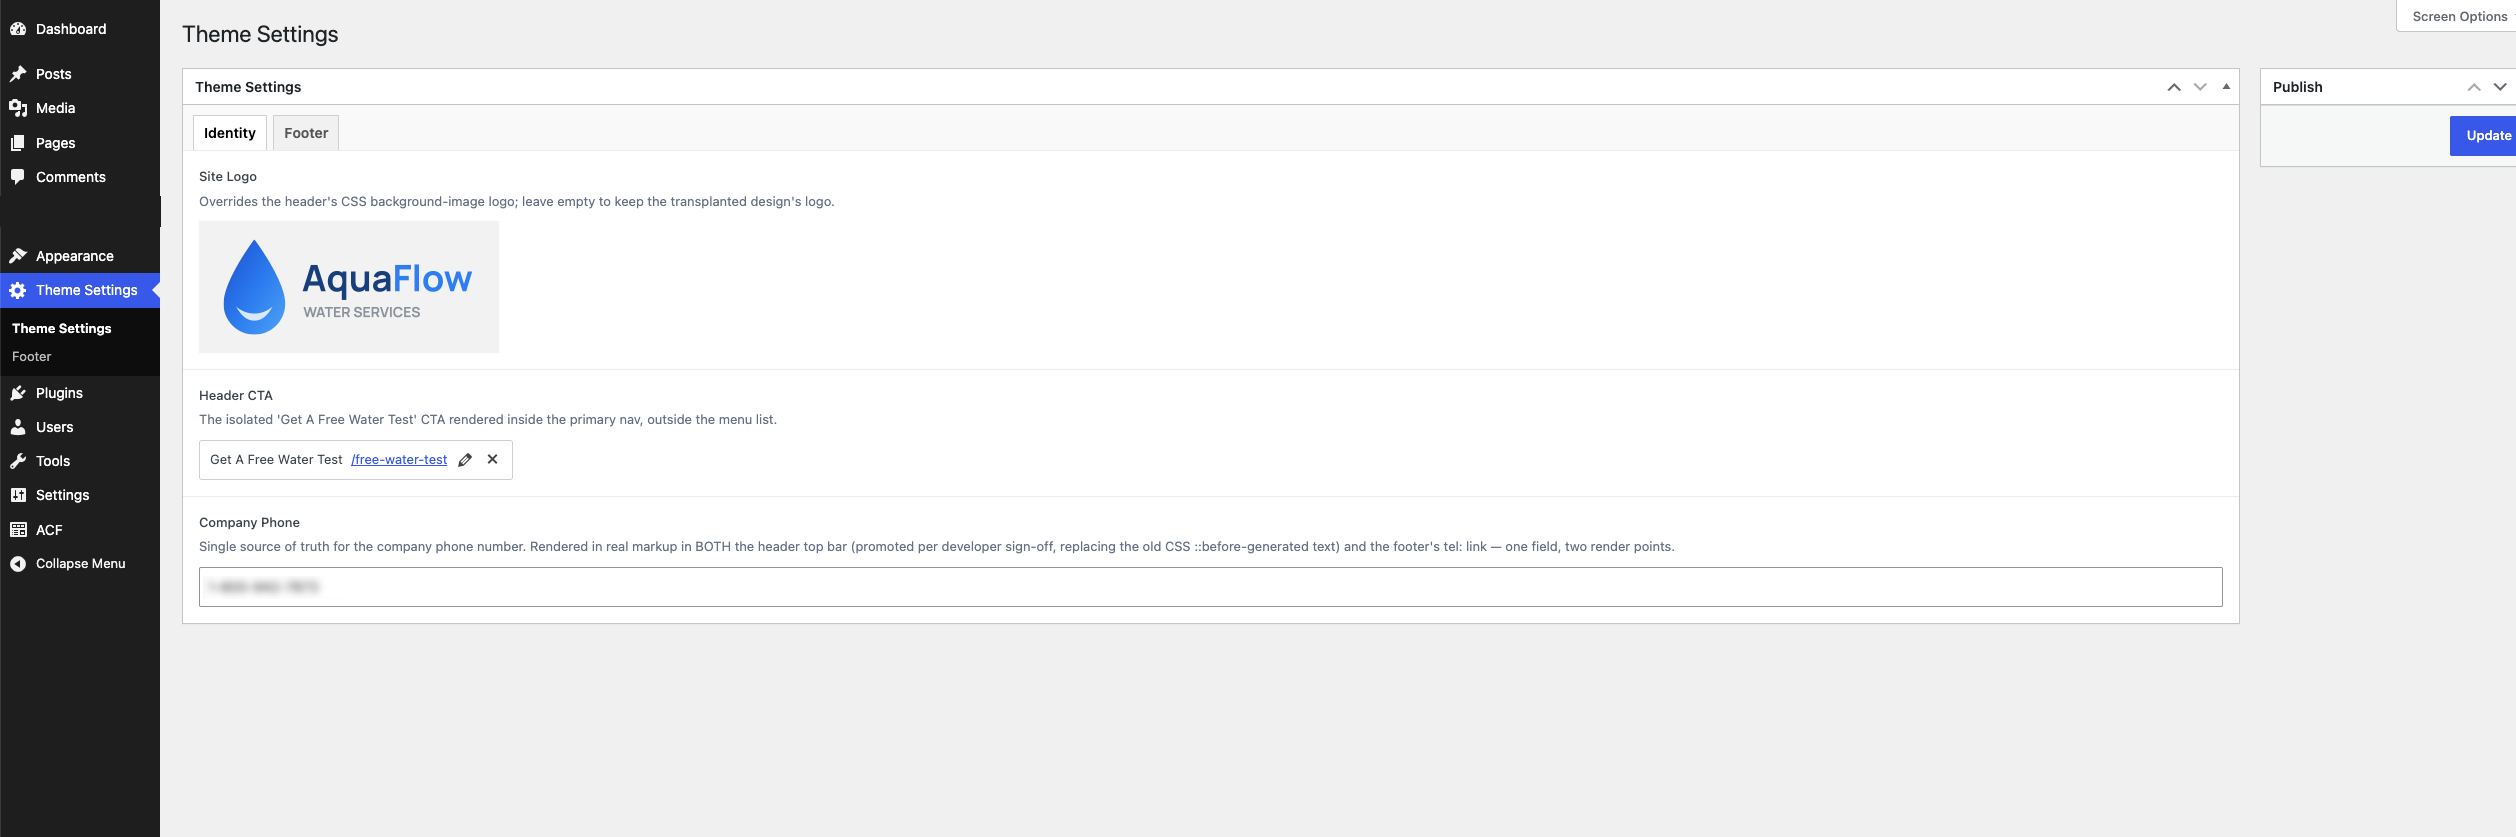
Theme Settings: the site logo, header button, and the promoted company phone, all site-wide editable fields.
A marketing team can now change any word, image, or button on this site without calling a developer. That’s the product.
Also read: How to Convert a Claude, v0, or Lovable Website Into a Real WordPress Site?
Does This Work With Elementor and Gutenberg Editor, or Only ACF?
Yes. ACF is the most mature workflow, but the same disciplined process runs against Elementor today, with Gutenberg in active development.
The run above used ACF, which is our most mature workflow: over 100 builds delivered, trained on live client projects until the output reached developer-ready quality. But a large share of agency work lands in Elementor, and the Elementor agent (50+ builds delivered) follows the same principles against a different target.
The sequence there runs through widget mapping, global settings, Theme Builder, the Elementor build itself, responsive and performance work, and QA. In practice, that means:
- Every component maps to a native Elementor widget, with real settings, not an HTML widget containing generated markup
- Flex containers on the current container architecture, rather than legacy sections and columns
- Global colors and typography set from your Figma design tokens, so a brand change is one edit, not forty
- Headers and footers as Theme Builder templates, where Elementor expects them to live
- Responsive settings configured per breakpoint inside the builder
The rule is identical to the ACF rule, just expressed differently: the goal is never to paste generated HTML into a widget box. If it were, the client would get a page that looks right and edits like a brick.
Gutenberg is in development on the same architecture: native blocks and patterns the client edits in WordPress itself. If your agency standardizes on a different builder, we can train an agent for that stack.
If you are still weighing ACF against Elementor and Gutenberg for your own projects, our guide to Best WordPress page builders for agencies breaks down the tradeoffs in more depth.
Why Does an AI-Powered Figma to WordPress Process Matter for Agencies?
Here’s what an AI-powered Figma to WordPress conversion actually delivers, measured rather than promised:
- Speed. If you’re after the fastest way to get from Figma to WordPress with AI in the loop, without sacrificing fidelity, this is it: the entire journey (reading the design, planning, building, deploying, QA, and the final audit) completes in hours, not weeks. The exact time varies with the size and complexity of the design, but design to editable site happens inside a day.
- Fidelity you can verify. Not “pixel perfect” as a slogan: 1.0000 / 0.9989 / 0.9973 as measurements, from an auditor that calibrates itself before scoring.
- Editability, proven, not promised. A dedicated gate verified that 100% of the visible content is editable, the most common failure of converted sites, checked mechanically before acceptance.
- Accountability at every step. Human approval gates, every decision recorded, every generated line traceable to an approved plan. Automation did the labor. People made the calls.
The honest summary: AI removed the repetitive production work. It did not remove a single decision.
Every gate in the flow above is a human gate by design. The extraction agent flags rather than guesses. The planner refuses to resolve open questions. The spec gate surfaces quirks instead of fixing them. The classification plan is marked not approved until someone approves it. Nothing publishes itself.
And after the pipeline finishes, the work is not done. Senior WprdPress developers with 10+ years of experience harden the architecture, optimize performance, and enforce WordPress coding standards. Human QA then tests responsive behavior, cross browser rendering, and accessibility on real devices. Every project, every time.
That is the part a tool cannot sell you. Our AI agents, skills, and infrastructure are operated by 100+ WordPress developers, against lessons encoded from 15,000+ builds. The AI gets the site to developer-ready. The developers get it to client-ready.
The distinction that matters: AI accelerates production. Developers remain responsible for delivery quality. Anyone can generate a page. The question is whether it survives review, handoff, search, accessibility standards, a builder update, and the next developer.
How Does E2M’s Figma to WordPress AI Service Help Your Agency?
Working with a Figma to WordPress AI agency changes three things for your business: how fast you can say yes to a project, how much of your senior developers’ time goes to new work instead of repetitive builds, and how confidently you can hand a finished site to a client.
Here is what that looks like in practice.
- Faster development on suitable projects. In our experience, the AI-assisted workflow runs roughly 30 to 50% faster than fully manual Figma to WordPress development. Actual savings depend on the Figma file’s quality and structure, the number of unique templates, animations, integrations, and custom functionality. We give a fixed quote after the design review, so there are no surprises in either direction.
- More predictable delivery. Gated, recorded steps produce fewer late surprises than a long silent build followed by a big reveal.
- Less repetitive manual work. Your developers, or ours, stop hand-coding the same hero, card grid, and footer for the fortieth time and spend their hours on architecture, integrations, and the parts clients actually notice.
- Clients who can edit their own site. Verified mechanically, before acceptance, not assumed.
- Maintainable builds. Native fields and widgets, standard theme structure, clean escaped code, and a trusted plugin stack rather than thirty random ones. Another developer can pick it up.
- More capacity without proportional hiring. The realistic version of this claim: you take on more projects without adding a developer for each one. Not: you never need developers.
- White label web delivery. Your brand, your client relationship, complete source code ownership, iron-clad NDAs. Your Figma files stay confidential and are never used to train publicly available AI models.
If you would like us to run one of your designs through it, you can see how the White Label Figma to WordPress AI service works for agencies or send over a Figma file and we will come back with a technical review and a fixed quote.
Already generated the site with an AI coding tool instead of designing it in Figma? That’s a different starting point, our Vibe Coded to WordPress service handles that, and we’ll tell you honestly which path fits your project better.
You bring the design. The pipeline brings it to life, measurably, verifiably, and ready for your client’s team to make it their own.
Weighing whether to build this capability in-house or bring in a partner? Our breakdown of how to price your WordPress development services is a useful place to start the internal math.
Frequently Asked Questions About Figma to WordPress AI
Yes. E2M’s AI agents pipeline reads a Figma file, builds a validated HTML version of it, then converts that HTML into a WordPress theme with editable fields, and every run ends with a numerical fidelity audit rather than a visual guess. The catch is that AI alone should not be the whole answer: the process only works because human checkpoints approve the plan, the blueprint, and the final QA before anything ships.
It is, if the pipeline is built to prove it rather than assume it. Steps 10 through 13 above convert every section into named ACF fields, and Step 15 runs a dedicated backend gate that checks 100% of visible content is editable from the WordPress dashboard before the site is accepted.
For most marketing sites, the full journey, from reading the design to a final audited WordPress theme, completes in hours rather than weeks, with design to editable site happening inside a day. Larger or more custom projects (unique templates, animations, integrations) take longer, which is why E2M gives a fixed quote after reviewing the actual Figma file.
The fastest reliable way is a pipeline that never re-types the design: preserving the original markup byte for byte and swapping only the pieces that need to become dynamic, then measuring the result against the source instead of eyeballing it. That is the transplant method described in Step 12, and it is why this approach can move quickly without trading away fidelity.
ACF is E2M’s most mature track record with 100+ builds delivered. The Elementor agent has shipped 50+ builds using the same principles, and Gutenberg support is in active development. Agencies standardized on a different builder can ask about training an agent for that stack.
Yes. The build ships under your brand, with complete source code ownership and an NDA covering the engagement. Your client relationship stays yours, and your Figma files are never used to train publicly available AI models.
It gets caught before launch, not after. Every stage has a review gate (design plan, website blueprint, ACF architecture) where a human signs off before the next agent starts, and two separate QA passes (one after the HTML build, one after WordPress deployment) compare the output against the original design and log every deviation. The final audit then scores the live site numerically so nothing is left to a visual impression.
A clean, standards compliant WordPress theme with proper heading structure and fast load times gives your content a better foundation to be crawled and understood, but showing up in AI Overviews and AI Mode is a separate discipline from how the site is built. See our guide on optimizing for Google AI Mode for the content and technical steps that actually move that needle.
If your agency is evaluating AI assisted White label WordPress development (ours or anyone’s), the questions worth asking are the ones this guide tried to answer with screenshots: where does it stop and ask a human, how does it prove the site is editable, and can it show you a run where QA failed first?
If you would like us to run one of your designs through it, you can see how the service works for agencies or send over a Figma file and we will come back with a technical review and a fixed quote. If you have already generated the site with an AI coding tool rather than designing it in Figma, that is a different starting point we also handle, and we will tell you honestly which path is better for the project.
You bring the design. The pipeline brings it to life, measurably, verifiably, and ready for your client’s team to make it their own.
Book a Growth Call and bring your next Figma file. We’ll tell you honestly whether AI assisted delivery is the right fit before you commit to anything.