
If you’re running an e-commerce website using Shopify, it’s essential to keep up with the latest Shopify updates to stay ahead of the competition. In 2023, the number of Shopify stores has surpassed 6.3 million, spanning 175 countries worldwide. Notably, Shopify has established its dominance in the U.S. e-commerce market, holding a significant 19.8% market share.
With such a massive user base, Shopify is always working on new features and functionalities to cater to its users’ needs. As a White-Label Shopify Development Partner, we keep ourselves up-to-date with the latest trends and updates.
These recent Shopify updates will help you improve your online store and keep up with the ever-changing e-commerce landscape.
I. Automated Collection with Metafield
Automated collections using metafield can help you create more accurate collections for your products on Shopify. Metafields are custom fields that allow you to add extra information to your products, such as color, size, or material.
Shopify now allows you to add metafield conditions to automated collections. This means that you can create more accurate automated collections for your products based on the product’s metafields.
Once you add metafields to a product, the product will get automatically added to the corresponding automated collection.
To add metafield conditions to a collection, you need to follow these steps:
Step 1: Creating a Metafield for the Product
First, you need to create a metafield for your product or variant. Go to the “Custom Fields” section in your Shopify settings and select “Add a Custom Field.”
With the recent Shopify updates, it’s now easier to add important information about your products using metafields. You can choose from four types of metafields:
- Single Line Text
- Integer
- Decimal
- True or False
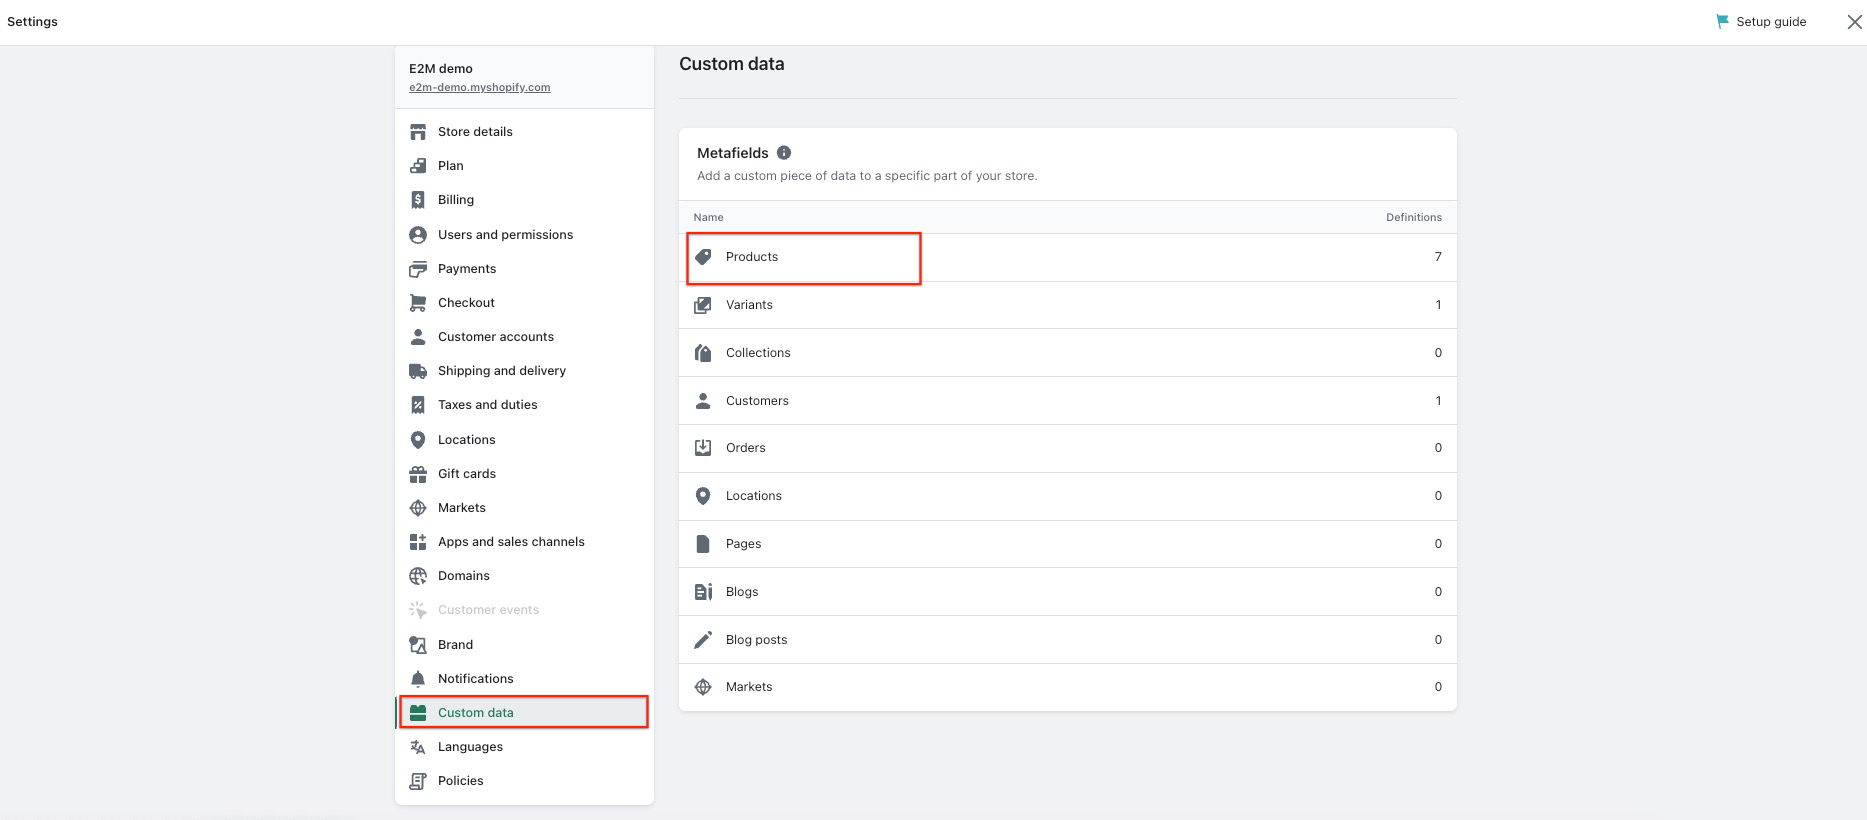
If you want to create pre-defined values for your metafield, select “List of Values.”
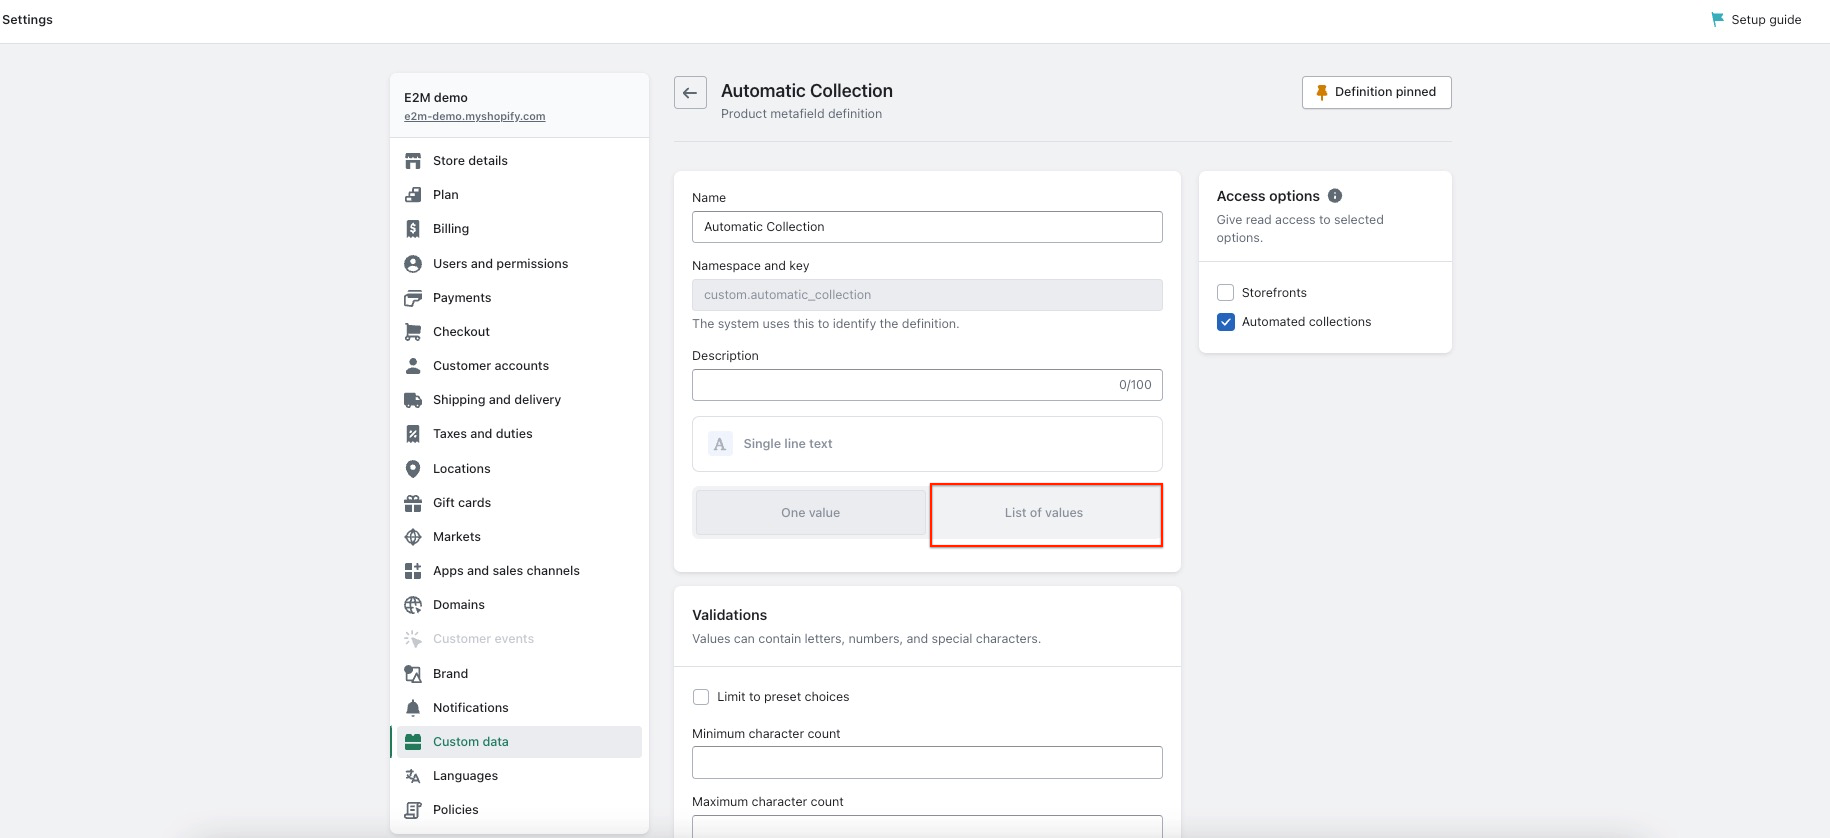
Step 2: Setting up Automated Collections
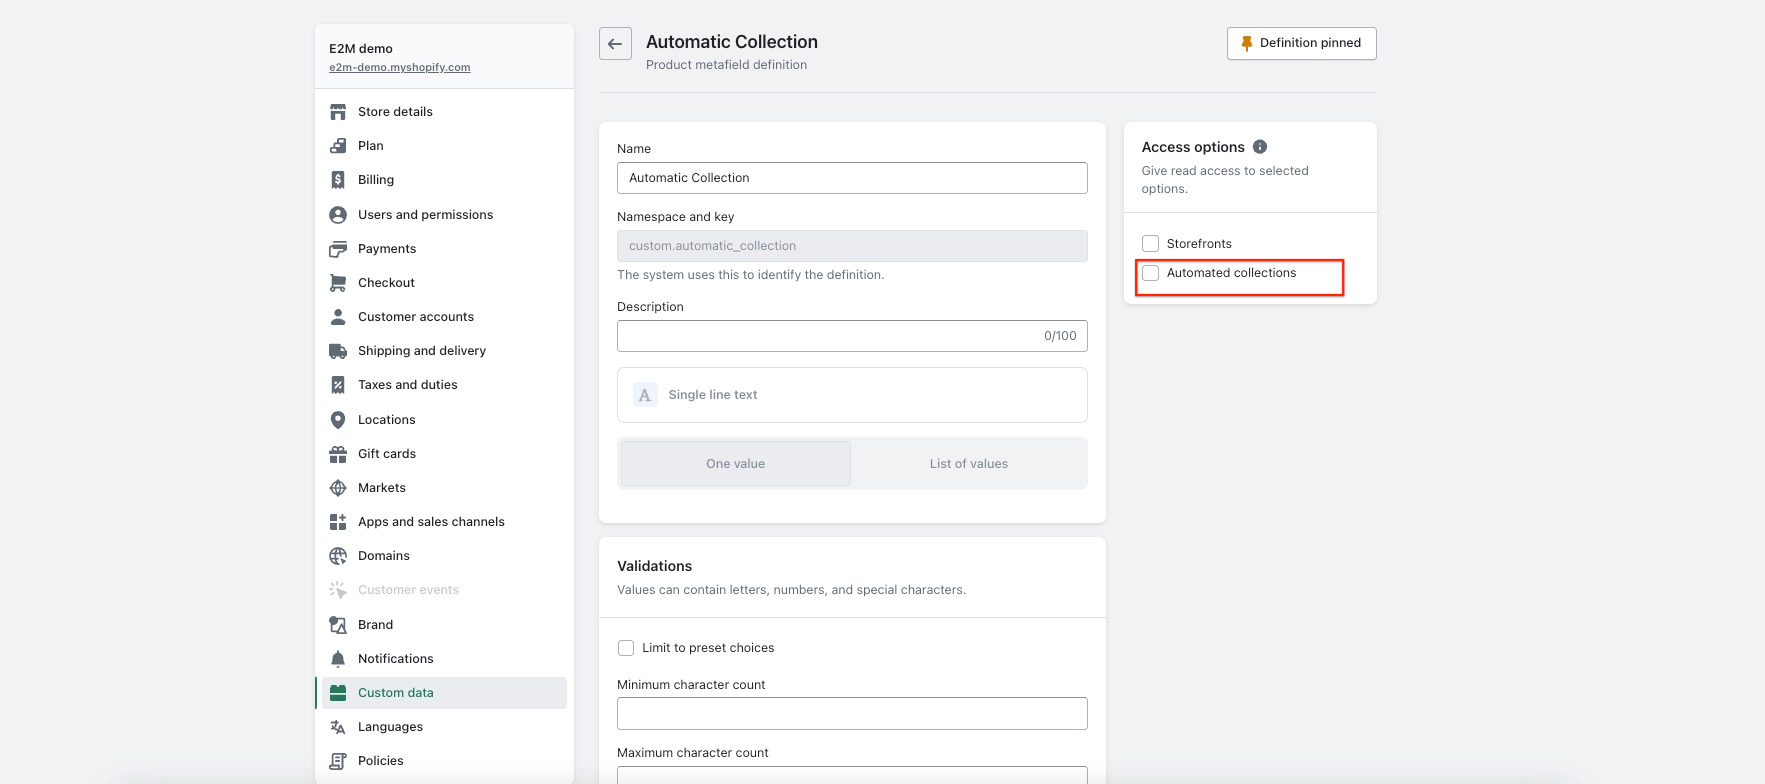
Once you have created your metafield, you can set up automated collections based on that metafield value. Go to your Shopify dashboard’s “Automated Collections” section and select “Create Automated Collection.”
From there, you can select the metafield you created earlier and set the conditions for your collection. This Shopify update lets you organize products into custom collections, simplifying inventory management.
Step 3: Creating a Collection
After setting up automated collections, you can create a new collection. Go to the “Collections” section in your Shopify dashboard and select “Create Collection.”
In the “Conditions” section, select the metafield you want to use for your collection and set the value for that metafield. This will automatically add products that match your metafield condition to your collection.
Follow these steps, to create automated collections with metafield for your products or variants. This can help you better organize your products and make it easier for your customers to find what they want for your online store.
To learn more about automated collections click here.
II. Checkout Extensibility
Starting August 13, 2024, checkout. liquid will no longer work for in-checkout pages. This means if you currently customize your in-checkout pages with checkout. liquid need to upgrade to checkout extensibility before this date.
You must use the Checkout API to customize your shipping and payment pages. Customizations done outside of this API will not be supported.
When you upgrade to checkout extensibility, you can benefit from enhanced checkout experiences and improved customer satisfaction.
Here’s how:
- Step 1: Navigate to the Shopify Checkout API section of the Shopify Developers website.
- Step 2: Familiarize yourself with the Checkout API and its capabilities.
- Step 3: Customize your in-checkout pages using the Checkout API.
- Step 4: Test your changes to ensure they work correctly.
This update will allow you to personalize your checkout experiences and give customers more information to make informed decisions during checkout.
III. Creating Section Groups in Shopify Themes
Shopify has introduced a new feature that allows you to create section groups in your theme’s layout. Section groups are JSON containers that will enable store owner to add, remove, and reorder sections in areas of the layout file, such as the header and footer.
With this Shopify update, you can easily customize and rearrange sections in your theme’s layout. This feature promises a more streamlined and efficient workflow for online stores.
To add a section group, follow these steps:
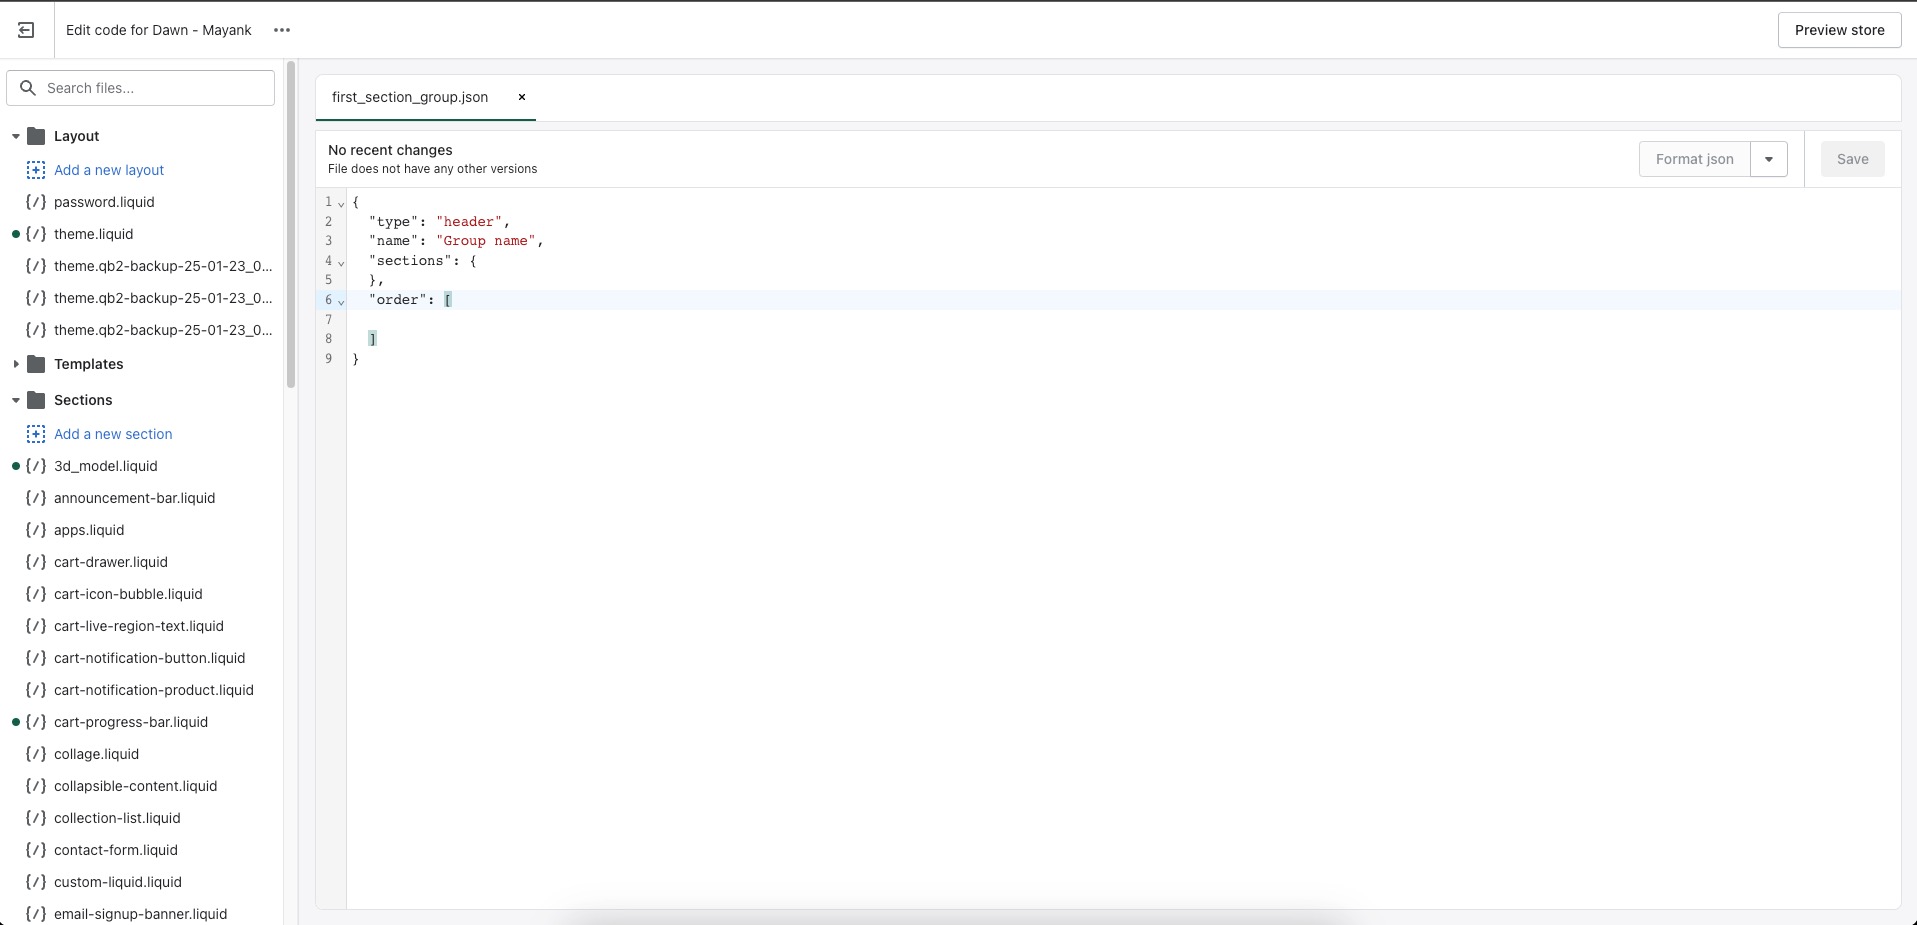
- Step 1: Navigate to “Edit Code” in your Shopify store.
- Step 2: Go to “Sections” and click on “Add a new Section” to add a new section.
- Step 3: Add a file name and append “.json” to it to create a new JSON file.
- Step 4: In the JSON file, add the following four attributes: “Type”, “Name”, “Sections”, and “Order”. These attributes are mandatory, without any of the elements JSON file will not save. if any of them is missing, it will give an error.
- Step 5: We can have one of the following values: “header”, “footer”, “aside”, or “custom. <name>” for the “Type” attribute.
- Step 6: “Name” attribute can be any name that you need to assign to the section group.
- Step 7: “Section” attribute has all the values that we added from Shopify Customizer. It will be generated by Shopify automatically based on the content that we add. We strongly recommend DO NOT EDIT that JSON file manually.
- Step 8: “Order” attribute defines the number of blocks that we added to the specific sections. It will be automatically changed when we change the order from the customizer. Order attributes define the ordering for the blocks.
- Step 9: Now that you have created the section group JSON file, the question arises of how to link it to the customizer and how it will appear in the customizer. To do this, you can add the following code to your liquid file:
- {% sections “Section_group_file_name” %}
- Step 10: This will link the section group file to the customizer. Once linked, you will be able to add multiple sections to that section group, as shown in the image below:
Overall, this new feature provides Shopify store owners like you with great flexibility and customization options for creating and managing sections in your layout file.
Note:
- Section groups created in Shopify will not appear in the customizer by default. If you want to add a section group, you will need to do so manually in the file from the liquid code.
- However, Shopify has recently introduced a new functionality on section schema that enables you to make your custom “.liquid” section visible in specific section groups.
- The “enabled_on” and “disabled_on” attributes in the schema can be used to accomplish this task. You can better organize your custom “.liquid” sections and use them in specific section groups with this Shopify Update.
- For example, if you have two section groups named “group1.json” and “group2.json” and a section file named “section_file.liquid”, you can use the “enabled_on” attribute in the schema to make the “section_file.liquid” section visible only in “group1.”
- On the other hand, you can use the “disabled_on” attribute to hide the “section_file.liquid” section in “group1” and show it in all other groups.
- The “enabled_on” and “disabled_on” attributes accept two arguments: “template” and “groups”. You can use both at the same time or one of them. The “template” argument allows all types of pages, and [“”] allows all pages.
- The “groups” argument allows you to add section group types, such as header, footer, aside, and custom. <name>. [“”] allows all types of sections.
- If you use “enabled_on” with both the template and group arguments, it means that your section will only show up in that template’s section group. The same will work in “disabled_on” but in reverse.
Learn more about “enabled_on” and “disabled_on” here, You can also read about section groups here.
IV. Shopify’s Meta Object Field Feature
Shopify’s Meta Object Field feature is an easy way to add and store structured information for your store. It allows you to store information about a product, such as its features, specifications, and size charts, which can then be retrieved and edited from the Shopify Admin.
This feature can be used for products, collections, customers, orders, and other parts of your store. This update makes managing and updating your store more effortless and efficient.
Meta Objects are accessible through Shopify Admin, as well as through the StoreFront API and Meta Object API. This feature enables third-party applications to access and interact with Meta Objects.
This means that you can use Meta Objects to create a wide range of customizations and integrations with your store.
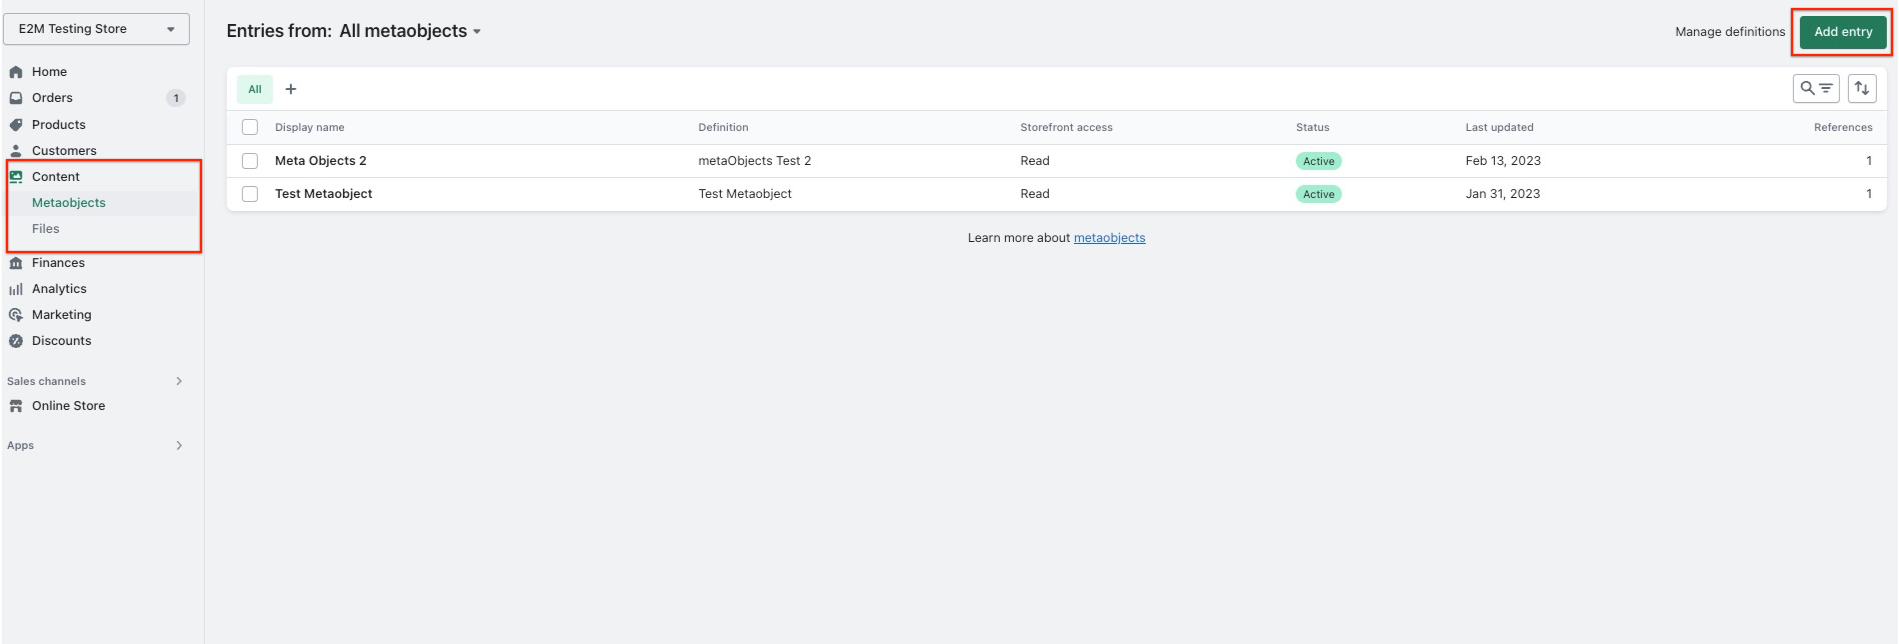
Setting up Meta Objects
Setting up Meta Objects is a straightforward process. There are two key elements to Meta Objects: the group of fields that describe an object’s structure, and the content or data of the Meta Objects.
- You can manage the structure of the Meta Objects from the Settings > Custom data section in your Shopify admin, where you can add or remove fields and define their data types.

- You can then manage the content or data of the Meta Objects from the Content > Meta Objects section in your Shopify admin, where you can add or edit the information stored in each Meta Object.
It’s important to stay updates with the latest Shopify updates to ensure your Meta Objects function correctly.
When creating Meta Objects in Shopify, it’s important to keep a few things in mind to ensure they function correctly.
- First, you should give each Meta Object a clear and concise name to help you identify it within the Shopify Admin dashboard. Next, you should assign a type to the Meta Object, which will be used to identify it in the APIs.
- In addition to the name and type, you must define the fields that make up the Meta Object. These fields will determine the type of content that can be added to the Meta Object.
- Each field will have its own details, including a name, description, type, and validation rules character limits, minimum and maximum values, or present values.
- Once your Meta Object has been created, you can begin building entries for it. These entries can be added to your store’s products, collections, customers, orders, and other parts. You can also reference Meta Objects within different areas of your store or through third-party apps.
- When it comes to displaying Meta Objects on your online store, you can take a few different approaches. You can display Meta Objects directly on product pages, for example, or use them to create custom fields in your checkout process.
Ultimately, Meta Objects aims to provide a flexible and powerful tool for managing structured data and schema mark-up in your store. When you follow the best practices and carefully design your Meta Objects, a Shopify update can help you create a more effective and efficient e-commerce experience for your customer.
Creating Metafield References for Specific Shopify Parts
To work with specific parts of Shopify, like products, orders, or customers, you can use Meta Objects by creating a metafield reference.
For instance, if you have a “Product features” Meta Object that you want to display on your product pages, you can create a product metafield that refers to this specific Meta Object.
This reference allows you to showcase unique “Product features” on specific products. For example, you can add reference entries like “Sustainability” on Product A and “Materials” on Product B.
ThisShopify updateis excellent, as it increases efficiency and helps create better user experiences.
You can learn more about reference Meta Objects by clicking here:
Displaying Metafields in Your Shopify Online Store.
To display Meta Objects on your online store, you have two options: connect metafields to your theme using the theme editor or edit your theme code to add Meta Objects.
Keeping up with the latest Shopify updates is essential to ensure you’re using the most efficient method.
Here are the steps for each option:
Connect Metafields to Your Theme Using the Theme Editor:
- Go to your Shopify admin and click on Online Store > Themes.
- Find the theme you want to edit and click on Customize.
- Navigate to the part of your template where you want the Meta Object reference to appear.
- Select an existing section with blocks or add a new one with blocks.
- Click on the block you want to connect to the Meta Object reference.
- Next to the block name, click on the Connect dynamic source icon.
- Select the Meta Object reference(s) you want to display with this block.
Edit Your Theme Code to Add Meta Objects:
- Only attempt this option if you have coding experience.
- Go to your Shopify admin and click on Online Store > Themes.
- Find the theme you want to edit and click on Actions > Edit code.
- In the left-hand menu, navigate to the template where you want to add the Meta Object reference.
- Use Liquid to reference the metafield(s) in your page templates.
- Save your changes and preview your theme to ensure the Meta Object reference appears as expected.
Note that if your theme is a vintage theme that doesn’t support metafields, you’ll need to edit the code to add metafield types.
This update makes it easier to customize page designs and create a unique look for the stores.
V. Optimizing Code with Shopify Liquid Prettier Plugin
The Shopify Liquid Prettier Plugin (1.0.0) effectively allows developers to format the code to a consistent code style instantly. It is a valuable tool for Shopify updates, eliminating the need to discuss style guidelines.
This plugin is available in the browser, terminal, or within your favorite code editor. With it, you can save time and effortlessly maintain high-quality code.
It is available with a few popular text editors, including Visual Studio Code, Vim, and WebStorm.
Install and configure the plugin in your preferred editor to get started. This will help you create cleaner, easier-to-read code and simplify debugging and maintenance tasks.
a. Visual Studio Code
Developers across the world use Visual Studio Code. Let’s learn about the two extensions that can help with formatting code, Shopify Liquid Prettier Plugin, and Prettier.
Shopify Liquid Prettier Plugin
Shopify Liquid Prettier Plugin is a built-in feature in Shopify Liquid, which helps to format Liquid code. To use this plugin, you can add the following code in the settings.json file of your store:
{

"[liquid]": {

"editor.defaultFormatter": "Shopify.theme-check-vscode",

"editor.formatOnSave": true

},

}
Add this configuration to apply formatting automatically to Liquid code on save.
Prettier
Prettier is an extension that can be downloaded from the Visual Studio Code Marketplace. To use Prettier with Shopify Liquid, you must install the Shopify Liquid Prettier Plugin locally in your repository.
To install the plugin, you can use either npm or Yarn:
npm install –save-dev prettier @shopify/prettier-plugin-liquid
yarn add –dev prettier @shopify/prettier-plugin-liquid
After installing the plugin, Prettier will format your code automatically based on the rules set in the plugin. This can help save time and ensure consistency in code formatting, making it easier to read and maintain.
Keeping up with Shopify updates can ensure your app or theme remains compatible with newly introduced features or changes.
b. Vim
Vim is also a popular text editor. Let’s explore how to use Vim Prettier with Shopify Liquid, a plugin that can help to format your code.
- Step 1: Install Vim
To get started, you’ll need to install Vim on your machine. You can download the latest version of Vim from the official Git repository, available here.
- Step 2: Install Vim Prettier
Next, you’ll need to install Vim Prettier, a plugin that allows you to format your code using Prettier from within Vim. You can find the plugin on the official Git repository here.
- Step 3: Install Shopify Liquid Prettier Plugin
To use Prettier with Shopify Liquid, you must install the Shopify Liquid Prettier Plugin locally in your repository. You can do this using either npm or Yarn. Run the following command to install the plugin using npm:
npm install –save-dev prettier @shopify/prettier-plugin-liquid
Alternatively, you can use Yarn to install the plugin:
yarn add –dev prettier @shopify/prettier-plugin-liquid
After installing the plugin, Prettier will format your code automatically based on the rules set in the plugin. This can help save time and ensure consistency in code formatting, making it easier to read and maintain.
Moreover, keeping up with Shopify updates can help ensure your code remains compatible with the latest versions of Shopify and other dependencies.
c. WebStorm
WebStorm is an Integrated Development Environment (IDE) for web development that provides advanced coding assistance, debugging tools, and support for popular web technologies.
To use Shopify Liquid Prettier plugin in WebStorm, you need to follow the below steps:
- Step 1: Install the Prettier Plugin from the JetBrains Plugins Marketplace. You can find the plugin here – https://plugins.jetbrains.com/plugin/10456-prettier.
- Step 2: Install the Shopify Liquid Prettier Plugin locally in your repository. You can install it using either npm or Yarn. To install it using npm, run the following command:
- npm install –save-dev prettier @shopify/prettier-plugin-liquid
- Alternatively, if you prefer using Yarn, run the following command:
- yarn add –dev prettier @shopify/prettier-plugin-liquid
- Step 3: Restart WebStorm.
- Step 4: In WebStorm preferences, search for Prettier and update the “Run for files” option to include “liquid” files. You can also tick the “On save” checkbox to format files automatically on save.
- Step 5: Save your settings to activate the plugin.
With these steps, you can use the Shopify Liquid Prettier Plugin in WebStorm to format your Liquid code automatically and improve your code’s readability.
It’s important to keep up with Shopify updates, updating the Shopify Liquid Prettier Plugin in WebStorm. When you regularly update a plugin, you can take advantage of new features and improvements, ensuring that your Shopify app code is consistently formatted correctly and easy to read.
Conclusion
As you can see, Shopify updates can bring a lot of improvement to how your online store operates. Armed with these updates, you can leave your competitors behind. And taking advantage of these valuable updates is now easier than ever with our white-label Shopify development services.
At E2M, we’re committed to your success and are more than happy to assist you with any questions you may have about these updates. We believe in your business and want to see it soar to new heights. Reach out to us if you need any assistance.
Take advantage of these valuable updates, and make sure your store is up to date with the latest Shopify innovations.