How to install Google Tag Manager ( GTM ) on Shopify?
Phase One: Add GTM container code and customer details script to the theme.liquid under <head>.
- Sign in to your Gmail account.
- Go to Google Tag Manager.
- Select the correct GTM Account.
- Click on the GTM Container ID.
- Copy the first script of the GTM container code that includes instructions to paste the code into the <head> section.
- Log in to your Shopify store and click on Themes under Online Store on the left-hand side of navigation panel.
- Click on Edit Code under the Actions drop-down.
- Click on the theme.liquid under Layout.
- Paste the copied GTM container code (on step 5) as high in the <head> of the page as possible.
- Copy the below-mentioned customer details script and paste it into the <head> section, above the GTM container code.
- Click Save on the theme.liquid towards the right-hand side top corner.
Step 1: Sign in to your Gmail account.
Step 2: Go to Google Tag Manager by following this link: https://tagmanager.google.com/
Step 3: Select the correct GTM Account

Step 4: Click on the GTM Container ID

Step 5: Copy the first script of the GTM container code that includes instructions to paste the code into the <head> section.

Step 6: Now login to your Shopify store and click on Themes under Online Store on the left-hand navigation panel.

Step 7: Click on Edit Code under the Actions drop-down.

Step 8: Click on theme.liquid under Layout.

Step 9: Paste the copied GTM container code (on step 5) as high in the <head> of the page as possible.
Step 10: Copy the following customer details script. Now, paste it into the <head> section above the GTM container code, as shown in the below image. This script will help pass the USER-scoped data to the GA4.
<script>
   window.dataLayer = window.dataLayer || [];
    window.dataLayer.push({
    {
        %
        if customer %
    }
    userType: "member",
    customer: {
        id: {
            {
                customer.id
            }
        },
        lastOrder: "{{ customer.orders.first.created_at | date: '%B %d, %Y %I:%M%p' }}",
        orderCount: {
            {
                customer.orders.size
            }
        },
        totalSpent: {
            %
            if customer %
        } {
            % assign total_spent = 0 %
        } {
            %
            for item in customer.orders %
        } {
            % assign total_spent = total_spent | plus: item.total_net_amount %
        } {
            % endfor %
        } {
            {
                total_spent | money_without_currency | remove: ","
            }
        } {
            %
            else %
        }
        "" {
            % endif %
        },
        tags: {
            {
                -customer.tags | json -
            }
        }
    },
    {
        %
        else %
    }
    userType: "visitor",
    customer: {
        id: "",
        lastOrder: "",
        orderCount: "",
        totalSpent: "",
        tags: ""
    },
    {
        % endif %
    }
    });
</script>
Step 11: Click Save on the theme.liquid towards the right-hand side top corner.

Well Done !!
You have finished the first phase of adding GTM container code to Shopify. Next, you will need to add GTM container code, customer details script, and purchase Data Layer on the checkout page.
Phase Two: Add the GTM container code and customer details script and purchase Data Layer to the checkout page.
- On Shopify store admin, click on the Settings in the left bottom corner.
- Click on Checkout and accounts
- Scroll Down and look for the Additional Scripts below the order in the status block.
- Paste the GTM container code first. Now, copy the following customer details script and paste it above the GTM container code.
- Copy and Paste the following purchase Data Layer between the customer details script and the GTM container code.
Step 1: On Shopify store admin, click on the Settings in the left bottom corner.

Step 2: Click on Checkout and accounts.

Step 3: Scroll Down and look for the Additional Scripts below the order in the status block.

Step 4: Paste the GTM container code first. Now, copy the following customer details script and paste it above the GTM container code.

Step 5: Copy and Paste the following purchase Data Layer between the customer details script and the GTM container code.
<script>
{
   %
   if first_time_accessed %
}
window.dataLayer.push({
   'page_type': 'purchase',
   'event': 'purchase',
   /* create a custom event in GTM */
   'transaction_id': '{{ order.name || order.order_number }}',
   'totalValue': {
      {
         total_price | money_without_currency | remove: ','
      }
   }, // Includes tax & shipping
   'subtotalValue': {
      {
         subtotal_price | money_without_currency | remove: ','
      }
   },
   'tax': {
      {
         tax_price | money_without_currency | remove: ','
      }
   },
   'shipping': {
      {
         shipping_price | money_without_currency | remove: ','
      }
   },
   'currency': '{{ shop.currency }}',
   'payment_type': '{{ order.transactions[0].gateway }}', //optional parameter
   'ecommerce': {
      'checkout_currency': '{{ checkout.currency }}',
      'value': '{{ checkout.total_price | money_without_currency | remove:',
      ' }}', // order total (price of all products + shipping)
      'tax': '{{ checkout.tax_price | money_without_currency | remove:',
      ' }}', // tax
      'shipping': '{{ checkout.shipping_price | money_without_currency | remove:',
      ' }}', // shipping costs
      'transaction_id': '{{ transactions[0].id }}', // transaction id
      'items': [{
            %
            for line_item in line_items %
         } {
            'item_name': '{{ line_item.product.title | replace: "'
            ","
            # # @ @singleinvertedcomma @ @ # # " }}'.replace("
            # # @ @singleinvertedcomma @ @ # # ", "
            '"),
            'item_id': '{{ line_item.sku || line_item.product.id }}',
            'price': {
               {
                  line_item.final_price | money_without_currency | remove: ','
               }
            },
            'item_brand': '{{ line_item.vendor }}',
            'quantity': {
               {
                  line_item.quantity
               }
            },
            'item_variant': '{{ line_item.variant.title }}'
         },
         {
            %
            endfor %
         }
      ]
   }
}); {
   %
   endif %
}
</script>
Step 6: Click Save at the right-hand side bottom corner.
Congratulations! You have successfully added GTM container code on Shopify. Now we will continue and create Data Layer variables on the GTM before making GA4 Page View Tag. When the page view tag gets loaded, these variables will allow us to collect and pass user-scoped data to GA4.
Create Data Layer Variables on the GTM
- Click on Variables on the left-hand navigation panel on GTM.
- Click New under User Defined Variables.
- Click anywhere on Variable configuration.
- Select Data Layer Variable under Page Variables.
- Assign Data Layer Variable Name.
- Rename the variable and Click Save.
Step 1: Click on Variables on the left-hand navigation panel on GTM.

Step 2: Click New under User Defined Variables.

Step 3: Click anywhere on Variable configuration.

Step 4: Select Data Layer Variable under Page Variables.

Step 5: Assign Data Layer Variable Name.

Step 6: Rename the variable and Click Save.

Following the above-mentioned steps, create the below-mentioned Data Layer variables.
| Datalayer Variable Name: | Rename the Variable |
|---|---|
| user_id | “dlv – customer – id – Variable” |
| customer.lastOrder | “dlv – customer – lastOrder – Variable” |
| customer.orderCount | “dlv – customer – orderCount – Variable” |
| customer.tags | “dlv – customer – tags – Variable” |
| customer.totalSpent | “dlv – customer – totalSpent – Variable” |
| customer.userType | “dlv – customer – userType – Variable” |
| event | “dlv – event – Variable” |
Create GA4 Page View Tag On GTM
- Go to Google Analytics and select GA4 property. https://analytics.google.com/
- Click on the Gear Icon bottom left hand.
- Click on the Data Stream under property level.
- Select the Web Stream and click on the arrow (>).
- Copy the GA4 Measurement ID.
- Go to Google Tag Manager. https://tagmanager.google.com/
- Click On Add a new tag.
- Click anywhere on the tag configuration.
- Select Google Analytics: GA4 Configuration.
- Paste the previously copied GA4 Measurement ID under the “Measurement ID” Box.
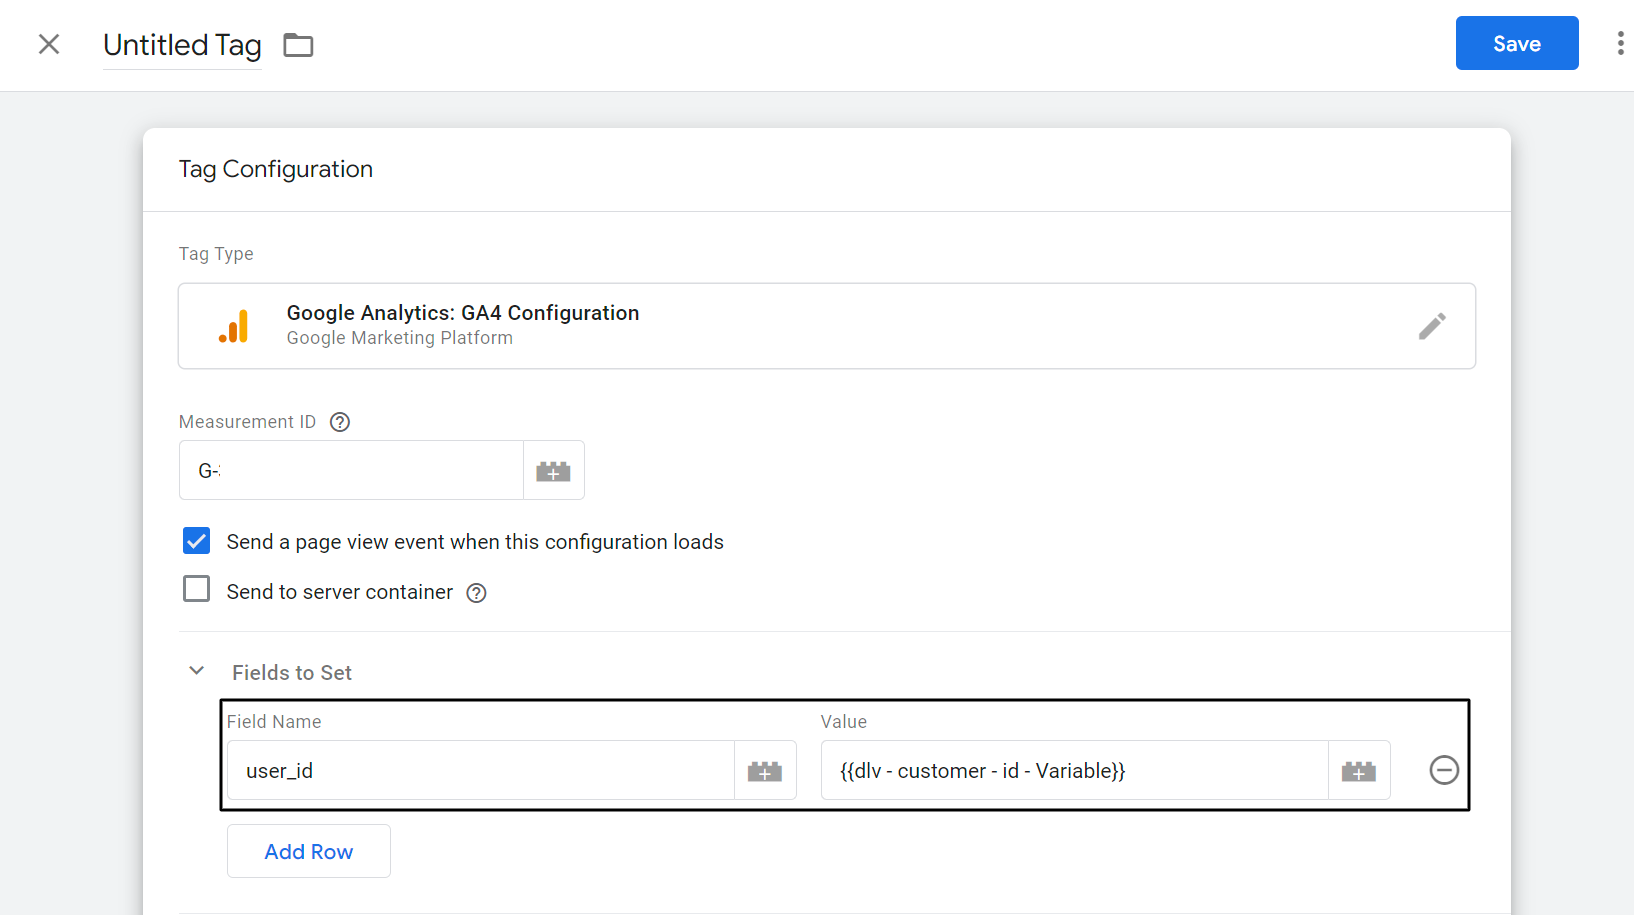
- Under Fields to set, click on the add row, then add the field name and its value.
- Under User Properties, add the following as Property Name and Value.
- Click anywhere on the Triggering.
- Select All Pages as a Trigger.
- Rename the Tag and click save.
Step 1: Go to Google Analytics and select GA4 property. https://analytics.google.com/
Step 2: Click on the Gear Icon bottom left hand.
Step 3: Click on the Data Streams under the property level.

Step 4: Select the Web Stream and click the arrow (>)
Step 5: Copy the GA4 Measurement ID.

Step 6: Go to Google Tag Manager. https://tagmanager.google.com/
Step 7: Click On Add a new tag.

Step 8: Click anywhere on the tag configuration.

Step 9: Select Google Analytics: GA4 Configuration.

Step 10: Paste the previously copied GA4 Measurement ID under the “Measurement ID” Box.

Step 11: Under Fields to set, click on the add row, then add the field name and its value as mentioned below:
Field Name: user_id
Value: {{dlv – customer – id – Variable}}
Step 12: Under User Properties, add Property Name and Value as mentioned below.
| Property Name | Value |
|---|---|
| customer_id | {{dlv – customer – id – Variable}} |
| last_order | {{dlv – customer – last order – Variable}} |
| order_count | {{dlv – customer – order count – Variable}} |
| total_spent | {{dlv – customer – total spent – Variable}} |
| user_type | {{dlv – customer – user type – Variable}} |

Step 13: Click anywhere on the Triggering.
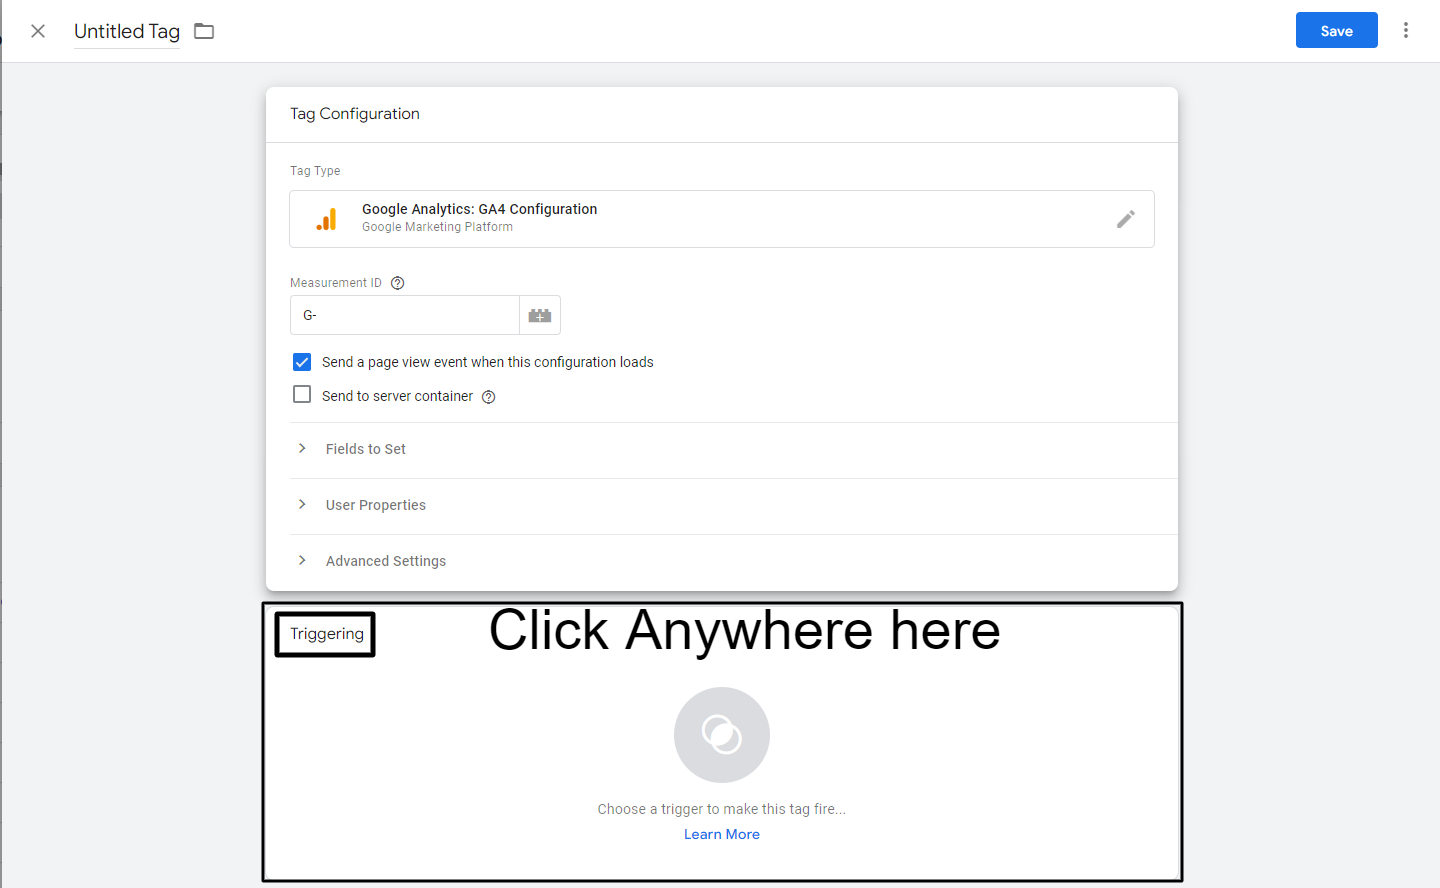
Step 14: Select All Pages as a Trigger.

Step 15: Rename the Tag.

Brilliant!
You have made the GA4 Page View Tag now.
Now let’s take a look at how to track the view_item event as and when someone views the product page and pass the necessary details to the GA4.
Track and pass view_item and purchase event data to GA4.
Add view_item Data Layer on Shopify.
- Log in to your Shopify store and click on Themes under Online Store on the left-hand navigation panel.
- Click on Edit Code under the Actions drop-down.
- Click on the main-product.liquid under Sections.
- Copy and Paste the below-mentioned Data Layer script.
- Click Save on the main-product.liquid towards the right-hand side top corner
Step 1: Log in to your Shopify store and click on Themes under Online Store on the left-hand navigation panel.
Section 2: Click on Edit Code under the Actions drop-down.
Section 3: Click on the main-product.liquid under Sections.

Step 4: Copy and Paste the below-mentioned Data Layer script.
<script>
   window.dataLayer = window.dataLayer || [];
        window.dataLayer.push({
        event: 'view_item',
        ecommerce: {
            items: [{
                item_name: '{{ product.title | replace: "'
                ","
                # # @ @singleinvertedcomma @ @ # # " }}'.replace("
                # # @ @singleinvertedcomma @ @ # # ", "
                '"),
                item_id: "{% if product.sku %}{{ product.sku }}{% else %}{{ product.id}}{% endif %}",
                price: "{{ product.price | money_without_currency | remove:',' }}",
                item_brand: "{{ product.vendor | remove: "
                '" | remove: '
                "' }}",
                {
                    %
                    for collection in product.collections %
                }
                item_category {
                    % unless forloop.index == 1 %
                } {
                    {
                    forloop.index
                    }
                } {
                    % endunless %
                }: "{{ collection.title }}",
                {
                    % endfor %
                }
                item_variant: "{{ product.selected_or_first_available_variant.title | remove: "
                '" | remove: '
                "' }}",
                quantity: '1'
            }]
        }
    });
</script>
Step 5: Click Save on the main-product.liquid towards the right-hand side top corner.

Create GTM Trigger for the view_item and purchase event.
- Go to Google Tag Manager.
- Click on Trigger on the left-hand navigation panel.
- Click New.
- Click anywhere on Trigger configuration.
- Select Custom Event under Other.
- Assign Event Name view_item.
- Rename the trigger CE – EEC – view_item – Trigger and Click Save.
NOTE:
- Assign Event Name as purchase
- Rename the trigger CE – EEC – purchase – Trigger and Click Save.
Step 1: Go to Google Tag Manager.
Step 2: Click on Trigger on the left-hand navigation panel.

Step 3: Click New.

Step 4: Click anywhere on Trigger configuration.

Step 5: Select Custom Event under Other.

Step 6: Assign Event Name view_item.

Step 7: Rename the trigger CE – EEC – view_item – Trigger and Click Save.

With these steps, you have created the view_item event trigger. Now you will need to make a purchase event trigger. To make a purchase event trigger, follow the first 5 steps above.
Step 8: Assign Event Name as purchase

Step 9: Rename the trigger as CE – EEC – purchase – Trigger and Click Save.

If you have followed all the steps, you have done almost everything to collect view_item and purchase event-related data from your Shopify store with the user-scoped data. Now let’s see how to pass these details to GA4 using Google Tag Manager.
Create GTM Tag for the view_item and purchase event.
- Click on Tag on the left-hand navigation panel.
- Click on the New.
- Click anywhere on Tag configuration.
- Select “Google Analytics: GA4 Event” under Featured Tag.
- In Configuration Tag, select “GA4 – Page View – Tag” from the drop-down.
- Assign Event Name. Select the previously made dataLayer variable – {{dlv – event – variable}}
- Click on More Settings and select Send Ecommerce Data under E-commerce. Select Data Layer as your data source.
- Click anywhere on Triggering.
- Select the previously created trigger “CE – EEC – view_item – Trigger” for the view_item event.
- Hover to the right top corner of the Trigger section and click on the pencil icon.
- Click on the plus icon now.
- Select the purchase event trigger named “CE – purchase – Trigger”.
- Rename the Tag: “GA4 – EEC event – Tag” and Click Save.
Step 1: Click on Tag on the left-hand navigation panel.

Step 2: Click on the New.

Step 3: Click anywhere on Tag configuration.

Step 4: Select “Google Analytics: GA4 Event” under the Featured Tag.

Step 5: In Configuration Tag, select “GA4 – Page View – Tag” from the drop-down.

Step 6: Assign Event Name. Select the previously made Data Layer variable – {{dlv – event – variable}}

Step 7: Click on More Settings and select the Send Ecommerce Data under E-commerce. Select Data Layer as your data source.

Step 8: Click anywhere on Triggering.

Step 9: Select the previously created trigger “CE – EEC – view_item – Trigger” for the view_item event.

Step 10: Hover to the right top corner of the Trigger section and click on the pencil icon.
Step 11: Click on the plus icon now.
Step 12: Select the purchase event trigger named “CE – purchase – Trigger”.

Step 13: Rename the Tag: “GA4 – EEC event – Tag” and Click Save.

Congratulations
With this guide, you can now track view product and purchase event data on GA4. You can also view the reports on GA4 by following these steps.
Step one: Go to the GA4 property.
Step two: Click on the Reports from the left navigation panel.
Step three: Click on the Monetization and then click on Ecommerce purchases.
If you wish to get the readymade GTM container for this guide, I highly recommend you to download the GTM recipe.
Download GTM Recipe
Conclusion
With this step-by-step guide, I have pulled out all the stops to address and resolve the burning issue of all the Shopify store owners. Ecommerce tracking can have many nuances and it is difficult to address with a single blog post. If you have any queries, feel free to connect with me on LinkedIn and ask your queries there.